Heatilator Fireplace Blower Installation: A Comprehensive Guide
A Heatilator fireplace blower is a valuable addition to any fireplace, enhancing heat distribution and overall efficiency. Its installation can seem daunting, but with the right knowledge and tools, homeowners can successfully undertake this project. This comprehensive guide provides a step-by-step breakdown of the process, covering essential considerations and safety precautions.
1. Preparation and Safety
Before starting the installation, it's crucial to ensure proper preparation and safety measures. This involves gathering the necessary tools and materials, understanding the specific instructions for your Heatilator blower model, and taking precautions to prevent accidents.
Here's a checklist of essentials: *
Heatilator Fireplace Blower:
Acquire the appropriate blower model compatible with your fireplace. *Instructions and Manual:
Refer to the manufacturer's guide for specific installation specifications and safety warnings. *Screwdrivers and Drill:
Use appropriate sizes for securing the blower and mounting bracket. *Measuring Tape and Level:
Ensure accurate placement and proper alignment of the blower. *Safety Glasses and Gloves:
Protect your eyes and hands during installation. *Fireplace Tools:
Have a poker and brush handy for cleaning the fireplace before installation. *Electrical Adapters and Wiring:
Ensure compatible wiring connections for power supply. *Fireplace Grate:
The blower should be placed on top of the grate for proper airflow. *Protective Gear:
Wear clothing that covers your arms and legs to prevent burns, especially when working near the hot fireplace.2. Installing the Heatilator Fireplace Blower
Once preparations are complete, follow these steps for a smooth installation process: 1.
Disconnect Power Supply:
Turn off the power to your fireplace at the circuit breaker to prevent any electrical hazards. 2.Clean Fireplace:
Thoroughly clean your fireplace using a poker and brush to remove soot and debris. This ensures optimal airflow for the blower. 3.Mount the Blower Bracket:
Locate the mounting bracket provided with your blower. Follow the manufacturer's instructions for attaching it to the fireplace. Ensure it's securely mounted to avoid potential loosening or detachment. 4.Attach the Blower:
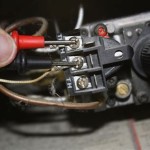
Position the blower on the mounted bracket, ensuring it sits firmly and securely. Attach the blower to the bracket using the provided screws. 5.Connect the Blower to the Power Source:
Carefully connect the blower's wiring to the electrical outlet or existing wiring in your fireplace. Follow the instructions carefully to avoid any misconnections or potential electrical hazards. 6.Secure the Blower:
Double-check that all screws and connections are secure before proceeding to the next step. 7.Test the Blower:
Turn on the power supply at the circuit breaker. Turn on the blower and ensure it operates smoothly and efficiently.3. Post-Installation Considerations
After successfully installing the Heatilator fireplace blower, it's essential to follow these post-installation guidelines: *
Monitor and Adjust:
Observe the blower's performance and adjust the settings as needed to achieve optimal heating distribution. *Regular Maintenance:
Periodically clean the blower and its components to prevent dust and debris buildup. *Inspect and Repair:
Inspect the blower regularly for any signs of damage or malfunction. Contact a qualified technician for repairs if needed.Installing a Heatilator fireplace blower can significantly enhance your fireplace's efficiency and heat distribution. By following these detailed steps and safety precautions, homeowners can confidently undertake this project and enjoy the benefits of a more efficient and comfortable heating system. Remember to prioritize safety and consult the manufacturer's instructions for any specific information related to your specific model.

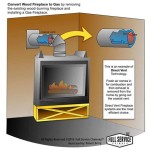
Installing A Fireplace Blower Gfk4 Gfk4a In Heatilator Natural Gas

Gfk 160a Blower System Heatilator Fireplaces

Installing A Fireplace Blower Gfk4 Gfk4a In Heatilator Natural Gas

Gfk 210 Blower System Heatilator Fireplaces

Gfk4 Gfk4a Fireplace Blower Kit Installation

Fk24 Fireplace Blower Kit Installation

How To Install A Blower Into Majestic Or Other Gas Fireplace Installation Tips Tricks

Installing A Fireplace Blower Gfk4 Gfk4a In Heatilator Natural Gas

Update Your Heatilator Mark 123 Fireplace In No Time

Noisy Gas Fireplace Blower Here S How To Replace It Diy
Related Posts