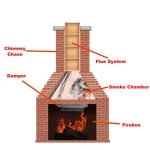
Gas Log Fireplace Conversion: An Essential Guide
Converting your traditional wood-burning fireplace into a gas log fireplace offers numerous advantages, including enhanced convenience, efficiency, and aesthetics. This comprehensive guide delves into the essential aspects of gas log fireplace conversion, providing a step-by-step roadmap to ensure a seamless and successful transition.
Step 1: Safety Considerations
Gas log fireplace conversion involves handling gas lines and electrical connections, which demand meticulous attention to safety protocols. Always engage a licensed, certified professional for the installation process. Ensure proper ventilation by inspecting the chimney for obstructions or damage and installing necessary venting systems.
Step 2: Choosing the Right Gas Logs
Gas logs are available in various sizes, styles, and materials to complement your fireplace and décor. Vent-free logs provide the most flexibility in terms of location, while vented logs require a chimney or vent system. Consider the size of your fireplace, the desired flame height, and the type of gas you plan to use (natural gas or propane).
Step 3: Fireplace Preparation
Before installing gas logs, prepare your fireplace by removing any existing grate or andirons. Clean the firebox thoroughly, removing any ashes or debris. Install a refractory panel or hearth pad to protect the floor from heat and sparks.
Step 4: Gas Line Installation
A licensed plumber must handle the gas line installation. They will connect a gas line to the existing gas supply, ensuring proper flow and pressure to the gas logs. Ensure the connection is leak-proof and complies with all applicable safety codes.
Step 5: Burner Placement
The burner is the heart of the gas log system, regulating the gas flow and creating the flame. Position the burner according to the manufacturer's instructions, typically centered at the base of the fireplace. Adjust the burner height to achieve the desired flame height and pattern.
Step 6: Log Arrangement
Arrange the gas logs carefully over the burner to create a realistic and aesthetically pleasing fire. Avoid overcrowding the logs, as this can restrict airflow and compromise combustion efficiency. Adjust the log placement to achieve the desired flame pattern and heat distribution.
Step 7: Electrical Connections
Most gas log fireplace systems require an electrical connection for ignition and flame control. A licensed electrician must perform this task, ensuring proper grounding and compliance with electrical codes. The electrical connections provide power to the igniter and the thermostat, allowing for convenient and safe operation.
Step 8: Final Touches
With the gas line, burner, logs, and electrical connections in place, it's time to add the finishing touches. Install a decorative surround or mantel to enhance the aesthetic appeal of the fireplace. Add ember bed materials, such as lava rocks or pebbles, to create a realistic ambiance and protect the burner from debris.
Conclusion
Converting your fireplace to gas logs can significantly enhance your home's comfort, convenience, and style. By carefully following the steps outlined in this guide and engaging licensed professionals for safety and quality assurance, you can enjoy a warm and inviting gas log fireplace for years to come.

Can A Wood Burning Fireplace Be Converted To Gas The Flame Company

Want To Convert Gas Wood Fireplace Full Service Chimney

Wood Fireplaces Gas Conversion That Counts

Gas Fireplace Inserts Fireplacesdirect Com

Wood Burner Conversion New Jersey Fireplaces Kjb

Want To Convert Gas Wood Fireplace Full Service Chimney

Convert From Wood To Gas With A Insert The Kernel Burner

Wood To Gas Fireplace Conversion In Wisconsin Free Quote Badgerland Waesha

Convert A Gas Or Wood Fireplace To An Electric

Fireplaces Inserts Wood Gas Fireplace Xtrordinair
Related Posts

