Gas Fireplace Valve Replacement: A Comprehensive Guide
A gas fireplace offers a convenient and aesthetically pleasing heating solution for many homes. However, like any mechanical system, components can wear down and require replacement over time. The gas valve, a critical safety component, regulates the flow of gas to the burner, ensuring proper operation and preventing dangerous leaks. This article provides a detailed overview of gas fireplace valve replacement, covering identification of the need for replacement, necessary tools and safety precautions, and the step-by-step replacement process.
Understanding the function of the gas valve is crucial before undertaking any repair or replacement. The gas valve is situated within the fireplace unit and connects to the gas supply line. It receives signals from the control system, typically a thermostat or remote control, to initiate or terminate the flow of gas. The valve incorporates safety mechanisms, such as a thermocouple or thermopile, that constantly monitor pilot light functionality. If the pilot light is extinguished, the safety mechanism shuts off the gas supply to prevent gas accumulation and potential explosion. Malfunctions of the gas valve can manifest in several ways, necessitating replacement.
Identifying the Need for Gas Valve Replacement
Several symptoms can indicate a failing gas valve. One common sign is difficulty starting or maintaining the pilot light. If the pilot light frequently goes out or refuses to light despite repeated attempts, a faulty thermocouple or a malfunctioning valve itself could be the cause. Another indication is intermittent or inconsistent burner operation. The burner may light erratically, produce weak flames, or shut off abruptly, pointing to a problem with the gas valve's ability to regulate gas flow. An audible gas leak smell, even a faint one, is a serious warning sign, demanding immediate action. Shut off the gas supply at the source and contact a qualified technician. Visual inspection of the valve may reveal physical damage, such as cracks, corrosion, or loose connections. These visible defects further support the need for replacement.
Before assuming the gas valve is faulty, other potential issues should be ruled out. A clogged burner orifice can restrict gas flow, mimicking the symptoms of a valve problem. Inspecting and cleaning the burner orifice may resolve the issue. A malfunctioning thermocouple or thermopile is another frequent culprit. These components generate a small electrical current when heated by the pilot light, which keeps the gas valve open. If the thermocouple or thermopile is defective, it will not produce sufficient current, causing the valve to close prematurely. Testing the thermocouple or thermopile with a multimeter verifies its functionality. Wiring issues, such as loose connections or damaged wires, can also disrupt the signal to the gas valve, leading to operational problems. Thoroughly inspect the wiring to ensure proper connections and integrity.
Preparing for the Replacement: Safety and Tools
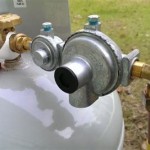
Safety is paramount when working with gas appliances. Before commencing any work, ensure the gas supply to the fireplace is completely shut off at the main gas line valve. This valve is typically located near the gas meter or outside the house. Double-check that no open flames or ignition sources are present in the vicinity. Wear appropriate personal protective equipment, including safety glasses and gloves. Disconnect the fireplace from the electrical power supply to prevent accidental shocks. Allow the fireplace to cool down completely before disassembling any components. Working on a hot fireplace poses a burn risk and can damage sensitive electronic components.
Gather the necessary tools before starting the replacement process. A new gas valve that is compatible with the fireplace model is essential. Verify the valve's specifications, including gas type (natural gas or propane) and BTU rating, to ensure proper functionality. Wrenches of various sizes are needed to disconnect the gas lines and remove the valve. Pipe thread sealant is crucial to create a gas-tight seal when reconnecting the gas lines. A screwdriver set, including both Phillips and flathead screwdrivers, facilitates the removal of screws and fasteners. A multimeter is used to test the thermocouple or thermopile (if applicable) and confirm proper electrical connections. A gas leak detector solution helps identify any gas leaks after the replacement is complete. Finally, have a container to catch any residual gas that may be present in the lines.
Step-by-Step Gas Valve Replacement Procedure
The first step is to carefully disconnect the gas lines from the old gas valve. Use two wrenches, one to hold the valve body and the other to loosen the gas line fitting. This prevents twisting and damaging the gas lines. Note the orientation of the gas lines to ensure they are reconnected correctly. Disconnect the thermocouple or thermopile from the gas valve, if applicable. Disconnect any electrical wiring connected to the valve, noting the location of each wire for proper reconnection. Remove any screws or fasteners holding the gas valve in place. Carefully remove the old gas valve from the fireplace unit.
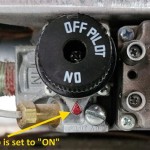
Install the new gas valve in the same position as the old valve. Secure it with the screws or fasteners that were previously removed. Apply pipe thread sealant to the threads of the gas line fittings. Carefully reconnect the gas lines to the new gas valve, ensuring they are tightened securely. Use two wrenches as before to prevent twisting. Reconnect the thermocouple or thermopile to the new gas valve, ensuring it is properly seated. Reconnect any electrical wiring, matching the original connections. Double-check all connections to ensure they are tight and secure.
After completing the replacement, perform a leak test. Turn the gas supply back on slowly. Apply gas leak detector solution to all gas line connections. Look for bubbles, which indicate a gas leak. If a leak is detected, immediately turn off the gas supply and tighten the connections further. Repeat the leak test until no leaks are present. Once satisfied that there are no leaks, relight the pilot light according to the manufacturer's instructions. Monitor the burner operation to ensure it is functioning correctly. If the burner does not light properly or operates erratically, re-examine the connections and wiring. If problems persist, consult a qualified gas fireplace technician.

Replacing A Gas Ball Valve To Your Fireplace

Replacing A Gas Ball Valve To Your Fireplace

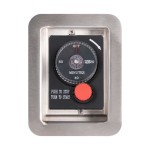
Affordable Universal Gas Valve Keys And Floor Plates For Fireplaces

How To Test Your Main Control Valve Www Mygasfireplacerepair Com

Majestic Direct Vent Fireplace Natural Gas Honeywell To Sit Replacement 10008800

Pro Flex Hearth Master Valve Kit Straight Brushed Nickel Finish Key And In The Gas Fireplace Log Accessories Department At Com

Gas Valve Check Does My Quarter Turn Ball Need Replaced

Low Pressure Lpg Propane Gas Fireplace Fire Pit Flame Temu

Gas Valve Kit Guide Fireplaces Direct Learning Center

Your Guide To Gas Log Valves Controls Woodlanddirect Com
Related Posts