Freestanding Wood Fireplace Installation: A Comprehensive Guide
Freestanding wood fireplaces offer a captivating blend of aesthetic appeal and efficient heating capabilities. Unlike traditional brick fireplaces, these units are self-contained and can be positioned almost anywhere within a room that meets safety and venting requirements. Successful installation, however, necessitates a meticulous approach to ensure compliance with local building codes, optimal performance, and, most importantly, the safety of the occupants.
This article provides a comprehensive guide to the installation process, encompassing crucial factors from pre-installation planning to final inspection. It aims to equip homeowners and contractors with the knowledge necessary to navigate the complexities of installing a freestanding wood fireplace, ensuring a safe and rewarding outcome.
Key Planning Considerations Before Installation
Prior to commencing any physical work, meticulous planning is paramount. Neglecting this stage can lead to costly errors, delays in project completion, and potential safety hazards. Several factors must be considered to ensure the chosen freestanding wood fireplace is suitable for the intended location and meets all relevant requirements.
Firstly, assess the structural integrity of the flooring. A freestanding wood fireplace, even without the weight of brickwork, can be surprisingly heavy. The floor must be able to support the combined weight of the fireplace, any hearth extension, and potentially, the weight of firewood stored nearby. Consulting a structural engineer is recommended if there are any doubts about the floor's load-bearing capacity. Reinforcements may be required to ensure a safe and level installation.
Secondly, determine the appropriate size and heating capacity of the fireplace. Over-sizing a fireplace can lead to overheating and discomfort, while under-sizing will result in inadequate heating. Calculate the square footage of the area intended to be heated and cross-reference this with the fireplace's BTU (British Thermal Unit) rating. Consider factors such as insulation levels, ceiling height, and window surface area. An efficient fireplace should provide adequate heat without excessive fuel consumption.
Thirdly, and perhaps most critically, research and understand local building codes and regulations. These codes dictate specific requirements for fireplace installation, including clearances to combustible materials, chimney height, hearth extension dimensions, and permit requirements. Contacting the local building department early in the planning process is crucial to avoid potential fines and delays. Failure to comply with these regulations can also void insurance coverage in the event of a fire.
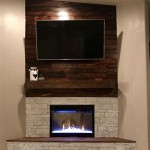
Fourthly, thoroughly evaluate the available space for the fireplace and associated components. Ensure there is sufficient clearance around the fireplace for safe operation and maintenance. Plan for the hearth extension, which is a non-combustible surface that protects the flooring from sparks and embers. Consider the placement of firewood storage and ensure it is located at a safe distance from the fireplace to prevent accidental ignition.
Fifthly, select a qualified and experienced installer. While some homeowners may be tempted to attempt a DIY installation, it is strongly advised against, particularly if they lack experience in plumbing, carpentry, and electrical work. A certified installer will possess the knowledge and expertise to ensure the fireplace is installed correctly and safely, adhering to all applicable codes and regulations. Check the installer's credentials, licenses, and insurance coverage before hiring them.
Hearth Extension and Clearance Requirements
The hearth extension and clearance requirements are crucial for preventing fires and ensuring the safe operation of the freestanding wood fireplace. These dimensions are typically specified by the fireplace manufacturer and are also governed by local building codes. Adhering strictly to these measurements is non-negotiable.
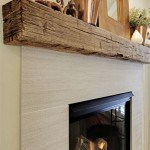
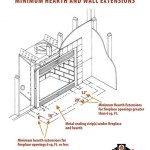
The hearth extension is a non-combustible surface that extends beyond the front and sides of the fireplace opening. Its purpose is to protect combustible flooring materials from sparks, embers, and radiant heat. The required dimensions of the hearth extension vary depending on the size and type of fireplace. Generally, the hearth must extend at least 16 inches in front of the fireplace opening and 8 inches to each side. For fireplaces with larger openings, these dimensions may need to be increased. Acceptable materials for the hearth extension include brick, stone, tile, concrete, and other non-combustible materials.
Clearance requirements refer to the minimum distance that must be maintained between the fireplace and any combustible materials, such as walls, furniture, and drapes. These clearances are specified in the manufacturer's installation manual and are based on the fireplace's radiant heat output. Failure to maintain adequate clearances can lead to overheating and potentially ignite nearby combustible materials. Typical clearance requirements range from 12 to 36 inches, depending on the fireplace model. Some fireplaces are designed with built-in heat shields or can be installed with additional shielding to reduce clearance requirements.
When measuring clearances, be sure to account for all combustible materials, including those that may be hidden behind walls or ceilings. Consider the potential for future additions or renovations that may introduce combustible materials closer to the fireplace. If unsure about clearance requirements, consult with the fireplace manufacturer or a qualified installer.
Special attention should be given to the clearance requirements for the chimney connector, which is the pipe that connects the fireplace to the chimney. The chimney connector must be installed with appropriate clearances to combustible walls and ceilings. Using a double-wall connector pipe can significantly reduce clearance requirements compared to single-wall pipe. However, it's vital to adhere to the manufacturer's specifications for safe installation.
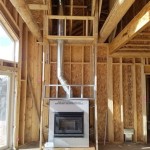
Chimney Installation and Venting
The chimney is an integral component of a freestanding wood fireplace system, responsible for safely venting combustion gases and smoke away from the living space. Proper chimney installation is essential for preventing carbon monoxide poisoning, chimney fires, and other hazards. Selecting the correct type of chimney and ensuring its proper installation are crucial for safe and efficient fireplace operation.
There are generally two types of chimneys suitable for freestanding wood fireplaces: masonry chimneys and factory-built chimneys. Masonry chimneys are constructed from brick, stone, or concrete and are typically more expensive to build. Factory-built chimneys, also known as prefabricated chimneys, are made from stainless steel or other durable materials and are generally easier and less expensive to install. Factory-built chimneys are specifically designed for use with wood-burning appliances and are tested and listed to meet safety standards.
When selecting a chimney, it is crucial to ensure that it is rated for the type of fuel being burned and that its diameter is appropriate for the fireplace. An undersized chimney can restrict airflow and cause smoke to back up into the room, while an oversized chimney can lead to excessive cooling and creosote buildup. The chimney manufacturer's specifications will provide guidance on the appropriate chimney diameter for the specific fireplace model.
Chimney height is another critical factor to consider. The chimney must extend at least 3 feet above the highest point where it passes through the roof and at least 2 feet higher than any structure within 10 feet. These height requirements ensure adequate draft and prevent downdrafts that can cause smoke to enter the home. Local building codes may also have specific chimney height requirements.
During installation, ensure that the chimney sections are properly connected and sealed to prevent leaks. Use appropriate sealing compounds and clamps to create a tight and secure connection. Inspect the chimney for any damage or defects before installation. Proper flashing around the chimney is essential to prevent water leaks into the roof and surrounding structure. The flashing should be installed according to the manufacturer's instructions and sealed to the roof using a compatible sealant.
It is highly recommended to hire a qualified chimney sweep or installer to inspect and clean the chimney on a regular basis. Creosote, a flammable byproduct of wood burning, can accumulate inside the chimney and pose a significant fire hazard. Regular cleaning removes creosote buildup and ensures that the chimney is functioning properly.
Connecting the Fireplace to the Chimney
Connecting the freestanding wood fireplace to the chimney requires meticulous attention to detail and adherence to manufacturer's instructions. A secure and airtight connection is vital for preventing smoke leaks and ensuring proper venting of combustion gases. The chimney connector, typically made of single-wall or double-wall stovepipe, serves as the link between the fireplace and the chimney.
Before commencing the connection, meticulously inspect the chimney and the fireplace flue collar for any damage or obstructions. Ensure that the flue collar is properly sized and compatible with the selected chimney connector. Clean the flue collar and chimney connector to remove any debris or residue that could interfere with the seal.
The chimney connector should be installed with a slight upward slope from the fireplace to the chimney to promote optimal draft. A minimum slope of ¼ inch per foot is generally recommended. Avoid sharp bends or horizontal runs in the chimney connector, as these can restrict airflow and increase the risk of smoke leakage. If bends are necessary, use elbows with a maximum angle of 45 degrees.
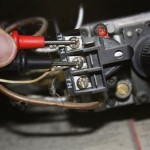
When connecting the chimney connector to the fireplace flue collar and the chimney, use appropriate sealing compounds and fasteners. High-temperature sealant, specifically designed for use with wood-burning appliances, should be applied to all joints to create an airtight seal. Use sheet metal screws or clamps to secure the chimney connector to the flue collar and the chimney. Ensure that the fasteners are properly tightened to prevent them from loosening due to vibration and thermal expansion.
If using single-wall stovepipe, maintain proper clearance to combustible materials. Refer to the manufacturer's instructions for specific clearance requirements. Consider using a double-wall stovepipe, which significantly reduces clearance requirements and offers enhanced safety. When installing double-wall stovepipe, ensure that the inner and outer walls are properly aligned and connected.
After completing the connection, thoroughly inspect all joints and seams for any signs of leakage. Use a smoke pencil or incense stick to check for drafts around the connections. If any leaks are detected, re-seal the joints and tighten the fasteners. Before lighting a fire, perform a test burn to ensure that the fireplace is venting properly and that there are no smoke leaks into the room.
Final Inspection and Safety Checks
Upon completion of the freestanding wood fireplace installation, a final inspection and a series of safety checks are crucial to ensure the system is operating safely and efficiently. This meticulous assessment aims to identify any potential issues that could compromise safety, performance, or compliance with local building codes.
The first step is to conduct a visual inspection of the entire installation. Carefully examine the fireplace, hearth extension, chimney, and chimney connector for any signs of damage, defects, or improper installation. Check for loose connections, gaps in sealing, or any other irregularities that could pose a safety hazard.
Verify that all clearances to combustible materials are met. Use a measuring tape to confirm that the fireplace, chimney, and chimney connector are positioned at the required distances from walls, furniture, and other combustible items. If any clearances are insufficient, make the necessary adjustments to ensure compliance.
Inspect the chimney for proper height and termination. Ensure that the chimney extends at least 3 feet above the highest point where it passes through the roof and at least 2 feet higher than any structure within 10 feet. Verify that the chimney cap is securely installed and free of any obstructions.
Perform a smoke test to assess the draft and venting performance of the fireplace. Light a small fire in the fireplace and observe the smoke pattern. The smoke should rise steadily and quickly up the chimney without any backdraft or leakage into the room. If the smoke is sluggish or if there is any smoke leakage, investigate the cause and make the necessary corrections.
Check the carbon monoxide (CO) detector to ensure it is functioning properly. Install a CO detector in the room where the fireplace is located and test it regularly. Carbon monoxide is a colorless and odorless gas that can be produced by incomplete combustion. A functioning CO detector will alert occupants to the presence of dangerous levels of CO.
Finally, familiarize yourself with the fireplace manufacturer's operating instructions and safety guidelines. Understanding the proper procedures for starting, operating, and maintaining the fireplace is essential for ensuring safe and efficient operation. Store firewood at a safe distance from the fireplace and avoid overfilling the firebox.
Obtain a final inspection from the local building department to ensure that the installation complies with all applicable codes and regulations. A passing inspection will provide assurance that the fireplace is installed correctly and safely and will protect you from potential liability in the event of a fire.
How To Install A Freestanding Fireplace 5 Easy Steps L Esseiale
Free Standing Fireplace Installation Stellenbosch Hydrofire
What Is A Freestanding Wood Stove Fireplace Service Experts
How To Install A Freestanding Fireplace 5 Easy Steps L Esseiale
Instructions On How To Install A Free Standing Wood Fired Stove Vitcas Blog
Install A Fireplace With Reble Installer Jetmaster Vic
Your Guide To Wood Stove Installation Full Service Chimney
New Fireplace Installation And Chimney Professionals
Your Guide To Wood Stove Installation Full Service Chimney
How To Install A Freestanding Fireplace 5 Easy Steps L Esseiale
Related Posts