Framing A Fireplace Surround: A Detailed Guide
Framing a fireplace surround involves constructing a structural framework around a fireplace opening, providing both aesthetic appeal and a solid base for the final decorative finish, such as tile, stone, or wood. Accurate framing is crucial for ensuring the fireplace surround is level, plumb, and capable of supporting the intended finish materials. This process requires careful planning, precise measurements, and a thorough understanding of building codes and safety regulations related to fireplaces.
The project commences with a comprehensive assessment of the existing fireplace structure and the desired aesthetic outcome. This includes determining the dimensions of the fireplace opening, the depth of the surround, and the type of finish materials to be used. Proper planning ensures that the framing accommodates both the fireplace itself and the intended decorative elements.
Safety is paramount throughout the framing process. It is essential to consult local building codes and regulations regarding fireplace construction, clearances to combustible materials, and fire safety requirements. Furthermore, ensure that the fireplace itself has been properly inspected and is in good working order before beginning any framing work.
The selection of materials is a critical step. Typically, kiln-dried lumber is used for framing fireplace surrounds. The specific dimensions and grade of lumber will depend on the size and complexity of the surround, as well as the load it will bear. Common choices include 2x4, 2x6, or even larger lumber for more substantial surrounds. Moisture-resistant materials may be required if the fireplace is located in a high-humidity environment.
Key Point 1: Measurement and Planning
Accurate measurement and meticulous planning are the cornerstones of successful fireplace surround framing. The first step is to precisely measure the existing fireplace opening. This includes the width, height, and depth of the firebox, as well as any existing facing or trim. These measurements will dictate the overall dimensions of the frame.
Next, determine the desired dimensions of the finished fireplace surround. Consider the overall style and aesthetic you wish to achieve. Will the surround be flush with the wall, or will it project outward? How wide will the mantel be, and what will its profile look like? These decisions will influence the design and dimensions of the framing.
Create a detailed sketch or plan of the framing. This plan should include all dimensions, lumber sizes, and the location of all framing members. Pay close attention to any structural considerations, such as the weight of the finish materials and the need for additional support.
Consider the position of any electrical outlets or other utilities that may be affected by the framing. Plan for any necessary relocation or modification of these utilities before beginning construction.
Determine the required clearances to combustible materials. Building codes typically specify minimum distances between the fireplace opening and any combustible materials, such as wood framing. Ensure that the framing complies with these requirements to prevent fire hazards.
Thorough planning minimizes errors and ensures that the framing is structurally sound and aesthetically pleasing. Take the time to carefully consider all aspects of the project before proceeding with construction.
Key Point 2: Constructing the Frame
Once the planning phase is complete, construction of the frame can begin. Start by cutting the lumber to the required lengths, following the dimensions outlined in the plan. Accurate cuts are essential for a square and stable frame. Use a miter saw or circular saw to ensure precise cuts.
Begin assembling the frame by joining the vertical and horizontal members using screws or nails. Ensure that the joints are strong and secure. Use wood glue in addition to fasteners for added strength and durability.
Check the frame for squareness using a framing square or level. Adjust the frame as necessary to ensure that all corners are perfectly square. An out-of-square frame will result in a crooked or uneven finished surface.
Attach the frame to the surrounding wall using construction adhesive and screws or nails. Ensure that the frame is securely fastened to the wall studs or other structural members. This will prevent the frame from shifting or moving over time.
Install any necessary blocking or support members within the frame. Blocking provides additional support for the finish materials and prevents the framing from flexing or bending. Pay particular attention to areas that will bear a significant load, such as the mantel or tile surround.
Consider incorporating fire-resistant materials, such as cement board or mineral wool insulation, into the framing. These materials provide added protection against heat and fire, particularly in areas close to the firebox.
Continuously check the frame for level and plumb as you build. Use a level to ensure that all horizontal members are perfectly level, and a plumb bob or level to ensure that all vertical members are perfectly plumb. Adjust the frame as necessary to maintain alignment.
Once the frame is complete, inspect it thoroughly to ensure that it is strong, stable, and accurately aligned. Address any imperfections or weaknesses before proceeding to the next step.
Key Point 3: Preparing for the Finish Material
After the frame has been constructed, the next step is to prepare it for the finish material. This involves sheathing the frame with a suitable substrate, such as plywood, cement board, or drywall. The choice of substrate will depend on the type of finish material being used.
If using tile or stone as the finish material, cement board is the preferred substrate. Cement board is a durable, water-resistant material that provides an excellent surface for tile adhesion. Cut the cement board to size and attach it to the frame using cement board screws. Ensure that the screws are properly embedded in the cement board to prevent them from interfering with the tile installation.
If using wood or other combustible materials as the finish material, a layer of fire-resistant material may be required between the framing and the finish material. This could include cement board, mineral wool insulation, or a fire-resistant coating. Consult local building codes to determine the specific requirements for fire protection.
If using paint or wallpaper as the finish material, drywall is a suitable substrate. Attach the drywall to the frame using drywall screws. Ensure that the drywall is properly installed and that all seams are taped and mudded to create a smooth, seamless surface.
Regardless of the substrate used, ensure that it is securely attached to the frame and that it is level and plumb. Any imperfections in the substrate will be visible in the finished surface.
Consider the thickness of the finish material when planning the framing. The framing should be designed to accommodate the thickness of the finish material so that the finished surface is flush with the surrounding wall.
Apply a primer or sealer to the substrate before installing the finish material. This will help to improve adhesion and prevent moisture from penetrating the substrate.
Thorough preparation of the frame for the finish material is essential for achieving a professional-looking and durable fireplace surround. Take the time to properly sheath the frame and prepare the surface for the final finish.
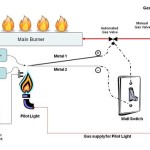
Ensuring proper ventilation around the firebox itself is critical. Modern fireplaces often require specific airflow patterns for safe and efficient operation. Blocking these airflow pathways can lead to overheating, reduced efficiency, and even dangerous conditions. Always consult the fireplace manufacturer's specifications regarding required clearances and ventilation openings.
When attaching framing members, consider using pocket hole joinery in addition to screws. Pocket holes provide a stronger, more concealed joint, especially useful in areas where aesthetics are paramount. This technique requires a specialized jig, but the resulting joint is significantly stronger than a simple screw connection.
Pay close attention to the transition between the fireplace surround and the existing wall. A smooth, seamless transition is crucial for a professional finish. Use shims to level the framing and fill any gaps with joint compound or caulk. Sand the transitions smooth before applying the final finish.
Consider the inclusion of a chase for running electrical wiring or other utilities. A chase is a hollow space within the framing that allows for easy access to these utilities. This is particularly useful if you plan to install a wall-mounted television above the fireplace.
Before installing the finish material, dry-fit all components to ensure that they fit properly and that the overall design is aesthetically pleasing. This is an opportunity to make any necessary adjustments before committing to the final installation.
The selection of fasteners is also an important consideration. Use screws designed for exterior use if the fireplace surround will be exposed to moisture. Consider using stainless steel fasteners in areas that are prone to corrosion.
In summary, framing a fireplace surround requires careful planning, accurate measurements, and meticulous construction. By following these guidelines and paying close attention to detail, you can create a safe, functional, and aesthetically pleasing fireplace surround that will enhance the beauty and value of your home.

How To Build A Fireplace Surround Beneath My Heart

How We Frame A Built In Gas Fireplace

How To Diy Built In Electric Fireplace Jenna Sue Design

Fireplace Framing

Fireplace Makeover Update Hearth Frame And Blue Gray Boards The Lettered Cottage

Family Room Makeover Part 2 Framing Out The Fireplace Infarrantly Creative

Our Diy Fireplace Makeover Framing Vents Part 2 Four Generations One Roof Blog

How To Build A Fireplace Surround Beneath My Heart

Diy Fireplace Mantel And Surround Jenna Kate At Home

Diy Fireplace With Electric Insert Angela Marie Made
Related Posts