Fireplace Pilot Light Is Out: Troubleshooting and Safety
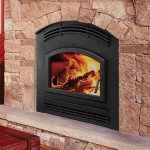
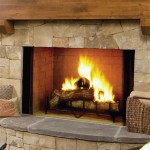
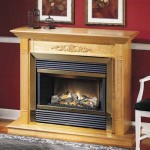
A fireplace provides warmth and ambiance during colder months. A key component in many gas fireplaces is the pilot light. This small, continuous flame ignites the main burner when heat is needed. When the pilot light extinguishes, the fireplace becomes inoperable. Understanding the common causes and appropriate troubleshooting steps when a fireplace pilot light is out can prevent frustration and ensure the safe operation of the appliance.
The pilot light’s primary function is to serve as a constant ignition source. It's a safety feature designed to prevent the buildup of unburned gas, which could lead to an explosion. Modern gas fireplaces incorporate safety mechanisms that automatically shut off the gas supply if the pilot light is not detected. This prevents the release of gas into the home.
Common Causes of a Pilot Light Extinguishing
Several factors can cause a pilot light to extinguish unexpectedly. Identifying the root cause is crucial for effective troubleshooting. These factors often relate to gas supply, airflow, or issues within the fireplace's control system.
1. Gas Supply Issues: The most common reason for a pilot light to go out is an interruption in the gas supply. This can stem from several sources within the gas system. A homeowner should verify the main gas valve supplying the fireplace is fully open. Sometimes, this valve can be accidentally bumped or partially closed, restricting gas flow. A problem elsewhere in the house, such as a gas leak detected by the gas company, can lead to the gas being shut off completely at the meter. In such cases, all gas appliances in the house will be affected.
Another potential issue is low gas pressure. If other gas appliances are operating simultaneously and drawing a significant amount of gas, the pressure available to the fireplace, especially if it is located far from the gas meter, might be insufficient to maintain the pilot light. This is more common in older homes with undersized gas lines. External factors, such as issues with the gas company's supply to the area, can cause a drop in pressure. This is less common but should not be dismissed.
Finally, if the gas supply line to the fireplace has air trapped inside, this air pocket can displace the gas and cause the pilot to go out. This is more likely to occur after the gas supply has been turned off for a repair or maintenance and then turned back on.
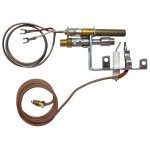
2. Dirty Pilot Assembly: The pilot assembly includes the pilot light orifice, which is a small opening that allows gas to flow to the pilot flame. This orifice is susceptible to clogging with dust, debris, or spider webs. These contaminants can partially or completely block the gas flow, weakening or extinguishing the pilot flame. The pilot assembly also includes a thermocouple or thermopile, which is a sensor that detects the heat from the pilot flame. If the thermocouple is dirty or corroded, it may not generate enough electrical current to keep the gas valve open, causing the pilot to extinguish.
A buildup of soot or carbon deposits around the pilot assembly can also interfere with the flame's stability. Regular cleaning and maintenance is crucial to prevent these issues. The pilot assembly should be inspected annually, and any visible debris should be carefully removed using a soft brush or compressed air.
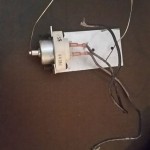
3. Faulty Thermocouple or Thermopile: The thermocouple is a safety device that generates a small electrical current when heated by the pilot flame. This current signals the gas valve to remain open, allowing gas to flow to the main burner. If the thermocouple is faulty, it will not generate sufficient current, causing the gas valve to close and extinguishing both the pilot and main burner. A thermopile performs a similar function but generates a higher voltage, often used in fireplaces with electronic ignition systems.
A thermocouple can fail due to age, corrosion, or physical damage. Testing the thermocouple requires a multimeter to measure the voltage it produces. A reading below the manufacturer's specification indicates a faulty thermocouple that requires replacement. Although a homeowner can replace a thermocouple, it is important to ensure the correct type and size is used. Consulting with a qualified technician is recommended if the homeowner is unsure or uncomfortable performing this task.
4. Drafts and Airflow Issues: An excessive draft can blow out the pilot light. Drafts can originate from various sources, including open windows, doors, or even HVAC systems. A negative pressure environment in the home, caused by exhaust fans or improperly sealed windows and doors, can draw air away from the fireplace, extinguishing the pilot.
To mitigate draft-related issues, make sure windows and doors near the fireplace are properly sealed. Adjustments to the fireplace damper can also help control airflow. A chimney inspection might be necessary to identify blockages or other issues that could be contributing to drafts. In extreme cases, a draft diverter may be needed to redirect airflow away from the pilot light.
5. Malfunctioning Gas Valve: The gas valve controls the flow of gas to both the pilot light and the main burner. If the gas valve is faulty, it may not properly regulate gas flow to the pilot, causing it to extinguish. A malfunctioning gas valve can also prevent the main burner from igniting even if the pilot is lit. Gas valves are complex mechanisms and should only be diagnosed and repaired by qualified technicians. Attempting to repair a gas valve without the proper training and tools can be dangerous and could lead to a gas leak or explosion.
Troubleshooting Steps When a Pilot Light Is Out
When a fireplace pilot light is out, a systematic approach to troubleshooting can help identify the cause and determine the best course of action. Safety should always be the top priority. If the smell of gas is present, immediately evacuate the premises and contact the gas company or fire department.
1. Check the Gas Supply: The first step is to verify that the gas supply to the fireplace is turned on. Locate the gas shut-off valve near the fireplace and ensure it is fully open. Also, check the main gas meter to confirm that gas is being supplied to the house. If the gas supply has been interrupted for any reason, such as repairs or maintenance, it may be necessary to bleed the gas line to remove trapped air. This process involves carefully opening a gas fitting to release air while being prepared to quickly tighten it once gas begins to flow. Note that a professional technician should perform this step, due to the potential hazards.
2. Inspect the Pilot Assembly: Carefully inspect the pilot assembly for any visible debris, such as dust, spider webs, or carbon buildup. Use a soft brush or compressed air to gently clean the assembly, taking care not to damage any components. Pay close attention to the pilot light orifice, ensuring it is clear of any obstructions. If the thermocouple or thermopile appears corroded or damaged, it may need to be replaced.
3. Relighting the Pilot Light: Most gas fireplaces have a specific procedure for relighting the pilot light. Consult the manufacturer's instructions for the correct method. Generally, this involves turning the gas control knob to the "Pilot" position, pressing and holding the knob to allow gas to flow to the pilot, and then using a spark igniter or match to light the pilot flame. Continue holding the knob for the specified time (usually 20-30 seconds) to allow the thermocouple to heat up and keep the gas valve open. If the pilot light extinguishes after releasing the knob, repeat the process, holding the knob for a longer period. If the pilot continues to extinguish, it may indicate a faulty thermocouple.
4. Testing the Thermocouple: A multimeter can be used to test the thermocouple's voltage output. Disconnect the thermocouple from the gas valve and connect the multimeter leads to the thermocouple terminals. Heat the tip of the thermocouple with a small flame and observe the voltage reading on the multimeter. Compare the reading to the manufacturer's specifications. A reading below the specified range indicates a faulty thermocouple that needs to be replaced.
5. Checking for Drafts: Observe the pilot flame for any signs of flickering or instability caused by drafts. Identify potential sources of drafts, such as open windows, doors, or vents. Seal any gaps or cracks that may be contributing to drafts. Adjust the fireplace damper to optimize airflow and minimize drafts. If drafts persist, consider installing a draft diverter to redirect airflow away from the pilot light.
6. Professional Inspection: If the pilot light continues to extinguish despite these troubleshooting steps, or if any unusual smells or sounds are detected, it is recommended to contact a qualified fireplace technician. Attempting to diagnose or repair complex gas appliance issues without the proper training and experience can be dangerous and could lead to gas leaks, explosions, or carbon monoxide poisoning. A professional technician can accurately diagnose the problem and perform the necessary repairs to ensure the safe and efficient operation of the fireplace.
Preventative Measures to Avoid Pilot Light Issues
Regular maintenance and preventative measures can significantly reduce the likelihood of pilot light problems and ensure the fireplace operates safely and efficiently. These measures include regular cleaning, inspection, and professional servicing.
1. Annual Maintenance: Schedule an annual inspection and cleaning of the fireplace by a qualified technician. This service should include a thorough inspection of all components, including the gas valve, burner, pilot assembly, and thermocouple or thermopile. The technician should also clean the fireplace and chimney to remove any soot, debris, or creosote buildup. This regular maintenance can identify potential problems before they escalate and ensure the fireplace operates safely and efficiently.
2. Regular Cleaning: Regularly clean the area around the fireplace to prevent dust and debris from entering the pilot assembly. Use a vacuum cleaner to remove any dirt or dust from the fireplace enclosure and surrounding area. Periodically inspect the pilot assembly for any visible debris and gently clean it with a soft brush or compressed air. Remember to turn off the gas supply before performing any cleaning or maintenance on the fireplace.
3. Chimney Inspection: Schedule a chimney inspection at least once a year to ensure it is free of obstructions and in good condition. A blocked chimney can cause drafts and prevent proper ventilation, which can lead to pilot light problems and carbon monoxide poisoning. A qualified chimney sweep can inspect the chimney for creosote buildup, cracks, or other damage and recommend any necessary repairs. Ensure the chimney cap is properly installed to prevent rain, snow, and debris from entering the chimney.
4. Carbon Monoxide Detector: Install a carbon monoxide detector near the fireplace and test it regularly to ensure it is functioning properly. Carbon monoxide is a colorless, odorless gas that can be deadly. A carbon monoxide detector will alert you to the presence of carbon monoxide in the air, allowing you to take appropriate action, such as evacuating the premises and contacting the fire department. Replace the batteries in the carbon monoxide detector at least once a year.

Why Does My Pilot Light Go Out We Love Fire

Should I Turn Off The Pilot Light In Spring B C Comfort Fireplace Hvac Repair Installation

Gas Fireplace Pilot Light Won T Stay Lit Easy Fix

How To Light The Pilot On A Gas Fireplace

How To Relight A Millivolt Valve Gas Fireplace Pilot Light Tophat Pro

Gas Fireplace Pilot Light Out How Can I It Again

My Gas Fireplace Pilot Light Works Perfectly However When I Flip The Switch For Rest Of To Turn On Nothing Happens What Quora

How To And It Works Light Your Gas Fireplace Pilot Steemit

Best And No 1 Pilot Light Elegant Fireside Patio

Why Would A Pilot Light Go Out Dreifuss Fireplaces
Related Posts