Here's an article focusing on fireplace damper installation, aiming for clarity, informativeness, and adherence to the specified formatting guidelines.
Fireplace Damper Installation: A Comprehensive Guide
A fireplace damper is a crucial component of a functional and efficient fireplace system. Its primary purpose is to seal the chimney flue when the fireplace is not in use, preventing heated or cooled air from escaping the building and outside air from entering. This function contributes significantly to energy efficiency and overall home comfort. A properly functioning damper also prevents debris, rain, snow, and animals from entering the chimney and potentially the home.
However, dampers can become damaged, corroded, or simply ineffective over time. Installing a new damper, therefore, becomes essential to maintain the fireplace's functionality and prevent energy loss. This article provides a comprehensive guide to understanding fireplace dampers and the process of installing them.
Understanding Different Types of Fireplace Dampers
Before undertaking a damper installation, it's critical to understand the various types of dampers available. The selection of an appropriate damper depends on the specific fireplace configuration, chimney dimensions, and individual preferences. Here are some common types:
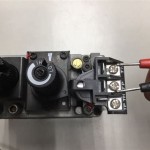
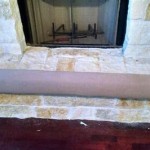
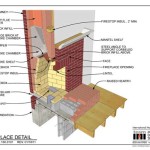
Throat Dampers: This is the most traditional type of damper, typically located just above the firebox within the fireplace throat. Throat dampers consist of a metal plate that hinges open and closed, controlled by a lever or handle. While relatively inexpensive, they are often less effective at creating a tight seal compared to newer damper designs. They are also prone to corrosion and warping due to direct exposure to heat and combustion byproducts. When measuring for a replacement throat damper, accurately measure the existing damper's dimensions or the opening where it sits. Note the orientation of the hinge and handle mechanism for proper installation.
Top-Sealing Dampers (Chimney Top Dampers): These dampers are installed at the top of the chimney, providing a more airtight seal than throat dampers. They typically feature a rubber gasket that presses against the chimney flue, effectively blocking airflow. Top-sealing dampers are more energy-efficient and prevent drafts, rain, and animals from entering the chimney. They are particularly advantageous for fireplaces that are infrequently used. Installation usually involves attaching the damper to the flue tile at the top of the chimney, which can be a more complex process requiring specialized tools and safety equipment. Measure the inside dimensions of the flue tile to ensure a proper fit. Check local building codes about required spark arrestors, which are often integrated into top-sealing damper designs.
Lock-Top Dampers: A variation of the top-sealing damper, lock-top dampers provide added security. They not only seal the chimney flue but also lock in place, preventing unauthorized access to the chimney from the outside. This feature can be useful for preventing animal entry or for added security. The installation process is similar to that of a standard top-sealing damper, but also includes a locking mechanism that needs to be properly engaged. Consider ease of operation of the locking mechanism, especially in inclement weather.
Energy-Saving Dampers: These dampers are designed to provide a superior airtight seal, often incorporating advanced materials and designs. They aim to minimize heat loss and air infiltration, maximizing energy savings. These dampers often come with higher price tags but offer long-term benefits through reduced energy bills. The installation process can be similar to either throat or top-sealing dampers, depending on the specific design. Pay close attention to the manufacturer's specifications for optimal performance.
Choosing the correct damper type is paramount. Factors to consider include budget, frequency of fireplace use, energy efficiency goals, and the structural condition of the chimney. Consult with a qualified chimney professional for personalized recommendations.
Preparing for Fireplace Damper Installation
Prior to beginning the installation process, thorough preparation is crucial. This not only ensures a smoother installation but also promotes safety. The following steps outline the necessary preparation:
Safety Precautions: Fireplace damper installation can involve working at heights, handling tools, and dealing with potentially hazardous materials. Wear appropriate safety gear, including safety glasses, gloves, and a dust mask. If working on the roof, use a secure ladder that is properly positioned and stabilized. Consider using a safety harness, especially if the roof is steep or slippery. Turn off any gas supply to the fireplace before starting work. If working on a top-sealing damper, ensure that someone is available to assist from the ground.
Gather Necessary Tools and Materials: The required tools and materials will vary depending on the type of damper being installed. However, common tools include a screwdriver set (including both flathead and Phillips head), adjustable wrench, measuring tape, wire brush, scraper, hammer, drill with appropriate drill bits, sealant (high-temperature silicone), and a ladder. For top-sealing dampers, you may also need a chisel, masonry drill bits, and possibly a cement mixer for patching any damaged chimney crown. Ensure you have the correct size and type of screws or fasteners specified by the damper manufacturer.
Inspect the Chimney: Before installing a new damper, thoroughly inspect the chimney for any signs of damage or deterioration. Look for cracks, loose bricks, crumbling mortar, or signs of water damage. If any of these issues are present, address them before proceeding with the damper installation. A damaged chimney can compromise the effectiveness of the damper and pose a safety hazard. Pay particular attention to the flue tile, ensuring it is intact and free from cracks. If the flue tile is damaged, consider having it relined before installing a top-sealing damper.
Remove the Old Damper: If replacing an existing damper, carefully remove the old one. For throat dampers, this may involve loosening screws or bolts and carefully lifting the damper out of place. Be prepared for debris and soot to fall during removal. For top-sealing dampers, the removal process may be more complex, potentially involving cutting the damper from the flue tile. Exercise caution to avoid damaging the chimney or flue. If the old damper is heavily corroded or difficult to remove, consider seeking professional assistance. Properly dispose of the old damper according to local regulations.
Clean the Fireplace and Chimney: After removing the old damper, thoroughly clean the fireplace and chimney flue. Use a wire brush and scraper to remove any soot, creosote, or debris. This will ensure a clean surface for the new damper to seal against. A clean flue also improves airflow and reduces the risk of chimney fires. Consider hiring a professional chimney sweep to thoroughly clean the chimney before installing the new damper, especially if there is a significant buildup of creosote.
Step-by-Step Installation Process
The following outlines a general step-by-step process for installing a fireplace damper. Note that the specific steps may vary depending on the type of damper being installed and the manufacturer's instructions. Always refer to the manufacturer's instructions for detailed guidance. The following instructions are for informational purposes only, and do not replace the need for professional installation.
Throat Damper Installation:
- Prepare the Mounting Surface: Ensure the area where the damper will be installed is clean and free of debris. Scrape away any loose mortar or soot.
- Position the Damper: Carefully position the new damper in the fireplace throat, ensuring it is properly aligned. The hinge should be oriented correctly to allow for smooth opening and closing.
- Secure the Damper: Use screws or bolts to secure the damper to the fireplace walls or flue liner. Ensure the fasteners are appropriate for the material being secured to (e.g., masonry screws for brick or concrete). Tighten the fasteners securely, but avoid over-tightening, which could damage the damper or the surrounding masonry.
- Test the Damper: Open and close the damper several times to ensure it operates smoothly and seals properly. Adjust the damper as needed to ensure a tight seal.
Top-Sealing Damper Installation:
- Prepare the Flue Tile: Ensure the top of the flue tile is clean and free of debris. Use a wire brush to remove any loose mortar or soot.
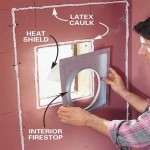
- Apply Sealant: Apply a bead of high-temperature silicone sealant around the top edge of the flue tile. This will create a waterproof seal between the damper and the chimney.
- Position the Damper: Carefully lower the damper onto the flue tile, ensuring it is centered and properly aligned. Press the damper firmly onto the sealant to create a tight seal.
- Secure the Damper: Some top-sealing dampers are secured with adhesive, while others require mechanical fasteners. Follow the manufacturer's instructions for securing the damper to the flue tile. If using fasteners, ensure they are appropriate for the material being secured to (e.g., masonry screws for brick or concrete).
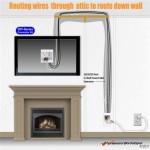
- Connect the Cable: Most top-sealing dampers have a cable that runs down the chimney to a handle located in the firebox. Thread the cable down the chimney and attach it to the handle according to the manufacturer's instructions.
- Test the Damper: Open and close the damper several times to ensure it operates smoothly and seals properly. Adjust the cable tension as needed to ensure a tight seal.
Post-Installation Checks: After installing the damper, conduct a thorough inspection to ensure everything is working correctly. Check for any leaks or gaps around the damper. Verify that the damper opens and closes smoothly and seals tightly. Operate the fireplace with a small fire to ensure proper draft and ventilation. Monitor the damper for any signs of overheating or malfunction. If any issues are detected, consult with a qualified chimney professional.
Correct installation is essential for the damper to function effectively and safely. This includes proper sealing, secure attachment, and correct cable operation (for top-sealing dampers). Failure to adhere to these requirements can lead to energy loss, draft issues, and potential safety hazards.
This article provides a general overview of fireplace damper installation. Fireplace and chimney systems vary greatly. Consulting with a qualified professional, such as a certified chimney sweep or a licensed contractor, is strongly recommended before undertaking any installation project. A professional can assess the specific needs of your fireplace, recommend the appropriate type of damper, and ensure that it is installed safely and correctly. Moreover, proper adherence to manufacturer's instructions and local building codes is of paramount importance during any installation.

Nicholas Chimney Sweeping Stove Fireplace Services Vienna Virginia

Chimney Dampers Types Of Installing

How To Use A Fireplace Damper The Right Way

The Purpose Of Your Chimney Damper Asheville Nc Environmental

Removing A Fireplace Damper For Chimney Liner Installation

How To Make A Fireplace Damper Ehow

Fireplace Flue Dampers Ensure Optimal On

Fireplace Damper Repair Full Service Chimney Kansas City

How Does A Fireplace Damper Work Tullahoma Tn A1 Chimney Specialist

How Do Fireplace Dampers Work Zoro Com
Related Posts