Fireplace Cleanout Door Installation: A Comprehensive Guide
The installation of a fireplace cleanout door is a crucial aspect of maintaining a safe and efficient fireplace. This often-overlooked component provides convenient access for removing accumulated ash and debris from the ash pit, preventing potential hazards and ensuring optimal fireplace performance. Understanding the importance of proper installation, the types of doors available, and the necessary steps involved can contribute significantly to the longevity and safety of a fireplace system.
This article provides a detailed exploration of fireplace cleanout door installation, covering essential considerations such as code compliance, site preparation, installation techniques, and troubleshooting common issues. Whether you are a homeowner undertaking a DIY project or a professional contractor, this guide aims to provide the necessary knowledge for a successful and safe installation.
Understanding the Function and Importance of a Fireplace Cleanout Door
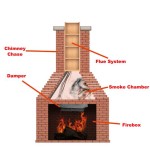
A fireplace cleanout door serves a primary purpose: to provide access to the ash pit located beneath the firebox. The ash pit is designed to collect ash and debris that falls through the firebox grate. Without a cleanout door, the ash would have to be removed directly from the firebox, a messy and potentially dangerous process, especially when the ashes are still hot. A cleanout door allows for a more controlled and safer removal process.
The accumulation of ash in the ash pit can pose several problems. Firstly, a full ash pit reduces the efficiency of the fireplace by restricting airflow. This can lead to incomplete combustion, increased smoke production, and reduced heat output. Secondly, accumulated ash, especially if it contains embers, can be a fire hazard if it comes into contact with combustible materials near the fireplace or ash pit.
Moreover, the presence of excessive ash can attract pests such as insects and rodents, which can create unsanitary conditions and potentially damage the fireplace structure. A properly installed and maintained cleanout door prevents these issues by providing a secure and airtight seal, preventing ash spillage, pest intrusion, and the escape of smoke or carbon monoxide.
Furthermore, regular ash removal facilitated by a functional cleanout door allows for inspections of the ash pit and surrounding masonry. Early detection of cracks, deterioration, or other structural problems can prevent costly repairs and ensure the long-term integrity of the fireplace system.
Key Considerations Before Installation
Before embarking on a fireplace cleanout door installation project, several crucial considerations must be addressed to ensure a successful and compliant outcome. These considerations include code compliance, accurate measurements, and selection of appropriate materials.
Firstly, local building codes and regulations often dictate specific requirements for fireplace construction and maintenance, including the installation of cleanout doors. These codes may specify minimum size requirements, materials specifications, and installation standards. Contacting the local building department and obtaining necessary permits is essential before proceeding with the installation.
Secondly, accurate measurements of the existing opening for the cleanout door are critical. The new door must fit snugly within the opening to provide a secure and airtight seal. Measure the height, width, and depth of the opening carefully, taking into account any irregularities or obstructions. It is advisable to select a door that is slightly smaller than the opening, allowing for adjustments during installation.
Thirdly, choosing the right type of cleanout door is paramount. Cleanout doors are typically made from cast iron, steel, or stainless steel. Cast iron doors are durable and offer excellent heat resistance, but they can be prone to rust if not properly maintained. Steel doors are less expensive than cast iron but may not be as durable. Stainless steel doors offer excellent corrosion resistance and longevity but can be more expensive. The selection should be based on budget, aesthetic preferences, and the specific environmental conditions of the installation location.
In addition to the door material, consider the type of closure mechanism. Some doors feature a simple latch, while others have a more secure locking mechanism. The choice depends on the level of security required and the potential for unauthorized access.
Finally, assess the condition of the surrounding masonry. If the masonry around the opening is cracked or deteriorated, it must be repaired before installing the new door. Failure to address these issues can compromise the integrity of the installation and lead to air leaks or water damage.
Step-by-Step Installation Process
The installation of a fireplace cleanout door typically involves the following steps, which should be followed carefully to ensure a safe and effective outcome. The process may vary slightly depending on the specific type of door and the condition of the existing opening.
Step 1: Preparing the Opening
Begin by thoroughly cleaning the existing opening. Remove any loose debris, old mortar, or rust. Use a wire brush to remove stubborn deposits. If the opening is uneven or requires minor adjustments, use a chisel and hammer to carefully shape the masonry to accommodate the new door. Ensure that the opening is square and level.
Step 2: Applying Mortar
Mix a batch of high-temperature mortar according to the manufacturer's instructions. This type of mortar is specifically designed to withstand the high temperatures associated with fireplaces. Apply a generous layer of mortar to the back and sides of the cleanout door frame. Ensure that the mortar is evenly distributed to create a strong and airtight seal.
Step 3: Inserting the Door
Carefully position the door into the opening. Press the door firmly against the surrounding masonry, ensuring that it is flush with the surface. Use a level to ensure that the door is perfectly level and plumb. If necessary, use shims to make minor adjustments. Excess mortar will squeeze out around the edges of the door. Remove this excess mortar with a trowel before it hardens.
Step 4: Securing the Door
Depending on the design of the cleanout door, it may be necessary to secure it in place with screws or anchors. Some doors have pre-drilled holes for this purpose. If so, drill pilot holes into the surrounding masonry and insert appropriate screws or anchors. Tighten the screws or anchors to secure the door firmly in place. If the door does not have pre-drilled holes, consider using masonry anchors to secure it to the surrounding wall.
Step 5: Curing the Mortar
Allow the mortar to cure completely according to the manufacturer's instructions. This typically takes several days. During this time, avoid using the fireplace to allow the mortar to set properly. Once the mortar is cured, inspect the installation for any gaps or cracks. If any are found, fill them with additional mortar.
Step 6: Final Inspection
Conduct a final inspection of the installation. Ensure that the door opens and closes smoothly and that the latch or locking mechanism functions properly. Check for any air leaks around the door. If any leaks are detected, seal them with high-temperature sealant.
Troubleshooting Common Installation Issues
Despite careful planning and execution, certain challenges may arise during the installation of a fireplace cleanout door. Addressing these common issues promptly and effectively is crucial for ensuring a successful outcome.
Problem: The Door Doesn't Fit Properly
If the door is too large for the opening, carefully enlarge the opening using a chisel and hammer. Remove small amounts of masonry at a time until the door fits snugly. If the door is too small, fill the gaps with additional mortar. Ensure that the mortar is properly packed and smoothed to create an airtight seal.
Problem: The Door is Not Level or Plumb
Use shims to adjust the position of the door until it is perfectly level and plumb. Ensure that the shims are evenly distributed around the door frame to provide adequate support. Once the mortar is cured, the shims can be removed or left in place.
Problem: Air Leaks Around the Door
Air leaks can compromise the efficiency of the fireplace and potentially allow carbon monoxide to escape. Seal any air leaks with high-temperature sealant. Apply the sealant around the perimeter of the door frame, ensuring that all gaps and cracks are filled.
Problem: The Mortar Cracks
Mortar cracks can occur if the mortar is not properly mixed or if the fireplace is used before the mortar is fully cured. Repair any cracks with additional mortar. Ensure that the area is clean and dry before applying the mortar. Allow the repaired area to cure completely before using the fireplace.
Problem: The Door Rusts
Cast iron and steel cleanout doors can be prone to rust, especially in humid environments. Prevent rust by applying a protective coating of heat-resistant paint or sealant. Regularly inspect the door for signs of rust and address any issues promptly.
By understanding the function of a fireplace cleanout door, carefully considering the factors before installation, following the correct installation process, and troubleshooting common issues, homeowners and professionals alike can ensure a safe, efficient, and long-lasting fireplace system. Proper installation and maintenance contributes significantly to the overall safety and enjoyment of a fireplace.
Installing A Clean Out Door And Cleaning Smoke Shelf

Masonry Clean Out Doors Ash Remval Chimney Friendly Fires

Fireplace Cleanout Door North Reading Ma Westford Sweepnman

Fire Box Grate Ash Dump Doors Clean Out Dr Sweep

Chimney 101 Base Assembly

Soot Box Installation

Fireplace Cleanup And Wood Stove Chimneys Com

Chimney 101 Base Assembly

Enhancing Fireplace Safety A Guide To Replacing Your Chimney Clean Out Door Friendly Fires

Fire Box Grate Ash Dump Doors Clean Out Dr Sweep
Related Posts