Fireplace Blower Installation Instructions
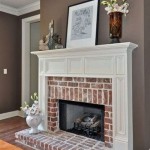
Installing a fireplace blower can significantly improve the heating efficiency of a traditional wood-burning fireplace. A blower circulates warm air from the firebox into the room, distributing heat more evenly and reducing heat loss up the chimney. The following instructions provide a comprehensive guide to safely and effectively install a fireplace blower. It is important to consult the specific instructions provided by the blower manufacturer, as variations may exist depending on the model and fireplace type.
Before commencing any work, it is crucial to ensure that the fireplace is completely cool. Never attempt to install a blower while the fireplace is in use or shortly after a fire has been extinguished. Disconnect the fireplace from the electrical mains by either unplugging it or switching off the appropriate circuit breaker. Safety is paramount, and these preliminary steps are essential to prevent burns or electrical shock.
Key Point 1: Preparation and Safety Precautions
Proper preparation is essential for a successful fireplace blower installation. This involves gathering the necessary tools and materials, understanding the specific requirements of the blower model, and ensuring all safety precautions are strictly adhered to. This phase minimizes potential complications and contributes to a smooth installation process.
The required tools typically include a screwdriver set (Phillips head and flat head), a socket set, a drill with various drill bits, wire strippers, wire connectors, electrical tape, a voltage tester, and possibly a fish tape or flexible wire. A work light will be helpful for illuminating the installation area, particularly inside the firebox. Safety glasses and work gloves are essential personal protective equipment.
Prior to starting, the installation manual provided with the fireplace blower should be thoroughly reviewed. This document contains critical information regarding specific wiring diagrams, mounting configurations, and any unique requirements for the particular blower model. Ignoring these instructions can lead to improper installation, malfunction, or even safety hazards.
Verify that the blower is compatible with the specific fireplace. Check the firebox dimensions to ensure that the blower unit will fit properly. Also, confirm that the electrical requirements of the blower, such as voltage and amperage, match the available electrical supply near the fireplace. Using an incompatible blower can result in inefficient operation or damage to the blower or the fireplace.
Before handling any electrical wiring, use a voltage tester to confirm that the circuit is indeed de-energized. Even if the circuit breaker is turned off, it is prudent to double-check to ensure no residual voltage is present. This simple step can prevent accidental electrical shock. Wear insulated gloves during any wiring procedures.
A clean workspace is also important for safety and efficiency. Clear the area around the fireplace of any obstructions and provide adequate ventilation. This will allow for easier access to the work area and prevent the accumulation of dust or fumes.
If the fireplace has been used recently, ensure that the ashes are completely cold before handling them. Hot ashes can retain heat for several days and pose a burn hazard. Dispose of the ashes properly in a metal container away from flammable materials.
Key Point 2: Installation Process
The installation process typically involves mounting the blower unit, connecting the electrical wiring, and testing the functionality of the blower. The precise steps may vary depending on the blower model and fireplace design, but the general principles remain the same. Following the manufacturer’s instructions closely is crucial for a successful installation.
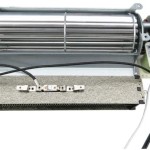
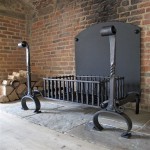
Begin by positioning the blower unit within the firebox according to the manufacturer’s instructions. Most blowers are designed to sit beneath the firebox, drawing in cool air from the bottom and blowing warm air out the top. Some models may require mounting brackets or screws to secure the blower in place. Ensure that the blower is level and properly aligned before fastening it securely.
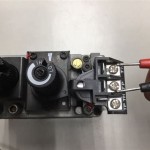
Next, connect the electrical wiring. Most fireplace blowers require a 120V AC power supply. Identify the power cord or wires from the blower and connect them to the existing electrical wiring near the fireplace. If a dedicated electrical outlet is not available, it may be necessary to install one. Consult with a qualified electrician if unfamiliar with electrical wiring practices.
Use wire connectors to securely join the wires, ensuring that the connections are tight and insulated. Match the wires according to color code (black to black, white to white, and green to green or bare copper). Wrap the connections with electrical tape for added insulation and protection. Secure the wiring neatly and safely to prevent it from coming into contact with hot surfaces or moving parts.
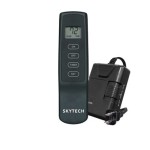
Some fireplace blowers come with a thermostat that automatically turns the blower on and off based on the firebox temperature. Install the thermostat according to the manufacturer’s instructions, typically placing it near the firebox to sense the heat. Connect the thermostat wiring to the blower unit as specified in the wiring diagram.
Once the blower is mounted and the wiring is connected, inspect the entire installation to ensure that everything is properly secured and connected. Double-check all connections and wiring to prevent potential problems. Make sure that the blower fan blades are free to rotate without obstruction.
Before testing the blower, ensure that the fireplace is completely free of flammable materials and that the area around the fireplace is clear. Turn the circuit breaker back on or plug the fireplace back in. Turn on the blower switch and observe its operation. Verify that the fan blades are spinning freely and that air is being blown out of the blower unit.
If the blower does not turn on, check the wiring connections and the circuit breaker. If the blower makes unusual noises or vibrates excessively, turn it off immediately and inspect for loose parts or obstructions. Address any issues before continuing to use the blower.
Key Point 3: Testing and Final Adjustments
After the initial installation, thorough testing and adjustment are necessary to ensure optimal performance and safety. This involves verifying the blower's functionality across different heat levels, checking for any unusual noises or vibrations, and making any necessary adjustments to the thermostat or blower speed. Proper testing ensures that the blower is working as intended and maximizes its efficiency in distributing heat.
Start a small fire in the fireplace and allow it to burn for a short period of time. Monitor the blower operation as the firebox temperature increases. The thermostat should automatically turn the blower on when the firebox reaches a certain temperature. Observe the airflow and adjust the blower speed if necessary to achieve the desired level of heat circulation.
Check for any unusual noises or vibrations coming from the blower unit. If any are detected, turn off the blower and inspect for loose parts or obstructions. Tighten any loose screws or bolts and remove any debris that may be interfering with the fan blades. Restart the blower and verify that the noises or vibrations have been eliminated.
Adjust the thermostat setting to fine-tune the blower's operation. The thermostat should be set to turn the blower on at a temperature that is comfortable for the room. Experiment with different settings to find the optimal balance between heat circulation and energy efficiency. Some blowers have variable speed controls that allow for manual adjustment of the airflow.
Ensure that the blower is not drawing excessive current. Using an amp meter, measure the current draw of the blower during operation. Compare the measured current draw to the specifications provided by the manufacturer. If the current draw is significantly higher than the specified rating, there may be a problem with the blower or the electrical wiring. Consult with a qualified electrician to diagnose and repair the issue.
Inspect the wiring connections periodically to ensure that they remain secure and insulated. Over time, vibration and heat can cause the connections to loosen or the insulation to deteriorate. Tighten any loose connections and replace any damaged wiring.
Clean the blower unit regularly to remove dust and debris that can accumulate on the fan blades and motor. Use a vacuum cleaner or compressed air to remove the debris. A clean blower will operate more efficiently and last longer. Disconnect the power supply before cleaning the blower.
If any issues are encountered during the testing and adjustment phase, consult the manufacturer’s troubleshooting guide or contact a qualified technician for assistance. Do not attempt to repair the blower without proper training and experience. Incorrect repairs can lead to further damage or safety hazards.
By following these comprehensive instructions and consistently prioritizing safety, a fireplace blower can be installed effectively, significantly enhancing the heating capabilities of the fireplace and contributing to a warmer, more comfortable home environment.

How Is A Fireplace Blower Kit Wired Fireplaceblowers Com

Installation Instructions Manual Fbk250 Fireplace Blower Kit

21 Trv Gs Blower Installation Instructions Avalon

How Is A Fireplace Blower Kit Wired Fireplaceblowers Com

Installation Instructions For Fbk 100 Fbk100 Fireplace Blower Kit

Fbk 100 Fireplace Blower Fan Kit Installation For Lennox And Superior

Gfk 160a Blower System Heatilator Fireplaces

Installing A Fireplace Blower Gfk4 Gfk4a In Heatilator Natural Gas

How Is A Fireplace Blower Kit Wired Fireplaceblowers Com

Gfk 160 Fireplace Blower Fan Kit Installation