DIY Electric Fireplace Mantel: A Comprehensive Guide
An electric fireplace mantel serves as a functional and aesthetic focal point in a room, offering the ambiance of a traditional fireplace without the complexities and maintenance of a wood-burning or gas-fueled alternative. Constructing a do-it-yourself (DIY) electric fireplace mantel allows for customization to match existing décor, accommodate specific space requirements, and often achieve cost savings compared to purchasing a pre-fabricated unit. This article provides a detailed guide to planning, building, and installing a DIY electric fireplace mantel.
The initial step in any DIY project involves thorough planning. Considerations must be given to the desired style, dimensions, materials, and the specific electric fireplace insert that will be housed within the mantel. A well-defined plan minimizes errors and ensures a satisfactory final product.
Planning and Design Considerations
The design of the mantel should complement the existing architectural style of the room. Options range from traditional, ornate designs to sleek, modern minimalist styles. Researching different mantel designs and compiling inspiration images provides a solid foundation for determining the desired aesthetic. Consider the overall dimensions of the room, the size of the electric fireplace insert, and the viewing angle for optimal placement and visual appeal.
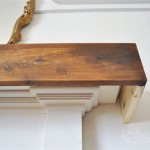
Selecting the right materials is crucial for both the aesthetic and structural integrity of the mantel. Common choices include hardwood, softwood, MDF (Medium-Density Fiberboard), and reclaimed wood. Hardwood, such as oak or maple, offers durability and a premium appearance but is typically more expensive. Softwood, such as pine, is more affordable and easier to work with but may require more care in finishing. MDF is a cost-effective option that provides a smooth surface for painting and is less prone to warping than solid wood. Reclaimed wood adds character and a rustic touch but requires careful preparation and may present unique challenges in terms of uniformity and structural soundness.
Accurate measurements are essential to ensure the electric fireplace insert fits snugly within the mantel and that the overall dimensions of the mantel are appropriate for the space. Measure the width, height, and depth of the electric fireplace insert precisely, allowing for a small margin of error (approximately 1/4 inch) to prevent binding. The mantel should be wide enough to visually balance the fireplace insert and deep enough to provide adequate support. Consider the height of the mantel relative to the room's ceiling height and the furniture that will be placed around it.
Creating a detailed drawing or CAD (Computer-Aided Design) model of the mantel is highly recommended. This allows for visualization of the finished product and identification of potential design flaws or structural weaknesses before construction begins. The drawing should include all dimensions, material specifications, and joint details. A bill of materials, listing all the required lumber, hardware, and finishing supplies, should also be compiled to ensure accurate purchasing and cost estimation.
Construction Process: Step-by-Step Guide
The construction process varies depending on the complexity of the design and the chosen materials. The following steps provide a general outline for building a basic electric fireplace mantel:
Obtain all necessary materials based on the bill of materials. This includes lumber, screws, nails, wood glue, sandpaper, primer, paint or stain, and any decorative elements. Ensure all lumber is properly dried and acclimatized to the room's humidity level to minimize warping or cracking after construction.
Cut all lumber pieces to the precise dimensions specified in the drawing. Use a table saw, miter saw, or circular saw to achieve clean, accurate cuts. Label each piece to avoid confusion during assembly.
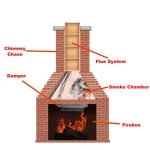
Assemble the main frame of the mantel using wood glue and screws or nails. Ensure the frame is square and level. Reinforce joints with corner braces or wood blocks for added stability. Construct the firebox opening according to the dimensions of the electric fireplace insert. The firebox must be precisely square and the correct size to securely house the insert.
Attach the mantel shelf to the frame using wood glue and screws. Ensure the shelf is level and securely fastened. Add decorative elements, such as trim, molding, or corbels, to the frame and shelf using wood glue and nails. These elements enhance the aesthetic appeal of the mantel and can be customized to match the desired style.
Sand all surfaces of the mantel to create a smooth, even finish. Use progressively finer grits of sandpaper to remove imperfections and prepare the wood for finishing. Apply wood filler to any nail holes or gaps and sand smooth after the filler has dried.
Apply primer to all surfaces of the mantel to seal the wood and provide a uniform base for paint or stain. Allow the primer to dry completely before applying the final finish. Apply multiple coats of paint or stain, following the manufacturer's instructions. Allow each coat to dry completely before applying the next. Consider using a clear coat or sealant to protect the finish and enhance its durability.
Installation and Safety Considerations
Installing the electric fireplace mantel requires careful attention to safety and proper mounting techniques. The mantel must be securely attached to the wall to prevent tipping or falling.
Locate wall studs using a stud finder. Mark the position of the studs on the wall. Position the mantel against the wall, aligning it with the desired location. Use a level to ensure the mantel is perfectly level. Attach the mantel to the wall studs using screws that are long enough to penetrate the studs securely. Use shims to compensate for any unevenness in the wall. For masonry walls, use masonry anchors to secure the mantel.
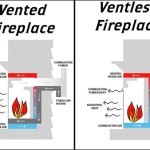
Carefully slide the electric fireplace insert into the firebox opening. Ensure the insert fits correctly and that there is adequate ventilation space around the unit. Connect the electric fireplace insert to a dedicated electrical outlet. Ensure the outlet is properly grounded and that the electrical circuit is capable of handling the insert's power requirements. Follow the manufacturer's instructions for proper electrical connections.
Before operating the electric fireplace, inspect all connections and ensure the unit is functioning correctly. Test all features, including the heating element, flame effects, and remote control. Monitor the unit for any signs of overheating or malfunction. Always adhere to the manufacturer's safety guidelines when operating the electric fireplace.
The area around the mantel should be kept clear of flammable materials. Avoid placing curtains, furniture, or other flammable items too close to the fireplace. Regularly inspect the electric fireplace and mantel for any signs of damage or wear. Repair any damage promptly to prevent potential hazards.

How To Build A Diy Built In Fireplace With An Electric Insert The Creative Mom

Electric Fireplace Mantle Diy She Holds Dearly

Diy Electric Fireplace Full Hearted Home

Diy Fireplace With Electric Insert Angela Marie Made

Diy Fireplace With Electric Insert Angela Marie Made

Diy Electric Fireplace Jenna Sue Design

Diy Electric Fireplace Build

6 Electric Fireplace Diys You Ll Want To Recreate Asap Heat Glo

19 Amazing Diy Fireplace Mantel Ideas To Inspire You Home Mantle Decor

Diy Shiplap Electric Fireplace Build With Mantel Healthy Grocery Girl
Related Posts