Easy Fireplace Mantel Plans: A Guide to Enhancing Your Hearth
A fireplace mantel serves as a focal point within a room, offering both aesthetic appeal and functional shelving. Constructing a mantel can be a manageable DIY project for individuals with basic woodworking skills and access to fundamental tools. Several easy fireplace mantel plans exist, catering to diverse styles and skill levels, allowing homeowners to personalize their living spaces without incurring significant expense.
Before embarking on any mantel construction project, careful consideration should be given to building codes and safety regulations. Local building codes often dictate minimum clearances between the fireplace opening and combustible materials, including the mantel. Adhering to these regulations is paramount to prevent fire hazards. Always consult with local authorities or qualified building professionals to ensure compliance.
This article elucidates several straightforward fireplace mantel plans, providing detailed information on materials, construction techniques, and essential safety considerations. Understanding these principles will empower individuals to confidently undertake their mantel-building endeavors.
Types of Easy Fireplace Mantel Plans
Several simple mantel designs are well-suited for DIY construction. These designs typically involve straightforward cuts, minimal joinery, and readily available materials, making them accessible to novice woodworkers:
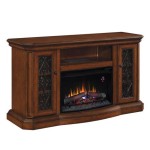
Box Beam Mantel: This type of mantel is constructed by assembling several pieces of lumber to form a hollow box, creating a substantial appearance without the weight of a solid wood beam. The box beam mantel can be customized to varying dimensions and finishes, offering versatility in design. Typically, four pieces of wood are used, one each for the top, bottom, and two sides. These are then joined using wood glue, screws, or nails. The finished mantel can be stained, painted, or left natural depending on the desired aesthetic.
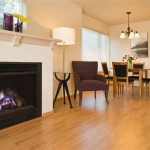
Floating Mantel: A floating mantel gives the illusion of being suspended from the wall without visible supports. This is often achieved using a hidden mounting system consisting of a wood cleat attached to the wall studs. The mantel itself then slides over the cleat, providing a secure and clean appearance. Floating mantels are minimalist in design and work well in contemporary or modern settings.
Shelf Mantel: This is arguably the simplest type of mantel to build. It consists of a single piece of lumber or a built-up shelf that is attached directly to the wall above the fireplace opening using brackets or screws. Shelf mantels are versatile and can be adapted to various styles, from rustic to modern, depending on the materials and finish used.
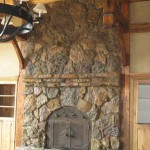
Reclaimed Wood Mantel: Utilizing reclaimed wood adds character and a rustic charm to any fireplace. Reclaimed wood can be sourced from old barns, demolition sites, or specialized suppliers. When using reclaimed wood, it's essential to thoroughly clean and inspect the wood for insects or rot before construction. The imperfections and unique grain patterns of reclaimed wood contribute to its distinctive appeal.
Materials and Tools Required
The materials and tools required for building a fireplace mantel will vary depending on the chosen plan and the desired aesthetic. However, some common materials and tools are essential for most projects:
Lumber: The type of lumber used will depend on the desired look and budget. Pine is a cost-effective option, while hardwoods like oak, maple, or cherry offer greater durability and visual appeal. Reclaimed wood is another option, providing a rustic and unique look. Consider the dimensions required for your chosen mantel plan when purchasing lumber.
Fasteners: Screws, nails, and wood glue are essential for joining the components of the mantel. Choose screws with appropriate length and head type for the specific application. Wood glue provides additional strength and stability to the joints.
Finishing Materials: Stain, paint, varnish, or polyurethane can be used to protect and enhance the appearance of the wood. Select a finish that complements the overall style of the room and provides adequate protection against moisture and wear.
Measuring Tools: A tape measure, level, combination square, and pencil are essential for accurate measurements and marking. Accurate measurements are crucial for ensuring that the mantel fits properly and is level.
Cutting Tools: A circular saw, miter saw, or hand saw can be used to cut the lumber to the required dimensions. A miter saw is particularly useful for making precise angled cuts.
Drilling Tools: A drill or impact driver is necessary for driving screws and drilling pilot holes. Pilot holes prevent the wood from splitting when driving screws.
Sanding Tools: Sandpaper, a sanding block, or an electric sander are used to smooth the wood surfaces and prepare them for finishing. Different grits of sandpaper are used for different stages of sanding, starting with coarser grits and progressing to finer grits.
Safety Equipment: Safety glasses, ear protection, and a dust mask are essential for protecting yourself from injury during the construction process. Woodworking can generate dust, fumes, and debris, so it's important to wear appropriate safety gear.
Step-by-Step Construction Guide for a Simple Box Beam Mantel
A box beam mantel is a relatively simple project that can significantly enhance the appearance of a fireplace. The following steps outline the construction process:
Step 1: Measuring and Planning: Begin by measuring the width of the fireplace opening and the desired length of the mantel. Determine the desired depth and height of the box beam. Account for any building code requirements regarding clearances from the fireplace opening.
Step 2: Cutting the Lumber: Cut the lumber to the required dimensions for the top, bottom, and side pieces of the box beam. Ensure that the cuts are accurate and square for a professional finish. Use a miter saw or circular saw for precise cuts.
Step 3: Assembling the Box: Apply wood glue to the edges of the side pieces and attach them to the top and bottom pieces using screws or nails. Ensure that the corners are square and the joints are tight. Use clamps to hold the pieces together while the glue dries.
Step 4: Reinforcing the Joints: For added strength, consider adding internal supports or corner braces to reinforce the joints. These can be made from scrap lumber and attached with glue and screws.
Step 5: Sanding and Finishing: Sand the entire mantel to smooth out any rough edges or imperfections. Apply a stain, paint, or varnish to the mantel to achieve the desired finish. Allow the finish to dry completely before proceeding.
Step 6: Installing the Mantel: Locate the wall studs above the fireplace opening. Attach a mounting cleat to the wall studs using screws. Slide the box beam mantel over the cleat, ensuring that it is securely attached. Alternatively, use heavy-duty brackets to support the mantel.
Safety Considerations and Fire Codes
Fire safety is paramount when constructing and installing a fireplace mantel. It is crucial to adhere to local building codes and regulations to minimize the risk of fire hazards.
Clearance Requirements: Most building codes specify minimum clearances between the fireplace opening and combustible materials, including the mantel. These clearances are typically measured from the top and sides of the fireplace opening. Consult with local authorities or qualified building professionals to determine the specific clearance requirements in your area.
Non-Combustible Materials: Consider using non-combustible materials, such as stone, brick, or metal, for the mantel facing or surround. These materials will not ignite or contribute to the spread of fire.
Heat Shielding: If the mantel is made of combustible materials, such as wood, consider installing a heat shield between the mantel and the fireplace opening. Heat shields are typically made of metal and are designed to deflect heat away from the mantel.
Professional Inspection: After installing the mantel, it is advisable to have it inspected by a qualified building professional or fire safety inspector to ensure compliance with all applicable codes and regulations.
Regular Maintenance: Inspect the mantel regularly for any signs of damage or deterioration. Repair any cracks, gaps, or loose joints promptly. Keep the area around the fireplace clean and free of combustible materials.
By adhering to these safety considerations and fire codes, homeowners can enjoy the beauty and functionality of their fireplace mantel while minimizing the risk of fire hazards.
In summary, constructing a fireplace mantel can be a rewarding DIY project. Choosing an easy plan, selecting appropriate materials, and adhering to safety guidelines are critical for a successful outcome. By carefully planning and executing the project, homeowners can enhance the aesthetic appeal of their living spaces and create a cozy and inviting atmosphere.

Diy Fireplace Mantel Designatedspacedesign Com

Easy Diy Fireplace Mantel Tutorial Jessica Welling Interiors

How To Build A Fireplace Mantel Easy Diy Blossoming Life

Diy Rustic Fireplace Mantel The Cure For A Boring

How To Build A Diy Fireplace Mantel Fixthisbuildthat

Easy Fireplace Mantel Diy

How To Build A Diy Fireplace Mantel Fixthisbuildthat

Building An Easy Modern Fireplace Mantel Young House Love

Diy Wood Beam Mantel

Diy Fireplace With Electric Insert Angela Marie Made