DIY Wood Fireplace Mantel: A Comprehensive Guide
A fireplace mantel serves as a focal point in any room, offering an opportunity to add character and style to a living space. While commercially available mantels offer convenience, a do-it-yourself wood fireplace mantel often provides a more personalized and cost-effective solution. Constructing a wooden mantel allows for customization in terms of dimensions, wood species, finish, and overall design, ensuring it complements the existing décor and meets specific aesthetic preferences.
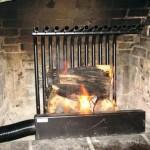
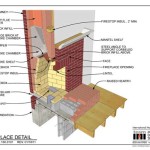
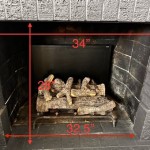
This guide provides a detailed overview of the process involved in creating a DIY wood fireplace mantel, covering essential planning, material selection, construction techniques, and finishing options. Adhering to safety guidelines and understanding building codes are crucial aspects of this project. Before commencing, it is imperative to consult local building codes concerning fireplace mantel clearances from the firebox opening. These regulations exist to prevent fire hazards and ensure safe operation of the fireplace.
Planning and Design Considerations
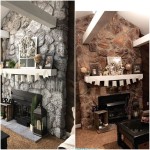
Before purchasing materials or initiating construction, meticulous planning is essential. The planning phase involves determining the desired dimensions of the mantel, selecting a suitable style, and creating a detailed design blueprint. Consider the existing fireplace surround and the overall architectural style of the room when choosing a design. Common mantel styles include rustic, modern, traditional, and contemporary, each offering unique aesthetic characteristics. Consider sketching the design to visualize the final product.
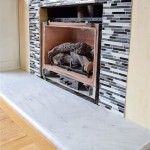
Accurate measurements are critical for a successful outcome. Measure the width of the fireplace opening, the height from the floor to the top of the firebox, and the available space on either side of the fireplace. These measurements will dictate the overall dimensions of the mantel. Also, factor in the required clearance from the firebox opening, as specified by local building codes. The mantel's depth, or how far it projects from the wall, is another important design consideration. A deeper mantel provides more surface area for displaying decorative items but may encroach on the room's space. A shallower mantel offers a more streamlined appearance.
Once the dimensions and style are determined, create a detailed design blueprint. This blueprint should include all measurements, material specifications, and construction details. A well-defined blueprint will serve as a guide throughout the construction process, minimizing errors and ensuring a professional-looking finished product. The design should also consider the method of attachment to the wall. Common attachment methods include using screws directly into studs, constructing a French cleat system, or employing masonry anchors if the fireplace surround is made of brick or stone. The chosen attachment method will influence the design and construction of the mantel.
Material Selection and Preparation
The choice of wood significantly impacts the mantel's appearance, durability, and cost. Common wood species for mantel construction include pine, oak, maple, cherry, and walnut, each possessing unique grain patterns, color variations, and hardness levels. Pine is a readily available and affordable option, ideal for rustic or painted mantels. Oak provides a classic and durable choice, while maple offers a smooth, even grain suitable for a variety of finishes. Cherry and walnut are premium hardwoods that offer rich color and distinctive grain patterns, ideal for a more formal or high-end aesthetic.
The wood should be properly dried and acclimatized to the room's environment before construction. This process minimizes warping and cracking after the mantel is installed. Purchase lumber from a reputable supplier to ensure it is free from defects such as knots, cracks, and excessive moisture content. The required amount of lumber will depend on the mantel's dimensions and design. It is advisable to purchase slightly more lumber than needed to account for potential errors or waste during the cutting and construction phases.
Before commencing construction, the selected lumber must be prepared. This involves cutting the lumber to the required dimensions according to the design blueprint. Use a circular saw, miter saw, or table saw to ensure accurate and clean cuts. Sand the lumber to create a smooth surface, removing any splinters or imperfections. Start with a coarse-grit sandpaper and gradually progress to a finer grit to achieve a polished finish. Dust thoroughly after sanding to prepare the wood for staining or painting.
Construction Techniques and Finishing
The construction of the mantel typically involves assembling multiple pieces of wood to create the desired shape and structure. Common joinery techniques include using screws, nails, wood glue, and dowels to secure the pieces together. Pocket hole joinery is a popular method for creating strong and concealed joints. This involves drilling angled holes into the back of the wood pieces, allowing screws to be driven in at an angle to create a secure connection. Wood glue should be applied to all joints to enhance the strength and longevity of the mantel.
If the design incorporates decorative elements such as corbels or moldings, attach them securely using wood glue and nails or screws. Ensure the decorative elements are properly aligned and evenly spaced. Once the mantel is assembled, fill any nail holes or imperfections with wood filler. Allow the wood filler to dry completely before sanding it smooth.
The finishing process involves applying a stain, paint, or clear coat to protect the wood and enhance its appearance. Staining allows the natural grain of the wood to show through, while painting provides a solid color finish. A clear coat protects the wood from moisture and scratches. Choose a finish that complements the overall décor of the room and provides the desired level of protection. Before applying the finish, thoroughly clean the mantel to remove any dust or debris. Apply the finish in thin, even coats, allowing each coat to dry completely before applying the next. Lightly sand between coats to achieve a smooth, professional-looking finish. After the final coat has dried, install the mantel according to the chosen attachment method. Ensure the mantel is level and securely attached to the wall.

How To Make An Easy Diy Fireplace Mantel Sprucing Up Mamahood

Diy Fireplace Mantel Designatedspacedesign Com

Diy Rustic Fireplace Mantel The Cure For A Boring

Our Diy Rustic Wood Mantel Love Renovations
:max_bytes(150000):strip_icc()/sandandsisal-bdc76ad938a44d28ae9e23ef6c9fa331.jpg?strip=all "17 Diy Fireplace Mantel Plans")
17 Diy Fireplace Mantel Plans

Diy Floating Mantel Shelf

Diy Wood Mantel Simple To Make Artsy Rule

Diy Reclaimed Wood Mantel My Simply Simple

How To Build A Rustic Faux Beam Mantel Toolbox Divas

Quick Wood Beam Mantel Diy Project Barron Designs
Related Posts