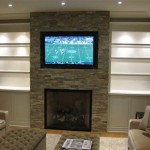
DIY Stone Veneer Fireplace Surround: A Step-by-Step Guide
Transform your fireplace into a stunning focal point with a DIY stone veneer surround. This project combines the durability and beauty of natural stone with the ease and affordability of a DIY installation. Here's a comprehensive guide to help you achieve a professional-looking result:
Materials You'll Need:
- Stone veneer panels
- Adhesive mortar
- Notched trowel
- Caulking gun
- Caulk
- Grout
- Grout float
- Level
- Chalk line
- Hammer and chisel (optional)
1. Preparation
Thoroughly clean the fireplace surround area and remove any debris. Use a level to ensure the surface is flat. If necessary, use a hammer and chisel to level uneven areas.
2. Dry Fit the Panels
Place the stone veneer panels on the surround without adhesive to get an idea of their placement. Arrange them to create a pleasing pattern and adjust the sizes as needed using a hammer and chisel.
3. Apply Adhesive Mortar
Apply a thick layer of adhesive mortar to the back of the first panel using a notched trowel. Hold the panel in place and gently press it against the surround. Repeat the process for the remaining panels.
4. Grout the Joints
Allow the adhesive mortar to set overnight. Mix the grout according to the manufacturer's instructions. Using a grout float, fill the joints between the panels. Smooth the grout with a wet sponge.
5. Caulk the Gaps
Once the grout has set, apply caulk to any gaps between the stone veneer and the fireplace. Use a painter's tape to create clean lines.
6. Finishing Touches
Remove any excess mortar or grout from the surface of the stone veneer. Allow the surround to cure for the recommended amount of time specified by the adhesive and grouting products used.
Tips:
- Choose stone veneer panels that complement the style of your fireplace and home décor.
- Use a variety of stone sizes and shapes to create a more dynamic look.
- Allow the adhesive and grouting products to dry completely before using the fireplace to prevent damage.
- Seal the stone veneer to protect it from stains and moisture.

Thin Stone Veneers Make A Fireplace Update Easy Swenson Granite 100 Natural Stones

How To Install A Stone Veneer Fireplace Shoe Makes New

Mary S Diy Stone Veneer Fireplace Surround Genstone

17 Stone Veneer Fireplace Designs Ideas Innovative Building Materials

Nate S Diy Stone Veneer Corner Fireplace Genstone

A Step By Diy Stone Veneer Installation On Fireplace In Only 4 Days This Customer To Faux Fireplaces Designs

Diy Overgrouted Stone Fireplace Shoe Makes New

Natural Stacked Stone Veneer Fireplace Ideas

How To Build A Stone Veneer Fireplace With Wood Mantel

Modern Living Room Inspiration Stone Veneer Fireplace Surround Design Ideas
Related Posts