DIY Stone Fireplace Mantels: A Comprehensive Guide
A fireplace serves as a focal point in many homes, providing warmth and aesthetic appeal. The mantel, positioned above the firebox, is a key element in the fireplace design, offering a surface for display and complementing the overall style. While professionally installed mantels can be costly, constructing a stone fireplace mantel as a DIY project presents a viable option for homeowners looking to personalize their living space and save money. This article provides a comprehensive guide to designing, building, and installing a DIY stone fireplace mantel.
The decision to undertake a DIY stone fireplace mantel project necessitates careful planning and execution. It's crucial to assess one's skill level in carpentry and masonry, as well as one's physical ability to handle heavy stone materials. A clear understanding of building codes and safety regulations applicable to fireplace installations is also paramount. Failure to adhere to these guidelines can result in structural instability or fire hazards.
Planning and Design Considerations
The initial phase of a DIY stone fireplace mantel project involves meticulous planning and design. This includes determining the appropriate dimensions of the mantel, selecting the type of stone to be used, and ensuring structural integrity. Failure to adequately plan can lead to aesthetic inconsistencies and safety issues later in the construction process.
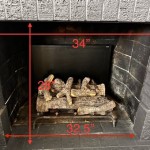
Dimensions: The height and depth of the mantel should be proportional to the fireplace opening and the surrounding wall. The height is typically dictated by building codes, which specify minimum clearances between the top of the firebox opening and combustible materials, including the mantel itself. These clearances are mandated to prevent the mantel from overheating and potentially igniting. The depth of the mantel is primarily a matter of aesthetics and functionality, influencing how much surface area is available for decorative items. A deeper mantel can provide more space but may also project excessively into the room, altering the overall visual balance.
Stone Selection: The choice of stone significantly impacts the aesthetic of the mantel and the overall cost of the project. Natural stone options include granite, marble, limestone, slate, and sandstone, each possessing unique colors, textures, and levels of porosity. Manufactured stone veneer is an alternative, offering a lighter weight and lower cost compared to natural stone, while still providing a similar appearance. The texture and color of the stone should complement the existing décor of the room. Consider the size and shape of the stones to ensure they are manageable for DIY installation and appropriate for the desired design.
Structural Integrity: The design must account for the weight of the stone. A solid stone mantel can be exceedingly heavy, requiring substantial support to prevent sagging or collapse. This support can be achieved through reinforced mortar joints, steel bracing, or a combination of both. If the mantel design incorporates a cantilevered overhang, the support requirements become even more critical. Consult with a structural engineer or experienced contractor to assess the load-bearing capacity of the fireplace structure and design an appropriate support system.
Style and Aesthetics: The style of the mantel should harmonize with the architectural style of the home. Options range from rustic, featuring rough-hewn stone, to contemporary, with smooth, polished surfaces. The mantel design can also incorporate decorative elements, such as corbels, keystones, or carvings to enhance the visual appeal. Careful consideration of these stylistic elements will contribute to a cohesive and aesthetically pleasing fireplace design.
Materials and Tools
Successful execution of a DIY stone fireplace mantel project necessitates the correct materials and tools. Investing in high-quality materials and ensuring access to appropriate tools will streamline the construction process and improve the final result.
Stone: The quantity of stone required depends on the dimensions of the mantel and the chosen layout. Precise measurements are essential to minimize waste and ensure sufficient material is available to complete the project. Purchase slightly more stone than calculated to account for cuts and potential breakage.
Mortar: Type S mortar is generally recommended for stone applications due to its high compressive strength and bonding properties. Choose a mortar color that complements the color of the stone. Premixed mortar offers convenience, but requires careful mixing to achieve the correct consistency. Dry mortar mix requires adding water according to the manufacturer's instructions.
Reinforcement: Metal lath or wire mesh is often embedded in the mortar joints to provide additional reinforcement and prevent cracking. Rebar can be incorporated into the mantel structure to provide substantial support, especially for cantilevered designs. Consult with a structural engineer or experienced contractor to determine the appropriate type and size of reinforcement needed for the specific project.
Adhesive: Construction adhesive, specifically designed for stone applications, can be used to supplement the mortar and provide an immediate bond between the stone and the underlying support structure. Choose an adhesive that is compatible with the type of stone being used.
Tools: Essential tools include a masonry saw with a diamond blade for cutting stone, a mortar mixing tub, a margin trowel, a pointing trowel, a level, a rubber mallet, a measuring tape, safety glasses, work gloves, and a dust mask. A grinder with a diamond grinding wheel may be needed to smooth rough edges or create custom shapes. Specialized tools, such as a brick hammer or a stone chisel, may be required depending on the type of stone and the complexity of the design.
Construction and Installation Process
The construction and installation process entails several key steps, including preparing the surface, dry-fitting the stone, mixing and applying the mortar, and ensuring proper alignment and support.
Surface Preparation: The wall surface where the mantel will be installed must be clean, level, and structurally sound. Remove any loose paint, plaster, or debris. If the wall is uneven, apply a leveling compound to create a smooth and consistent surface. If the existing fireplace surround is combustible material, ensure it is adequately shielded from the heat of the firebox according to local building codes. This may involve installing a non-combustible barrier, such as cement board.
Dry-Fitting: Before applying any mortar, dry-fit the stones to ensure they fit together properly and create the desired aesthetic. This allows for adjustments to be made and identifies any stones that need to be cut or shaped. Number the stones in the order they will be installed to maintain the intended layout. This step helps prevent errors and ensures a smooth installation process.
Mortar Mixing and Application: Mix the mortar according to the manufacturer's instructions, achieving a consistency similar to thick peanut butter. Apply a generous layer of mortar to the back of each stone and to the wall surface where the stone will be placed. Press the stone firmly into place, ensuring a solid bond with the wall. Use a level to ensure each stone is aligned correctly. Remove any excess mortar that squeezes out from the joints. Maintain consistent joint widths between the stones.
Reinforcement Integration: If the design incorporates metal lath or wire mesh, embed it in the mortar joints as the stones are being installed. If rebar is used, ensure it is properly anchored to the fireplace structure and encased in mortar. These reinforcement measures enhance the structural integrity of the mantel and prevent cracking or movement.
Grouting and Finishing: Once the mortar has partially cured, use a pointing trowel to fill the joints with mortar. Smooth the mortar joints to create a consistent and professional appearance. Remove any excess mortar from the face of the stones. After the mortar has fully cured, clean the stone surface with a brush and water to remove any remaining residue. Apply a stone sealant to protect the stone from staining and moisture.
Safety Precautions: Throughout the construction and installation process, prioritize safety. Wear safety glasses to protect the eyes from flying debris. Wear work gloves to protect the hands from sharp edges and rough surfaces. Use a dust mask to prevent inhaling dust and mortar particles. Ensure the work area is well-ventilated. If using power tools, follow the manufacturer's instructions carefully to prevent injury.
Building a DIY stone fireplace mantel can be a rewarding project, adding character and value to a home. However, it requires careful planning, attention to detail, and adherence to safety guidelines. By following the steps outlined in this guide, homeowners can create a beautiful and functional stone fireplace mantel that will be enjoyed for years to come.

How To Build And Hang A Mantel On Stone Fireplace Shanty 2 Chic

Diy Faux Cast Stone Fireplace Part 2 Building The Mantel Top Shelf

Diy Faux Plaster Fireplace Surround Chelsey Freng

Diy Faux Cast Stone Fireplace Part 2 Building The Mantel Top Shelf

Stone Fireplace Makeover Taryn Whiteaker Designs

Easy L And Stick Stone Fireplace Surround Sondra Lyn At Home

Diy Fireplace Mantel Surround Faux Cast Stone European Style Tidbits

Diy Painted Stone Fireplace Refresh Live Edge Mantle Lemon Thistle

Diy Fireplace Mantel Making It In The Mountains

Diy Overgrouted Stone Fireplace Shoe Makes New
Related Posts