DIY Oak Fireplace Mantel: A Guide to Crafting a Timeless Focal Point
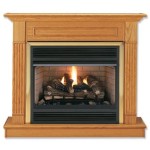
A fireplace mantel serves as a prominent architectural element within a room, often acting as a focal point that draws the eye and contributes significantly to the overall aesthetic. While various materials can be used for its construction, oak stands out for its inherent beauty, durability, and versatility. Creating a DIY oak fireplace mantel offers a rewarding experience, allowing for customization and the satisfaction of crafting a lasting addition to a home's décor.
This article provides a comprehensive guide to constructing a DIY oak fireplace mantel, covering aspects from material selection and design considerations to step-by-step instructions and finishing techniques. The goal is to empower individuals with the knowledge and confidence to undertake this project, resulting in a beautiful and functional mantel that enhances the character of the fireplace and the room it occupies.
Key Considerations Before Beginning: Planning and Design
Before embarking on the construction of an oak fireplace mantel, careful planning and design are critical. This initial phase establishes the foundation for a successful project and minimizes potential issues down the line. Several factors play a crucial role in this pre-construction process.
Firstly, the style of the mantel should complement the existing architectural style of the room and the fireplace itself. Whether the design leans towards traditional, modern, rustic, or contemporary, maintaining stylistic coherence is essential for a harmonious look. Consider the existing trim work, the fireplace surround material (brick, stone, tile), and the overall color palette of the room when determining the mantel's design. For instance, a sleek, minimalist oak mantel with clean lines would be more fitting for a modern interior, while a more ornate, carved oak mantel might suit a traditional setting.
Secondly, accurate measurements are paramount. Measure the width and depth of the fireplace opening, as well as the desired height of the mantel from the floor. Consider the clearance requirements for combustible materials around the fireplace opening, adhering to local building codes and manufacturers' specifications for safe operation. The mantel's dimensions should be proportional to the size of the fireplace and the room; a mantel that is too large or too small will detract from the overall aesthetic. It is prudent to create a detailed sketch or even a 3D rendering of the mantel design with precise measurements. Such visual aids facilitate clear communication and accurate execution during the construction phase.
Thirdly, oak selection is a key determinant of the final product's appearance and longevity. Oak is available in various grades and species, each with distinct characteristics. Red oak and white oak are two common choices, with white oak typically being more resistant to moisture and decay. The grade of the oak will affect the presence of knots and other imperfections. Select oak boards that are straight, free from significant defects, and of the desired thickness and width. Kiln-dried oak is preferable, as it has been properly dried to minimize warping or cracking issues. When purchasing oak, consider the grain pattern and color variation to ensure it aligns with the intended aesthetic. It's also wise to purchase slightly more material than calculated to account for potential errors or waste during cutting and shaping.
Lastly, the intended use of the mantel should inform the design and construction. Will the mantel be primarily decorative, or will it also serve as a surface for displaying objects? If it will bear weight, the construction must be sturdy enough to support the intended load. Consider incorporating reinforcement elements, such as internal supports or brackets, if necessary. Furthermore, consider any integrated features, such as shelving, lighting, or cable management for electronics. These aspects should be incorporated into the initial design phase to ensure seamless integration and functionality.
Step-by-Step Construction: From Milling to Assembly
Once the design and planning are finalized, the construction phase begins. This involves milling the oak lumber to the required dimensions, shaping the components, and assembling the mantel according to the design specifications.
Firstly, milling the oak lumber to the correct dimensions is critical. Using a jointer and planer ensures that the boards are flat, square, and consistent in thickness. Start by jointing one face and one edge of each board to create a reference surface. Then, plane the opposite face parallel to the jointed face. Finally, joint the remaining edge perpendicular to the planed face. This process creates boards with uniform dimensions, which are crucial for precise assembly. If specialized milling equipment is not accessible, consider having a local lumberyard or woodworking shop perform these tasks.
Secondly, cutting the components to size and shaping them as per the design is necessary. Use a table saw, miter saw, and jigsaw to cut the oak boards to the specified lengths and widths. Follow the detailed measurements outlined in the design plan. If the design incorporates curved elements or intricate profiles, utilize a router with appropriate bits to shape the oak accordingly. For example, a round-over bit can soften sharp edges, while a cove bit can create decorative profiles. When shaping the oak, exercise caution and wear appropriate safety gear, such as eye protection and hearing protection.
Thirdly, assembling the mantel is a crucial step that dictates the final structural integrity and appearance. There are several methods for joining the oak components, including screws, nails, wood glue, and joinery techniques such as mortise-and-tenon or dovetail joints. Screws provide a strong and reliable mechanical fastening, while wood glue provides a permanent bond that enhances the structural integrity. A combination of both is often recommended for optimal results. When using screws, pilot holes should be drilled to prevent the oak from splitting. Clamps are essential for holding the components together while the glue dries. Ensure that all joints are tight and aligned correctly before the glue sets. Internal supports, such as wooden blocks or metal brackets, can be added to reinforce the mantel, especially if it will bear weight.
Fourthly, sanding the assembled mantel creates a smooth and uniform surface in preparation for finishing. Begin with a coarser grit sandpaper (e.g., 80-grit) to remove any imperfections or rough edges. Gradually progress to finer grits (e.g., 120-grit, 180-grit, and 220-grit) to achieve a smooth, polished surface. Use a sanding block or a power sander to ensure even sanding. Pay particular attention to corners, edges, and joints. After sanding, thoroughly remove all dust with a vacuum cleaner and a tack cloth. This ensures that the finish will adhere properly and result in a flawless appearance.
Finishing Touches: Protecting and Enhancing the Oak
The finishing stage is where the oak mantel truly comes to life, revealing its natural beauty and providing protection against wear and tear. The selection of finishing products and techniques significantly impacts the final appearance and longevity of the mantel.
Firstly, selecting the appropriate finish is critical. Several options are available, each with its own advantages and disadvantages. Stain enhances the natural grain of the oak and allows for customizing the color. Polyurethane provides a durable, protective coating that resists scratches, moisture, and UV damage. Oil finishes, such as linseed oil or tung oil, penetrate the wood and provide a natural, low-luster finish. Water-based finishes are environmentally friendly and offer good durability. Consider the desired aesthetic, the level of protection required, and the ease of application when choosing a finish. Always test the finish on a scrap piece of oak to ensure it achieves the desired look.
Secondly, applying the finish requires careful attention to detail. Whether using stain, polyurethane, or oil, follow the manufacturer's instructions carefully. For stain, apply it evenly with a brush or cloth, and wipe off the excess after a few minutes to achieve the desired color intensity. For polyurethane, apply thin, even coats with a brush or spray gun, allowing each coat to dry completely before applying the next. Sand lightly between coats with fine-grit sandpaper to remove any imperfections. For oil finishes, apply liberally with a cloth, allowing the wood to absorb the oil for a period of time before wiping off the excess. Allow ample drying time between coats, as recommended by the manufacturer.
Thirdly, achieving a smooth, even finish is essential for a professional-looking result. Sanding between coats of finish helps to remove any imperfections and create a smooth surface for the subsequent coat. Use fine-grit sandpaper (e.g., 320-grit or 400-grit) and apply light pressure. Be careful not to sand through the finish, especially on edges and corners. After sanding, remove all dust with a vacuum cleaner and a tack cloth. This ensures that the next coat of finish will adhere properly and result in a flawless appearance.
Fourthly, installing the mantel safely and securely is the final step in the process. Locate the wall studs behind the fireplace surround using a stud finder. Attach the mantel to the wall studs using screws or bolts. Ensure that the mantel is level and securely fastened to the wall. Consider using construction adhesive in addition to screws or bolts for added stability. If the mantel is heavy or spans a significant distance, additional support, such as corbels or brackets, may be necessary. After installation, inspect the mantel for any gaps or imperfections. Caulk any gaps between the mantel and the wall to create a seamless appearance. The final step is to stand back and admire the beautiful oak fireplace mantel, a testament to the skills and effort invested in creating a unique and lasting focal point within the home.

Diy Rustic Fireplace Mantel The Cure For A Boring

How To Make An Easy Diy Fireplace Mantel Sprucing Up Mamahood

Diy Wood Mantel Simple To Make Artsy Rule

Diy Wood Beam Mantel
:max_bytes(150000):strip_icc()/remodelaholic-6ed1d077bb0744c5ae6f656273fbc540.jpg?strip=all "17 Diy Fireplace Mantel Plans")
17 Diy Fireplace Mantel Plans

Diy Fireplace Mantel Designatedspacedesign Com

Easy Diy Fireplace Mantel Tutorial Jessica Welling Interiors

Diy Wood Beam Mantel
:max_bytes(150000):strip_icc()/ablossominglife-4151b41015a64193a437e981c3aad037.jpg?strip=all "17 Diy Fireplace Mantel Plans")
17 Diy Fireplace Mantel Plans

Diy Wood Beam Mantel