DIY Fireplace Mantel with Media Storage: A Comprehensive Guide
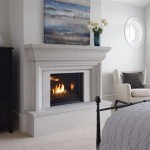
A fireplace often serves as the focal point of a living room, drawing eyes and creating a sense of warmth and comfort. Enhancing this focal point with a custom-built mantel that incorporates media storage not only elevates the aesthetic appeal but also provides a practical solution for organizing entertainment equipment. This article provides a comprehensive guide to constructing a DIY fireplace mantel equipped with integrated media storage, encompassing design considerations, material selection, construction techniques, and finishing touches.
Planning and Design Considerations
Prior to commencing construction, meticulous planning and design are paramount. This phase involves assessing the existing fireplace structure, determining the desired dimensions of the mantel and storage compartments, and selecting a design that complements the overall style of the room.
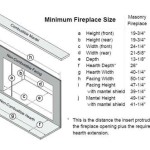
The first step involves accurately measuring the fireplace opening and the surrounding wall area. These measurements will dictate the overall width, height, and depth of the mantel. Consider leaving ample space above the firebox to prevent heat damage to the mantel and any stored media components. Building codes often specify minimum clearances required between the firebox and combustible materials, so consulting local regulations is crucial.
Next, determine the type of media storage required. This could include shelves for media players, gaming consoles, or decorative items, as well as enclosed cabinets for concealing less frequently used items or unsightly cables. The design should facilitate easy access to cables and power outlets, ensuring seamless connectivity for all devices.
The aesthetic design of the mantel should align with the room's décor. Options range from traditional styles with ornate moldings to modern, minimalist designs with clean lines. Consider the existing architectural features of the room, such as crown molding or baseboards, and incorporate similar elements into the mantel design to create a cohesive look. Software programs like SketchUp can be utilized to create three-dimensional models of the design, allowing for visualization and refinement before construction begins.
Finally, consider the weight limitations of the fireplace structure. A heavy mantel can potentially damage the existing fireplace, so it is crucial to assess the structural integrity and reinforce it if necessary. Distributing the weight evenly across the mounting points is also essential. If the fireplace has a gas insert, ensure compliance with all safety requirements. The gas line and connections must be handled according to safety regulations.
Material Selection and Preparation
The choice of materials significantly impacts the appearance, durability, and cost of the fireplace mantel. Common materials include solid wood, plywood, medium-density fiberboard (MDF), and various composite materials. Each option offers unique advantages and disadvantages, and the selection should be based on the desired aesthetic, budget, and skill level.
Solid wood, such as oak, maple, or pine, offers a classic and durable option. It can be stained or painted to match any décor, and its natural grain patterns add character and warmth. However, solid wood can be more expensive than other materials and may be prone to warping or cracking if not properly seasoned and sealed.
Plywood provides a more affordable alternative to solid wood while still offering reasonable strength and stability. It is less prone to warping and cracking than solid wood and can be painted or veneered to achieve a desired finish. However, the exposed edges of plywood can be unsightly and require careful finishing.
MDF is a cost-effective and versatile material that is easy to work with. It has a smooth, uniform surface that is ideal for painting. However, MDF is not as strong as solid wood or plywood and is susceptible to moisture damage. It is best suited for interior components that are not subject to significant stress or exposure to moisture.
Composite materials, such as manufactured stone or concrete, offer a unique and contemporary look. They are durable, fire-resistant, and can be molded into various shapes and textures. However, composite materials can be heavy and require specialized tools and techniques for installation.
Once the materials have been selected, it is important to prepare them properly before construction. This involves cutting the materials to the required dimensions, sanding them smooth, and applying a primer or sealer to protect them from moisture and improve the adhesion of the finish.
Accurate cuts are crucial for achieving a professional-looking result. A table saw, circular saw, or miter saw can be used to cut the materials to the desired dimensions. Ensure that the blades are sharp and that the cuts are straight and square. Sanding the materials smooth will remove any imperfections and create a smooth surface for finishing. Use progressively finer grits of sandpaper to achieve a polished finish.
Applying a primer or sealer will protect the materials from moisture and improve the adhesion of the finish. Choose a primer or sealer that is compatible with the chosen finish. Apply the primer or sealer in thin, even coats, allowing each coat to dry completely before applying the next.
Construction Techniques and Assembly
The construction process involves assembling the various components of the fireplace mantel according to the design plan. This typically involves connecting the frame, adding the shelves and cabinets, and attaching the mantel top.
The frame provides the structural support for the mantel and should be constructed from sturdy materials, such as solid wood or plywood. The frame can be assembled using screws, nails, or wood glue. Ensure that the joints are strong and square to prevent the mantel from sagging or wobbling.
Shelves and cabinets can be added to the frame to provide media storage. The shelves can be fixed or adjustable, depending on the desired functionality. The cabinets can be equipped with doors or drawers to conceal items. Install cable management systems to hide unsightly cable clutter and keep the media organized.
The mantel top is the horizontal surface that sits above the firebox. It can be made from solid wood, plywood, MDF, or composite materials. The mantel top should be securely attached to the frame using screws or construction adhesive. Consider adding decorative moldings or trim to the mantel top to enhance its appearance.
When assembling the components, ensure that all joints are flush and that the surfaces are smooth. Use a level to ensure that the mantel is plumb and level. Fill any gaps or imperfections with wood filler and sand them smooth before finishing.
Consider using pocket hole joinery for hidden fasteners. This technique allows for strong, clean joints without visible screws or nails. Pre-drilling holes before driving screws prevents splitting the wood and ensures a secure connection. When using wood glue, clamp the pieces together until the glue is fully cured.
Finishing and Installation
The finishing process involves applying a stain, paint, or other finish to the fireplace mantel to protect it from moisture and enhance its appearance. The installation process involves attaching the mantel to the fireplace wall and connecting any necessary electrical or plumbing connections. Add any final touches, such as cable conduits or trim, to complete the installation.
The choice of finish depends on the desired aesthetic and the type of materials used. Stain can be used to highlight the natural grain patterns of wood, while paint can be used to create a more uniform and contemporary look. Apply the finish in thin, even coats, allowing each coat to dry completely before applying the next.
Before installation, locate wall studs to provide secure mounting points for the mantel. Use a stud finder to accurately locate studs and mark their positions on the wall. Pre-drill pilot holes through the mantel frame and into the wall studs. Attach the mantel to the wall using lag bolts or heavy-duty screws.
If the mantel includes electrical outlets or plumbing connections, ensure that these are installed by a qualified electrician or plumber. Follow all local building codes and safety regulations. Conceal electrical wires and plumbing pipes within the mantel structure to maintain a clean and organized appearance.
After installation, inspect the mantel for any imperfections or gaps. Fill any gaps with caulk and touch up the finish as needed. Clean the mantel thoroughly and remove any dust or debris.
Consider installing a heat shield behind the mantel if it is located close to the firebox. A heat shield will protect the mantel from excessive heat and prevent it from warping or catching fire. Install soft close hinges on cabinet doors to prevent slamming. Add LED strip lighting to the shelves for ambient lighting and enhanced aesthetics.
By carefully following these steps, individuals can construct a beautiful and functional DIY fireplace mantel with integrated media storage that enhances the aesthetic appeal of their living room while providing a practical solution for organizing entertainment equipment. Proper planning, material selection, construction techniques, and finishing touches are essential for achieving a professional-looking result that will stand the test of time.

Wood Mantle With Storage Ana White

Diy Fireplace Remodel Pt 3 Custom Mantle Build

Fireplace With Mantle Storage And Side Bookshelves Ana White

Storage Rustic Mantle Media For Components Distressed Fireplace Living Room Custom

Diy Fireplace Mantel With Storage Designed Simple

Diy Modern Fireplace Designed Simple

Storage Mantel Knotted Walnut Fireplace With Drop Front Media

Faux Fireplace Cabinet With Storage Ana White

Iheart Organizing Diy Fireplace Built In Tutorial

Buy Custom Made Fireplace Mantel With Storage To Order From Corners Llc Custommade Com