DIY Fireplace Mantel Shelf: A Comprehensive Guide
The fireplace serves as a focal point in many homes, providing warmth and aesthetic appeal. Enhancing this feature with a well-crafted mantel shelf elevates its overall presence, offering both decorative space and architectural interest. Constructing a fireplace mantel shelf as a do-it-yourself project provides a cost-effective and personalized approach to home improvement. This article offers a detailed guide to building a fireplace mantel shelf, encompassing design considerations, material selection, construction techniques, and finishing touches.
Planning and Design Considerations
Prior to commencing the construction process, a thorough evaluation of design parameters is essential. This phase directly influences the functionality and aesthetic integration of the mantel shelf with the existing fireplace and surrounding room.
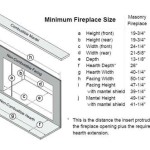
First, the dimensions of the fireplace itself must be accurately measured. This includes the width, height, and depth of the firebox, as well as the dimensions of any existing brickwork or facing material. The mantel shelf should ideally be wider than the fireplace opening to create a balanced visual effect. A common practice is to extend the shelf several inches, typically between 6 to 12 inches, beyond each side of the firebox. The depth of the shelf, or how far it protrudes from the wall, is also a crucial aspect to consider. A depth of 8 to 12 inches generally provides sufficient space for displaying decorative items without appearing overly bulky.
Second, the height of the mantel shelf above the firebox is a critical safety consideration. Building codes often dictate minimum clearance requirements to prevent the shelf from overheating and posing a fire hazard. While local codes should be consulted for specifics, a general guideline suggests maintaining a minimum distance of 12 inches between the top of the firebox opening and the bottom of the mantel shelf. For gas fireplaces, this distance may be less stringent, but verification with the manufacturer's specifications is still recommended. For wood-burning fireplaces, a greater distance, potentially exceeding 18 inches, is typically advisable.
Third, the overall aesthetic style of the mantel shelf should complement the existing décor. Options range from rustic and traditional designs featuring reclaimed wood and ornate carvings to modern and minimalist styles with clean lines and simple profiles. The choice of materials, such as wood species, stain colors, and decorative hardware, should align with the homeowner's personal preferences and the room’s overall design theme. Consider the architectural details of the house itself – a Victorian home might benefit from a more elaborate mantel, while a mid-century modern home could call for a sleek, minimalist design.
Finally, consider the weight-bearing capacity of the shelf. The intended use of the mantel shelf will dictate the structural requirements. If heavy objects, such as sculptures or large picture frames, are to be displayed, the shelf must be designed and constructed to support the additional weight. This may necessitate the use of heavier lumber, reinforced supports, or a combination of both.
Material Selection and Preparation
The choice of materials significantly impacts the aesthetic appeal, durability, and cost of the fireplace mantel shelf. A variety of options are available, each with its own advantages and disadvantages.
Hardwoods, such as oak, maple, and cherry, are popular choices due to their strength, durability, and attractive grain patterns. These woods are generally more expensive than softwoods but offer superior resistance to dents and scratches. Softwoods, such as pine and fir, are more affordable and easier to work with, but are also more prone to damage. Reclaimed wood, often sourced from old barns or buildings, provides a unique rustic aesthetic and is an environmentally conscious option. However, reclaimed wood may require more extensive preparation to remove nails, screws, and other debris, and to ensure it is structurally sound.
Once the wood species is selected, its preparation is paramount. This involves several key steps. First, the lumber should be properly dried and acclimated to the room’s humidity level to minimize warping or cracking after installation. This process typically involves storing the wood in the room where it will be installed for several days or weeks. Second, the lumber should be carefully inspected for any defects, such as knots, splits, or insect damage. Defective portions should be removed or avoided during the cutting process. Third, the lumber should be planed and sanded to achieve a smooth, consistent surface. Planing ensures that the wood is uniformly thick, while sanding removes any imperfections and prepares the surface for staining or painting.
Beyond the primary shelf material, consider the mounting hardware and any decorative elements. Strong brackets are essential for supporting the weight of the shelf and its contents. The type of bracket will depend on the construction of the wall and the desired aesthetic. Hidden brackets offer a clean, minimalist look, while decorative brackets can add a touch of elegance or rustic charm. Screws or lag bolts used for mounting should be appropriately sized and rated for the weight they will be supporting. Decorative elements, such as corbels, mouldings, or trim, can be added to enhance the visual appeal of the mantel shelf. These elements can be purchased pre-made or custom-fabricated to suit the specific design.
Construction Techniques and Installation
The construction process involves precise cutting, assembly, and secure installation of the mantel shelf. Accuracy and attention to detail are crucial at each stage to ensure a professional-looking and structurally sound final product.
Accurate measurements are the foundation of any successful woodworking project. Use a high-quality measuring tape and double-check all dimensions before making any cuts. A miter saw is ideal for making precise angled cuts, while a circular saw or table saw can be used for straight cuts. For intricate shapes or curves, a jigsaw may be necessary. When cutting the lumber, always err on the side of caution by cutting slightly larger than the final dimensions. This allows for fine-tuning and adjustments during the assembly process.
Once the lumber is cut to size, the assembly process can begin. This typically involves joining multiple pieces of wood together to create the desired shape and thickness of the mantel shelf. Several joining techniques can be employed, including using wood glue and screws, pocket screws, or dowels. Wood glue provides a strong and durable bond, while screws or dowels provide additional mechanical strength. Pocket screws are particularly useful for creating hidden joints that are both strong and aesthetically pleasing. Clamps should be used to hold the pieces together while the glue dries to ensure a tight and secure bond.
The method of installation will depend on the type of wall construction and the weight of the mantel shelf. For brick or masonry walls, masonry anchors or lag bolts should be used to secure the shelf to the wall. For drywall walls, it is crucial to locate the wall studs and attach the mounting brackets directly to them. If studs are not conveniently located, toggle bolts or other heavy-duty drywall anchors can be used, but these should be used cautiously, especially with heavier shelves. Ensure the brackets are level before securing them to the wall. Using a level and a stud finder are critical for accurate installation. After the brackets are installed, the mantel shelf can be placed on the brackets and secured with screws or bolts. Consider using shims if needed to achieve a perfectly level installation.
Finally, after installation, inspect the mantel shelf for any gaps or imperfections. Fill any gaps with wood filler and sand smooth. Ensure all screws or bolts are tightened securely. Check the levelness of the shelf and make any necessary adjustments. With the mantel shelf properly installed, consider adding a bead of caulk along the top edge where it meets the wall to prevent dust and debris from accumulating.

I Love How This Simple Diy Mantel Changes The Fireplace Find Out To Build A Or F Shelves

Diy Floating Mantel Shelf

Easy Diy Wood Mantel Remington Avenue

How To Build A Simple Mantel Maison De Pax

How To Build A Diy Mantel Shelf Simply Home

Diy Rustic Fireplace Mantel The Cure For A Boring

How To Turn A Bookshelf Into Faux Fireplace Mantle Miss Mustard Seed S Milk Paint

Building Our Fireplace The Diy Mantel House Mommy

How To Make A Diy Fireplace Mantel The Idea Room

Easy Fireplace Mantel Diy
Related Posts