DIY Fireplace Hearth: A Comprehensive Guide
A fireplace hearth is a non-combustible area extending outwards from the fireplace opening. Its primary function is to protect the surrounding flooring from sparks, embers, and radiant heat produced by the fire. Beyond its practical role, the hearth also contributes significantly to the aesthetic appeal of the fireplace and the room it occupies. Constructing a fireplace hearth can be a rewarding DIY project, offering customization options and cost savings compared to professional installation. This article provides a comprehensive guide to building a fireplace hearth, outlining key considerations, materials, and steps involved.
Understanding Building Codes and Safety Regulations
Before embarking on a DIY fireplace hearth project, a thorough understanding of local building codes and safety regulations is paramount. These codes often specify minimum size requirements for the hearth based on the fireplace opening size. For example, many codes stipulate that the hearth must extend at least 16 inches in front of the fireplace opening and 8 inches on either side. Furthermore, the materials used must be non-combustible, such as brick, stone, tile, or concrete. Contacting the local building department is advisable to obtain the most up-to-date and accurate information specific to the region. Ignoring these regulations can result in code violations, safety hazards, and costly rework.
The type of fireplace also influences the hearth requirements. Wood-burning fireplaces typically have stricter regulations than gas fireplaces due to the higher risk of sparks and embers. Understanding the fuel type and the fireplace's operational characteristics is crucial for ensuring the hearth complies with safety standards. Additionally, clearances to combustible materials surrounding the fireplace must be carefully considered. These clearances dictate the minimum distance between the fireplace and any flammable materials, such as wood framing, walls, or furniture. Maintaining adequate clearances is essential to prevent fires and ensure the safe operation of the fireplace.
Material Selection and Preparation
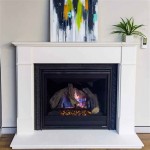
The choice of materials for a fireplace hearth significantly impacts its appearance, durability, and cost. Brick is a classic and durable option, offering a traditional aesthetic. Stone provides a natural and rustic look, with a wide variety of colors and textures available. Tile offers versatility in design, with options ranging from simple ceramic tiles to intricate mosaic patterns. Concrete is a modern and cost-effective choice, allowing for custom shapes and finishes.
When selecting materials, consider the overall style of the room and the existing fireplace surround. The hearth should complement the surrounding decor and create a cohesive look. Also, consider the material's heat resistance and durability. Stone and brick are generally more heat-resistant than tile, while concrete can be sealed to enhance its durability and resistance to staining.
Proper preparation is essential for a successful hearth installation. This involves ensuring a level and stable subfloor. If the existing subfloor is uneven or structurally unsound, it may need to be reinforced or replaced. A layer of cement board or a similar non-combustible material should be installed over the subfloor to provide a solid and fire-resistant base for the hearth. This layer also helps to distribute the weight of the hearth materials evenly and prevent cracking.
Installation Techniques and Best Practices
The installation process varies depending on the chosen materials and design. For brick, stone, and tile hearths, a layer of mortar is typically used to adhere the materials to the cement board. It is important to use a mortar specifically designed for high-temperature applications. The mortar should be mixed according to the manufacturer's instructions and applied evenly to the back of each brick, stone, or tile. Spacers can be used to maintain consistent spacing between the materials.
For concrete hearths, the concrete can be poured in place or pre-cast into sections. If pouring in place, a form must be constructed to contain the concrete while it cures. Rebar or wire mesh can be added to the concrete to provide additional strength and prevent cracking. The concrete should be allowed to cure completely before removing the forms.
Grouting is an essential step in sealing the gaps between bricks, stones, or tiles. The grout should be applied evenly and allowed to dry before cleaning off any excess. Sealing the hearth with a suitable sealant is recommended to protect it from moisture and stains. The sealant should be applied according to the manufacturer's instructions and allowed to dry completely before using the fireplace.
Throughout the installation process, maintaining accurate measurements and alignment is critical. Using a level and a square ensures that the hearth is even and square with the fireplace opening. Regularly checking the progress and making adjustments as needed helps to prevent errors and ensure a professional-looking result. Safety precautions, such as wearing safety glasses and gloves, should be observed throughout the project.

How To Build A Diy Built In Fireplace With An Electric Insert The Creative Mom

Is Your Fireplace Dated And In Need Of A Refresh Check Out This Makeover The Before Aft Diy Build Home

Diy Fireplace Makeover At Home With The Barkers

How To Build A Diy Stone Fireplace Boxwood Design Co

Diy Fireplace Hearth Stencil Makeover Under 100 Michaela Noelle Designs

Updating Fireplace Hearth No Demolition Required Single Girl S Diy

Diy Rustic Fireplace Mantel The Cure For A Boring

Diy Fireplace Mantel And Surround Jenna Kate At Home

How To Build A Raised Fireplace Hearth Design Remodel Diy

Diy Fireplace Mantel Designatedspacedesign Com
Related Posts