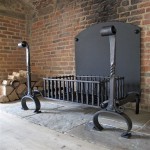
DIY Fireplace Grate: Enhance Your Fireplace Experience
A fireplace grate is an essential component for any fireplace, as it plays a crucial role in optimizing fire safety, efficiency, and aesthetic appeal. It provides a sturdy platform for the firewood, ensuring proper airflow and combustion, while elevating the burning embers above the hearth for greater heat distribution and a more visually pleasing fire. While premade grates are readily available, crafting your own DIY fireplace grate offers a fulfilling project and allows for customization to perfectly suit your fireplace's dimensions and design preferences.
Benefits of a Fireplace Grate
Fireplace grates offer numerous advantages that enhance the fireplace experience. Here are some key benefits: *
Improved Combustion and Efficiency:
A grate elevates the firewood above the hearth, allowing for greater airflow around the burning embers. This increased oxygen flow promotes more efficient combustion, resulting in a hotter fire with less smoke and a greater heat output. *Enhanced Safety:
By elevating the firewood, a grate prevents direct contact between the burning embers and the hearth floor, minimizing the risk of heat damage or accidental ignition. This elevated position also makes it easier to manage and control the fire. *Aesthetic Appeal:
Fireplace grates add a decorative element to the fireplace, enhancing its visual appeal. They come in various sizes, shapes, and materials, allowing you to choose a grate that complements your fireplace's style and adds a touch of elegance to your living space. *Easier Cleaning:
With the embers elevated, cleaning the hearth becomes significantly easier. Ash and debris can be conveniently swept away, eliminating the need for laborious manual removal.DIY Fireplace Grate Materials and Tools
Before embarking on your DIY fireplace grate project, gather the necessary materials and tools. The following list provides a comprehensive overview: *
Metal:
Choose a durable metal such as steel, iron, or wrought iron. Steel is a popular choice for its strength and rust resistance, while wrought iron offers an elegant and rustic aesthetic. *Grating Material:
Select a suitable grating material for the grate's surface. Welded wire mesh, expanded metal, or even heavy-duty hardware cloth can serve as effective options. *Welding Equipment (Optional):
If using solid metal bars for the grate's frame, you'll need welding equipment, including a welding machine, welding rods, and safety gear. *Cutting Tools:
Use a metal-cutting saw, angle grinder, or shears to cut the metal components to size. *Measuring Tools:
Precise measurements are crucial for a well-constructed grate. Utilize a tape measure, ruler, and a protractor for accuracy. *Drilling Tools:
A drill with appropriate bits for drilling holes in metal will be needed for attaching the grating material to the frame. *Fasteners:
Choose sturdy fasteners such as bolts, nuts, and washers to secure the grate's components. *Safety Gear:
Always prioritize safety by wearing appropriate protective gear, including safety glasses, gloves, and a respirator when working with welding or cutting tools.Step-by-Step Guide for DIY Fireplace Grate
Follow these detailed instructions to craft your DIY fireplace grate: 1.
Measure and Design:
Accurately measure the dimensions of your fireplace opening and determine the size of the grate. Consider the width, depth, and height of the opening to ensure a snug fit. Sketch a design for the grate, including the frame, supports, and grating material. 2.Cut and Shape:
Cut the metal bars, rods, or plates to the desired lengths and shapes for the frame and supports. Use a metal-cutting saw, angle grinder, or shears for precision. 3.Assemble the Frame:
If using welding, carefully weld the metal components together to create the frame. Alternatively, use bolts and nuts to create a sturdy frame. 4.Attach the Grating:
Secure the grating material to the frame using welding, drilling, or fastening with screws and nuts. Ensure that the grating is evenly spaced and securely attached. 5.Finishing Touches:
Clean the finished grate to remove any welding slag or debris. Consider applying a protective coating such as paint or a rust-resistant sealant to enhance durability and prevent corrosion. 6.Install the Grate:
Carefully insert the completed fireplace grate into your fireplace opening, ensuring it fits snugly and sits level. 7.Testing and Adjustments:
Before using the new grate, conduct a test burn to ensure it functions properly and safely. Make any necessary adjustments to the grate's position or the intensity of the fire for optimal performance.
Diy Fire Place Grate Made Of Rebar Metal Working Welding

Vertical Fireplace Grates Grate Wall Of Fire Fronts Inserts

15 Diy Fireplace Grate

Keep Your Fire In The Right Place This Winter S Best Fireplace Grates

Grate For Outdoor Fireplace Cooking Diy Kitchen Design

How To Make A Fireplace More Efficient Gratewalloffire Com Efficiency Grate Technical Information

18 23 Railroad Spike Fireplace Grate

How To Make A Fireplace More Efficient Gratewalloffire Com Efficiency Grate Technical Information

Pin By Guillermo Adolfo Otero Salazar On Fireplaces Fireplace Heat Blower Grate

15 Diy Fireplace Grate
Related Posts

