DIY Electric Fireplace Surround Plans: A Comprehensive Guide
An electric fireplace surround serves as both an aesthetic enhancement and a functional element within a living space. Building one, instead of purchasing a prefabricated model, presents opportunities for customization, cost savings, and a satisfying sense of accomplishment. This article details vital aspects of DIY electric fireplace surround plans, addressing planning considerations, material selection, construction techniques, and finishing touches.
Before embarking on the build, it is crucial to have a clear understanding of the project scope. This involves determining the intended location of the fireplace, taking precise measurements, and developing a detailed plan outlining the design, materials, and construction steps. A well-defined plan minimizes errors, reduces material waste, and ensures a smoother building process.
Key Planning and Design Considerations
The initial phase of any DIY project involves thorough planning. Several factors must be taken into account to ensure the final product meets both aesthetic preferences and functional requirements. These include the dimensions of the electric fireplace insert, the overall size and style of the surround, and the integration of the surround with the existing décor.
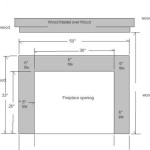
The dimensions of the electric fireplace insert are paramount. Accurate measurements of the height, width, and depth are essential for creating a snug and secure housing. It is advisable to consult the manufacturer's specifications for precise dimensions and any clearance requirements. Allowing for adequate ventilation is also crucial to prevent overheating and ensure the safe operation of the fireplace.
The size and style of the surround should complement the room's existing décor. Consider the room's architectural style, color palette, and furniture. A modern room might benefit from a sleek, minimalist surround, while a more traditional room might call for a surround with ornate detailing. The overall size of the surround should be proportionate to the room and the fireplace insert. A surround that is too large can overwhelm the space, while one that is too small can appear insignificant.
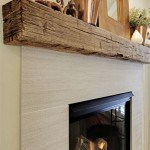
The design of the surround should consider factors such as storage, shelving, and decorative elements. Integrating shelving for books or decorative items can add functionality and visual interest. Adding a mantel provides a surface for displaying photographs or other cherished objects. Consider also the ease of access to electrical outlets and the routing of any necessary wiring.
Finally, ensure that the designed surround complies with any local building codes or regulations. This may involve obtaining permits or adhering to specific fire safety standards. Failure to comply with building codes can result in fines or the need to dismantle the structure.
With a solid plan in place, the next step involves selecting the appropriate materials. The choice of materials will influence the appearance, durability, and cost of the surround. Common materials include wood, MDF (Medium-Density Fiberboard), and stone veneer.
Wood offers a classic and versatile option. Different types of wood, such as pine, oak, and maple, offer varying degrees of durability and grain patterns. Wood can be stained, painted, or varnished to achieve the desired finish. However, wood can be susceptible to moisture damage, especially in humid environments. It's also often the most expensive option compared to the other available materials.
MDF is a more affordable alternative to solid wood. It is a composite material made from wood fibers and resin. MDF is smooth, uniform, and easy to work with. It is also less prone to warping or cracking than solid wood. However, MDF is not as durable as solid wood and can be damaged by water. It is best suited for painting rather than staining.
Stone veneer offers the look of real stone without the weight and cost. It is available in a variety of styles and colors. Stone veneer can add a rustic or elegant touch to the surround. However, it requires specialized adhesive and cutting tools. Applying stone veneer is also a more labor-intensive process than working with wood or MDF.
The selection of fasteners is also important. Screws, nails, and adhesives should be appropriate for the chosen materials. Consider the load-bearing requirements of the surround and choose fasteners that are strong enough to support the weight. High-quality wood glue is essential for creating strong and durable joints.
Construction Techniques and Assembly
With the plan finalized and materials acquired, the construction phase begins. This involves cutting the materials to size, assembling the various components, and ensuring structural integrity. Precision and attention to detail are crucial for achieving a professional-looking result.
Accurate cutting is essential for a well-fitting surround. Use a table saw, circular saw, or miter saw to cut the materials to the dimensions specified in the plan. Ensure that the cuts are straight and square. A speed square or combination square can be used to verify the accuracy of the cuts.
Assembly typically involves joining the various pieces of the surround together using screws, nails, and glue. Start by assembling the frame of the surround. Use wood glue and screws to create strong and durable joints. Clamp the pieces together while the glue dries. A pneumatic nail gun can speed up the assembly process, but it is important to use the correct nail size and pressure setting to avoid splitting the wood.
When attaching the facing or decorative elements, use construction adhesive or finishing nails. Ensure that the facing is flush with the frame. Use shims to level the facing if necessary. Apply wood filler to any gaps or imperfections. Sand the filler smooth before applying the finish.
During assembly, regularly check for squareness and alignment. Use a level and a square to ensure that the surround is plumb and level. Adjust the components as needed to ensure that the finished product is structurally sound and visually appealing.
If the design incorporates storage or shelving, install the shelves and doors or drawers after the frame is assembled. Use shelf supports or brackets to support the weight of the shelves. Install hinges and latches for the doors or drawers. Ensure that the doors and drawers operate smoothly.
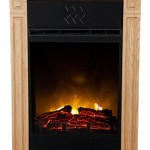
Pay particular attention to the installation of the electric fireplace insert. Ensure that the insert fits snugly within the surround. Follow the manufacturer's instructions for installation and wiring. Provide adequate ventilation to prevent overheating. Test the fireplace to ensure that it is operating properly.
After the surround is assembled, the final step is to apply the finishing touches. This involves sanding, priming, painting, staining, or applying stone veneer. The finish should complement the room's décor and protect the surround from damage.
Sanding is crucial for creating a smooth and even surface for the finish. Use progressively finer grits of sandpaper to remove any imperfections. Start with a coarse grit sandpaper (e.g., 80-grit) and gradually work your way up to a fine grit sandpaper (e.g., 220-grit). Sand with the grain of the wood.
Priming is essential for preparing the surface for paint or stain. Primer seals the wood and provides a uniform surface for the finish. Use a high-quality primer that is compatible with the chosen finish. Apply the primer evenly and allow it to dry completely before applying the finish.
Final Steps: Finishing and Installation
The selection of paint or stain will depend on the desired aesthetic. Paint offers a wide range of colors and finishes. Stain allows the natural grain of the wood to show through. Choose a paint or stain that is durable and easy to clean. Apply the finish in thin, even coats. Allow each coat to dry completely before applying the next coat.
If applying stone veneer, use a specialized adhesive that is designed for stone veneer. Apply the adhesive to the back of the stone veneer and press it firmly onto the surround. Use spacers to maintain consistent spacing between the stones. Allow the adhesive to dry completely before grouting the joints.
Grouting is the process of filling the gaps between the stones with grout. Use a grout that is compatible with the stone veneer. Apply the grout evenly and wipe away any excess grout with a damp sponge. Allow the grout to dry completely before sealing it.
Sealing protects the finish from damage and makes it easier to clean. Use a sealant that is compatible with the chosen finish. Apply the sealant evenly and allow it to dry completely. Reapply the sealant periodically to maintain its effectiveness.
Once the finish is complete, install the surround in its final location. Ensure that the surround is securely attached to the wall. Use anchors or screws to secure the surround to the studs in the wall. Conceal any wiring or cables behind the surround. Add any decorative touches, such as a mantel or shelving.
The successful completion of a DIY electric fireplace surround project depends on careful planning, accurate execution, and attention to detail. By following these guidelines, individuals can create a beautiful and functional addition to their home that reflects their personal style and enhances their living space. Remember to always prioritize safety and consult with professionals when necessary.

How To Build A Diy Built In Fireplace With An Electric Insert The Creative Mom

Diy Fireplace With Electric Insert Angela Marie Made

Diy Fireplace With Electric Insert Angela Marie Made

Diy Electric Fireplace Build

Diy Electric Fireplace Jenna Sue Design

Diy Fireplace Mantel And Surround Jenna Kate At Home

How To Build A Diy Stone Fireplace Boxwood Design Co

How To Diy Built In Electric Fireplace Jenna Sue Design

How To Build A Diy Fireplace Surround For Your Electric Insert Hand Treated Home

How To Diy Built In Electric Fireplace Jenna Sue Design
Related Posts