DIY Electric Fireplace Surround Ideas to Enhance Your Home
Electric fireplaces offer a convenient and cost-effective alternative to traditional wood-burning fireplaces, providing warmth and ambiance without the need for chimney maintenance or wood storage. A well-designed surround can significantly enhance the aesthetic appeal of an electric fireplace, transforming it from a functional appliance into a focal point within a room. This article explores various DIY electric fireplace surround ideas, offering guidance on materials, design considerations, and construction techniques.
Understanding Electric Fireplace Surround Requirements
Before embarking on a DIY electric fireplace surround project, it is crucial to understand the specific requirements of the electric fireplace unit. These units generate heat, and the surround must be constructed of materials that can withstand elevated temperatures without warping, cracking, or posing a fire hazard. Consult the manufacturer's specifications for the minimum clearance requirements between the fireplace unit and the surround materials. These instructions typically outline the permissible materials and the necessary spacing for safe operation.
Common materials for electric fireplace surrounds include wood, stone veneer, tile, and metal. Wood, being a relatively inexpensive and easily workable material, is a popular choice. However, it must be properly treated with a fire-resistant coating. Stone veneer offers a more rustic and durable option, while tile provides a sleek and modern aesthetic. Metal surrounds, often constructed from steel or aluminum, are known for their durability and heat resistance, but require specialized tools and welding skills.
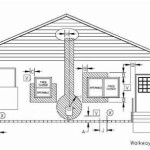
Beyond material selection, consider the overall dimensions of the electric fireplace and the surrounding space. The surround should be appropriately sized, not overwhelming the room nor appearing too small relative to the fireplace. Measure the fireplace unit accurately and account for any necessary clearances when planning the surround's dimensions. The design should also complement the existing architectural style and décor of the room, ensuring a cohesive and visually appealing result.
DIY Surround Design Ideas and Material Options
The design possibilities for electric fireplace surrounds are virtually limitless, ranging from simple and minimalist designs to elaborate and ornate creations. The choice of design will depend on personal preferences, the existing architectural style of the room, and the budget allocated for the project.
Simple Wooden Surround: A straightforward wooden surround is an excellent option for those seeking a clean and understated look. This design typically involves constructing a frame from lumber, such as pine or poplar, and cladding it with decorative trim or paneling. The wood can be stained or painted to match the existing décor. A mantelpiece can be added for displaying decorative items. This is a relatively beginner-friendly project, requiring basic woodworking skills and tools.
Stone Veneer Surround: For a more rustic and substantial look, consider using stone veneer. Stone veneer is a lightweight alternative to natural stone, making it easier to install. It comes in a variety of colors, textures, and styles, allowing for customization to suit different tastes. The installation process typically involves adhering the stone veneer to a backer board, such as cement board, using mortar. Grouting is then applied to fill the gaps between the stones, creating a realistic stone appearance. This project requires some experience with masonry techniques.
Tile Surround: A tile surround offers a sleek and modern aesthetic, and is particularly well-suited for contemporary interiors. Various types of tile can be used, including ceramic, porcelain, glass, and mosaic tile. The choice of tile will depend on the desired look and the budget. Tile is typically installed using thin-set mortar and grout. This project requires precision and attention to detail to ensure a smooth and even surface.
Reclaimed Wood Surround: Using reclaimed wood adds character and a touch of history to an electric fireplace surround. Reclaimed wood can be sourced from old barns, fences, or demolition sites. It often features unique textures, colors, and imperfections that add to its appeal. Before using reclaimed wood, it is essential to thoroughly clean and inspect it for any signs of pests or rot. The wood can be sanded and sealed to protect it from moisture and wear. This project requires careful planning and preparation, as reclaimed wood can be more challenging to work with than new lumber.
Combined Material Surround: Blending different materials can create a visually interesting and unique surround. For example, a wooden frame can be combined with a stone veneer or tile inlay. This approach allows for customization and the creation of a distinctive focal point. The key to a successful combined material surround is to carefully consider the proportions and textures of the different materials, ensuring they complement each other harmoniously.
Step-by-Step Construction Guide: Building a Simple Wooden Surround
Constructing a simple wooden surround is a manageable DIY project for those with basic woodworking skills. The following is a step-by-step guide to building a basic wooden surround. Always consult the electric fireplace manufacturer's instructions for specific clearance requirements and safety precautions before beginning any construction.
Step 1: Planning and Design: Begin by sketching out the desired design for the surround. Determine the overall dimensions, including the height, width, and depth. Account for the dimensions of the electric fireplace unit and the required clearances. Create a detailed materials list, including lumber, fasteners, and finishing materials.
Step 2: Cutting the Lumber: Using a circular saw or miter saw, cut the lumber to the required dimensions. Ensure accurate cuts for a clean and professional-looking finished product. Label each piece of lumber to avoid confusion during assembly.
Step 3: Assembling the Frame: Assemble the frame of the surround using screws or nails. Ensure the corners are square and the frame is sturdy. Use wood glue in addition to fasteners for added strength.
Step 4: Adding the Facing: Attach the facing material to the frame. This could be paneling, trim, or decorative boards. Secure the facing material with nails or screws. Ensure the facing material is flush with the frame and that there are no gaps or overlaps.
Step 5: Installing the Mantelpiece (Optional): If desired, add a mantelpiece to the surround. The mantelpiece can be constructed from a single piece of lumber or assembled from multiple pieces. Secure the mantelpiece to the frame with screws or nails.
Step 6: Sanding and Finishing: Sand the entire surround to create a smooth surface. Remove any dust or debris with a tack cloth. Apply a primer to the wood surface, followed by paint or stain. Apply multiple coats of finish for added durability and protection. Be sure to use fire-resistant paint or stain, especially on surfaces close to the electric fireplace unit.
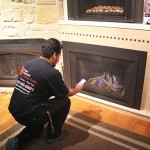
Step 7: Installing the Fireplace Unit: Carefully install the electric fireplace unit into the surround. Ensure the unit is securely in place and that all clearances are met. Connect the unit to a power source and test its functionality.
Step 8: Adding Decorative Accents: Add decorative accents, such as molding, trim, or other embellishments, to enhance the appearance of the surround. Consider adding a decorative fire screen or grate to further enhance the fireplace aesthetic.
Safety Considerations for Electric Fireplace Surrounds
Safety is paramount when constructing an electric fireplace surround. Adhering to the manufacturer's specifications for the electric fireplace unit is essential to prevent fire hazards and ensure safe operation. The following safety considerations should be carefully observed:
Clearance Requirements: Maintain the minimum clearance requirements between the electric fireplace unit and the surround materials. These clearances are specified by the manufacturer and are designed to prevent overheating and potential fire hazards. Do not obstruct the vents on the fireplace unit, as this can impede airflow and cause the unit to overheat.
Fire-Resistant Materials: Use fire-resistant materials, such as fire-resistant paints and stains, especially on surfaces that are close to the electric fireplace unit. These materials are designed to resist ignition and slow the spread of fire.
Electrical Safety: Ensure the electric fireplace unit is properly grounded and connected to a dedicated electrical circuit. Do not overload the circuit with other appliances. If unsure about electrical wiring, consult a qualified electrician.
Ventilation: Provide adequate ventilation around the electric fireplace unit. Do not enclose the unit in a tightly sealed space, as this can cause it to overheat. Ensure there is sufficient airflow to dissipate heat.
Regular Maintenance: Regularly inspect the electric fireplace unit and surround for any signs of damage or wear. Repair any damage promptly to prevent potential hazards. Clean the unit and surround regularly to remove dust and debris.

How To Build A Diy Built In Fireplace With An Electric Insert The Creative Mom

Diy Electric Fireplace Jenna Sue Design

6 Electric Fireplace Diys You Ll Want To Recreate Asap Heat Glo

Diy Fireplace With Electric Insert Angela Marie Made

Diy Fireplace With Electric Insert Angela Marie Made

Diy Electric Fireplace Full Hearted Home

Diy Shiplap Electric Fireplace Build With Mantel Healthy Grocery Girl

6 Electric Fireplace Diys You Ll Want To Recreate Asap Heat Glo

Diy Electric Fireplace Jenna Sue Design

19 Amazing Diy Fireplace Mantel Ideas To Inspire You Home Mantle Decor
Related Posts