DIY Cast Stone Fireplace Surround Kits: Elevating Your Hearth
The fireplace serves as a focal point in many homes, offering warmth, ambiance, and a sense of gathering. While the fire itself provides the function, the surrounding structure, especially the fireplace surround, drastically influences the aesthetic. For homeowners seeking to upgrade their fireplace without the extensive cost and complexity of a custom installation, DIY cast stone fireplace surround kits present a compelling alternative. These kits offer a blend of affordability, customization potential, and manageability for the average homeowner with some basic construction skills.
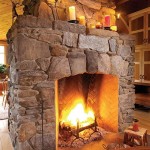
Cast stone, an architectural precast concrete manufactured to simulate natural cut stone, provides the desired aesthetic quality without the high price tag associated with quarried stone. The material is durable, fire-resistant, and can be molded into a variety of shapes and textures, making it well-suited for fireplace surrounds. DIY kits leverage the benefits of cast stone by providing pre-designed, pre-cut, and often pre-finished components that can be assembled on-site, transforming a plain or outdated fireplace into a stunning architectural feature.
Understanding the Components of a DIY Cast Stone Fireplace Surround Kit
A typical DIY cast stone fireplace surround kit generally includes several key components, each playing a critical role in the overall design and structural integrity of the installation. Familiarizing oneself with these components is essential before embarking on the project.
The primary components usually include the legs or pilasters, which form the vertical supports on either side of the firebox opening. These legs provide structural support and contribute significantly to the visual style of the surround. The header or mantel shelf, which sits atop the legs, spans the width of the firebox and often serves as a decorative element or a platform for displaying ornaments. The inner surround, also known as the facing, frames the firebox opening and provides a transition between the firebox and the outer surround. This section might consist of multiple pieces to achieve a desired pattern or texture.
Some kits might also include additional decorative elements, such as keystones, corbels, or intricate moldings, to enhance the overall aesthetic. These elements offer opportunities for customization and personalization, allowing homeowners to tailor the surround to their specific tastes.
Beyond the visible architectural components, the kit should also include necessary hardware, such as adhesive, shims, and potentially anchoring screws or brackets. The instructions provided with the kit are paramount, detailing the precise steps required for proper assembly and installation. A comprehensive understanding of these components and the accompanying instructions is crucial for a successful DIY project.
Selecting the Right Kit: Considerations for Style, Size, and Installation
Choosing the appropriate DIY cast stone fireplace surround kit involves careful consideration of several factors, including the architectural style of the home, the dimensions of the existing fireplace opening, and the level of installation skill possessed by the homeowner. A mismatch in any of these areas can lead to unsatisfactory results or installation complications.
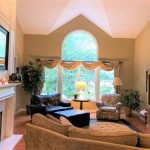
Style compatibility is paramount. The fireplace surround should complement the existing architectural style of the room. Traditional homes might benefit from surrounds with ornate detailing, classical columns, and intricate moldings. Modern homes, on the other hand, might be better suited to minimalist designs with clean lines and a focus on geometric shapes. A wide range of styles are available, from rustic and farmhouse-inspired designs to sleek and contemporary options, ensuring that homeowners can find a kit that aligns with their aesthetic preferences.
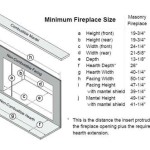
Accurate measurements are equally critical. Before purchasing a kit, the homeowner must carefully measure the dimensions of the existing fireplace opening, including the width, height, and depth. The kit should be sized appropriately to ensure a proper fit, avoiding unsightly gaps or an overwhelming scale that clashes with the surrounding space. It is generally recommended to choose a kit that allows for slight adjustments during installation to accommodate minor variations in the existing structure.
The complexity of the installation process should also be considered. Some kits are designed for relatively straightforward assembly, requiring only basic tools and minimal experience. Others might involve more intricate steps, such as cutting or modifying components, which necessitates more advanced skills and specialized equipment. Honest self-assessment of one's DIY abilities is essential to avoid frustration and potential installation errors. If the installation appears too challenging, it's prudent to consider hiring a professional installer.
Finally, considering the firebox type is crucial. Gas, electric, and wood-burning fireplaces have different clearance requirements from combustible materials. Ensure the cast stone surround complies with local building codes and manufacturer specifications for the specific type of fireplace. Failure to do so could pose a fire hazard.
Step-by-Step Guide to Installing a DIY Cast Stone Fireplace Surround Kit
While specific instructions vary depending on the kit and manufacturer, the following general steps outline the typical process for installing a DIY cast stone fireplace surround. It is imperative to consult and diligently follow the instructions provided with the specific kit for optimal results and safety.
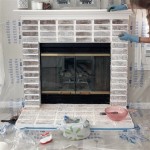
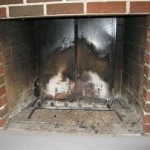
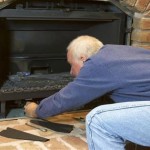
The first step involves preparing the existing fireplace area. This might entail removing an old surround, cleaning the surface, and ensuring it is level and structurally sound. Any necessary repairs to the existing firebox or chimney should be addressed before proceeding.
Next, dry-fit all the components of the kit. This step involves assembling the surround without adhesive to verify the fit, identify any potential issues, and familiarize oneself with the assembly process. This allows for adjustments to be made easily before the adhesive is applied.
Begin applying adhesive to the backs of the cast stone components. Use a high-quality construction adhesive specifically designed for masonry or stone. Apply the adhesive in a consistent bead or pattern, ensuring adequate coverage for a secure bond. Following the manufacturer's recommendations for adhesive application is critical.
Carefully position and attach the first component, typically the legs or pilasters. Use shims to level and align the components, ensuring they are plumb and square. Allow the adhesive to cure according to the manufacturer's instructions before proceeding to the next step. This often involves applying pressure or bracing the components in place while the adhesive sets.
Once the legs are securely in place, attach the header or mantel shelf. Again, apply adhesive to the back of the header and carefully position it on top of the legs. Verify that it is level and aligned with the legs. Secure the header with shims or temporary supports if necessary, and allow the adhesive to cure.
Install the inner surround or facing pieces, following the same procedure of applying adhesive, positioning the components, and ensuring proper alignment. Pay close attention to any joints or seams, ensuring they are tight and flush. If required by the kit design, install any additional decorative elements, such as keystones or corbels, using adhesive or screws.
After all the components are installed and the adhesive is fully cured, remove any shims or temporary supports. Clean any excess adhesive from the surface of the surround using a damp cloth or sponge. Inspect the installation for any imperfections or gaps, and address them as needed. Some kits may include grout or caulk to fill any seams or cracks.
Finally, allow the installation to fully cure and set before using the fireplace. Consult the adhesive manufacturer's instructions for the recommended curing time. During this period, avoid placing any weight or stress on the surround. Once fully cured, the DIY cast stone fireplace surround should provide years of beauty and enjoyment.
Beyond the visual appeal and structural considerations, selecting a DIY cast stone fireplace surround kit also involves practical factors. The weight of the individual components must be manageable for the homeowner or helpers involved in the installation. Lifting and maneuvering heavy stone pieces can present a significant challenge and potential safety hazard. Consider the availability of assistance and the need for specialized lifting equipment if the components are particularly heavy.
Furthermore, the ease of cleaning and maintenance should be taken into account. Cast stone, while durable, can be susceptible to staining or damage from certain cleaning agents. Choose a kit with a finish that is easy to clean and resistant to common household spills. Regularly dusting and cleaning the surround will help maintain its appearance and longevity.

Diy Faux Cast Stone Fireplace Part 2 Building The Mantel Top Shelf

Diy Faux Cast Stone Fireplace Part 1 Demo And Tiling The Hearth Top Shelf

Diy Faux Plaster Fireplace Surround Chelsey Freng

Diy Faux Plaster Fireplace Surround Chelsey Freng

Diy Faux Cast Stone Fireplace Part 1 Demo And Tiling The Hearth Top Shelf

Diy Fireplace Mantel Surround Faux Cast Stone European Style Tidbits

Diy Faux Cast Stone Fireplace Part 1 Demo And Tiling The Hearth Top Shelf

Diy Fireplace Mantel Surround Faux Cast Stone European Style Tidbits

Diy Faux Cast Stone Fireplace Part 3 Mounting Our Tv Top Shelf

Cast Stone Fireplaces So Much Better With Age
Related Posts