DIY Cast Stone Fireplace Surround Ideas: A Comprehensive Guide
Cast stone fireplace surrounds offer a sophisticated and timeless aesthetic to any living space. They provide a focal point, enhancing the architectural character of a room. While professionally installed cast stone surrounds can be costly, a do-it-yourself approach can be a significantly more budget-friendly option, allowing homeowners to customize the design and achieve a desired look without incurring substantial expenses. This article explores various DIY cast stone fireplace surround ideas, providing detailed information on materials, techniques, and design considerations.
The term "cast stone" refers to a manufactured product that simulates natural stone. It is typically made from a mixture of cement, aggregates (such as sand or crushed stone), and pigments. The mixture is then molded into a desired shape and allowed to cure, resulting in a durable and aesthetically pleasing material. Cast stone offers several advantages over natural stone, including lower cost, greater design flexibility, and consistency in color and texture.
Before embarking on a DIY cast stone fireplace surround project, it is crucial to thoroughly plan the design and gather the necessary materials. The design should complement the architectural style of the room and the existing fireplace. Accurate measurements are essential to ensure a proper fit. The selection of materials, including cement, aggregates, pigments, and molds, will significantly impact the final appearance and durability of the surround.
Planning and Design Considerations
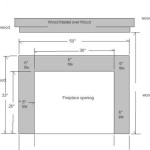
The initial phase of any DIY project involves meticulous planning. For a cast stone fireplace surround, this includes determining the surround's dimensions, style, and complexity. Consider the existing fireplace opening and the overall proportions of the room. A surround that is too large or too small can look disproportionate and detract from the room's aesthetics.
Several design styles are suitable for cast stone fireplace surrounds, ranging from traditional to contemporary. Traditional designs often feature intricate moldings, corbels, and keystones, creating a classic and elegant look. Contemporary designs, on the other hand, tend to be simpler and more minimalist, emphasizing clean lines and geometric shapes. Choosing a style that complements the existing décor and architectural style is paramount.
Creating detailed drawings or sketches of the proposed surround is highly recommended. These drawings should include accurate measurements and specifications for each component. This visual representation serves as a blueprint throughout the project, ensuring that all elements fit together correctly.
Another critical aspect of the planning phase is considering local building codes and regulations. Fireplace surrounds must adhere to specific safety standards to prevent fire hazards. This may involve obtaining permits and ensuring that the surround meets minimum clearance requirements from combustible materials. Consulting with a local building inspector can help ensure compliance with all applicable regulations.
The selection of aggregates significantly impacts the texture and appearance of the cast stone. Different types of sand, gravel, or crushed stone can be used to achieve various effects. Finer aggregates create a smoother surface, while coarser aggregates result in a more textured finish. Pigments are added to the cement mixture to achieve the desired color. A wide range of pigments are available, allowing for customization to match existing décor or create a unique look.
Molding and Casting Techniques
Once the design is finalized and the materials are gathered, the next step is to create the molds. Molds can be made from various materials, including wood, silicone, or fiberglass. Wood molds are relatively easy to construct for simple shapes but may not be suitable for intricate designs. Silicone molds offer greater flexibility and detail but can be more expensive to create. Fiberglass molds are durable and long-lasting, making them a good option for repetitive casting.
Before casting the stone, the molds must be properly prepared. This involves cleaning the molds thoroughly and applying a release agent to prevent the cast stone from sticking. Release agents can be purchased commercially or made from a mixture of petroleum jelly and mineral spirits. The release agent should be applied evenly to the entire surface of the mold.
The cement mixture should be prepared according to the manufacturer's instructions. This typically involves combining cement, aggregates, pigments, and water in a specific ratio. It is crucial to mix the ingredients thoroughly to ensure a consistent color and texture. The mixture should have a consistency similar to thick mortar.
Pour the cement mixture into the prepared molds, ensuring that all corners and crevices are filled. Use a trowel or other tool to compact the mixture and remove any air pockets. Air pockets can weaken the cast stone and create imperfections on the surface. Vibrate the mold slightly to help the mixture settle and release trapped air.
Allow the cast stone to cure in the molds for the recommended period, typically 24 to 48 hours. Curing time may vary depending on the type of cement used and the ambient temperature. Once the cast stone has cured sufficiently, carefully remove it from the molds. Avoid applying excessive force, as this can damage the stone.
After removing the cast stone from the molds, it may be necessary to perform some finishing work. This can include sanding or grinding the surface to remove any imperfections or create a smoother texture. A sealant can be applied to protect the cast stone from moisture and staining.
Installation and Finishing Touches
Preparing the fireplace opening is crucial before installing the cast stone surround. Ensure the existing surface is clean, level, and structurally sound. Remove any loose debris or old mortar. A thin layer of mortar or construction adhesive can be applied to the back of each cast stone component to help it adhere to the fireplace wall.
Begin installing the larger components first, such as the side panels and the header. Use shims to ensure that the components are level and plumb. Check the alignment frequently using a level and a plumb bob. Once the larger components are in place, install the smaller details, such as the corbels and keystones.
Apply mortar or grout to fill any gaps between the cast stone components. Use a sponge to wipe away any excess mortar or grout. Allow the mortar or grout to cure completely before applying any finishing touches.
After the mortar or grout has cured, inspect the surround for any imperfections or areas that need attention. Touch up any chips or cracks with a patching compound. Apply a sealant to protect the cast stone from moisture and staining. The sealant should be applied evenly to the entire surface of the surround.
Consider adding decorative elements to enhance the appearance of the cast stone surround. This can include painting, staining, or adding faux finishes to simulate the look of natural stone. Lighting can also be used to highlight the features of the surround and create a warm and inviting atmosphere.
Maintaining the cast stone fireplace surround is essential to preserve its appearance and longevity. Clean the surround regularly with a mild soap and water solution. Avoid using harsh chemicals or abrasive cleaners, as these can damage the surface of the stone. Reapply sealant periodically to protect the stone from moisture and staining. Promptly repair any chips or cracks to prevent further damage.
By following these detailed instructions and paying careful attention to detail, homeowners can successfully create a beautiful and durable DIY cast stone fireplace surround. The resulting surround will add value and enhance the aesthetic appeal of the home for years to come.

Diy Faux Cast Stone Fireplace Part 1 Demo And Tiling The Hearth Top Shelf

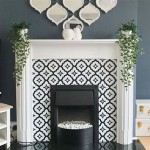
Diy Faux Plaster Fireplace Surround Chelsey Freng

Diy Faux Plaster Fireplace Surround Chelsey Freng

Diy Fireplace Mantel Surround Faux Cast Stone European Style Tidbits

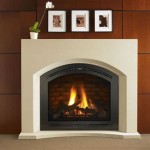
Cast Stone Fireplaces So Much Better With Age

Diy Faux Cast Stone Fireplace Part 2 Building The Mantel Top Shelf

Diy Fireplace Mantel Surround Faux Cast Stone European Style Tidbits

Diy Faux Cast Stone Fireplace Part 1 Demo And Tiling The Hearth Top Shelf

Faux Concrete Fireplace Surround And Mantel South House Designs

Diy Faux Plaster Fireplace Surround Chelsey Freng
Related Posts