Converting a Wood Fireplace to a Gas Insert: A Comprehensive Guide
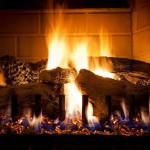
Wood-burning fireplaces, once a ubiquitous feature in homes, have gradually been superseded by more convenient and efficient heating alternatives. Gas inserts offer a compelling alternative, providing the aesthetics of a fire without the associated maintenance and environmental impact. Converting a wood-burning fireplace to a gas insert is a significant undertaking that requires careful planning and adherence to safety regulations. This article provides a detailed exploration of the process, outlining the key considerations and steps involved.
Assessing Fireplace Suitability for Conversion
Before embarking on the conversion, a thorough assessment of the existing fireplace is crucial. This assessment involves several key factors, each of which can significantly influence the feasibility and cost of the project. Firstly, the structural integrity of the fireplace and chimney must be evaluated. Cracks, crumbling mortar, or other signs of damage can compromise the safety of the installation. If structural issues are present, repairs may be necessary before proceeding. In some cases, extensive damage might render the fireplace unsuitable for conversion.
Secondly, the dimensions of the firebox must be accurately measured. Gas inserts are manufactured in various sizes, and selecting an insert that fits properly within the existing firebox is essential for both functionality and aesthetics. The insert should not be too large, as this can obstruct airflow and create unsafe conditions. Conversely, an insert that is too small may not provide adequate heat output and can detract from the visual appeal of the fireplace. Manufacturers typically provide detailed specifications regarding the required firebox dimensions for each insert model.
Thirdly, the condition of the chimney needs professional inspection. A chimney sweep can assess the flue for blockages, creosote buildup, and structural damage. Wood-burning fireplaces produce creosote, a highly flammable substance that accumulates within the chimney over time. If the chimney is not properly cleaned and inspected before installing a gas insert, the risk of a chimney fire increases significantly. In many cases, a stainless-steel liner may be required to adapt the chimney for use with a gas appliance. This liner prevents the corrosive byproducts of gas combustion from damaging the original chimney structure and ensures proper venting.
Finally, the existing gas line capacity and proximity to the fireplace are critical considerations. A gas insert requires a dedicated gas line with sufficient capacity to meet the insert's BTU (British Thermal Unit) rating. If the existing gas line is undersized or located too far from the fireplace, a new gas line may need to be installed. This can involve significant plumbing work and associated costs. It is advisable to consult with a qualified gas technician to determine the adequacy of the existing gas line and to obtain estimates for any necessary modifications.
Selecting the Appropriate Gas Insert
Choosing the right gas insert is a critical step in the conversion process. Several factors should be taken into account to ensure that the selected insert meets the homeowner's heating needs, aesthetic preferences, and budget. Firstly, consider the BTU rating of the insert. This rating indicates the amount of heat the insert is capable of producing. The required BTU rating will depend on the size of the room being heated and the climate in which the home is located. An insert with a higher BTU rating will be necessary for larger rooms or colder climates.
Secondly, explore the different types of gas inserts available. There are primarily two types: natural gas and propane. Natural gas is typically less expensive than propane, but it is not available in all areas. Propane requires a storage tank, which can be either above ground or underground. The choice between natural gas and propane will depend on the availability of each fuel source and the homeowner's preferences.
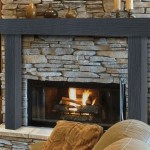
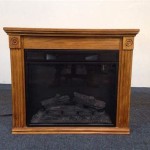
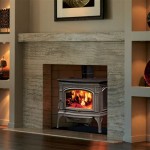
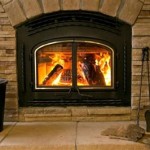
Thirdly, evaluate the different features and options offered by various gas insert models. Some inserts feature electronic ignition, which eliminates the need for a pilot light and can save on gas costs. Others offer variable flame height and heat output settings, allowing for greater control over the fire's appearance and heat output. Remote controls are also a common feature, providing convenient control over the insert from anywhere in the room. Additionally, various aesthetic options are available, including different log sets, firebox liners, and surround designs. Consider the overall style of the room and select an insert that complements the existing décor.
Fourthly, consider the energy efficiency of the gas insert. Look for models with high AFUE (Annual Fuel Utilization Efficiency) ratings. AFUE is a measure of how efficiently the insert converts fuel into heat. A higher AFUE rating indicates that the insert will waste less fuel and save on energy costs. Energy-efficient gas inserts may qualify for rebates or tax credits, further reducing the overall cost of the conversion.
Finally, carefully review the manufacturer's warranty and customer reviews. A reputable manufacturer will offer a comprehensive warranty that covers defects in materials and workmanship. Customer reviews can provide valuable insights into the reliability and performance of the insert. Look for reviews that address issues such as ease of use, heat output, and customer service.
The Conversion Process: A Step-by-Step Guide
The conversion of a wood-burning fireplace to a gas insert involves a series of steps, each of which requires precision and adherence to safety standards. It is highly recommended to hire a qualified and licensed professional to perform the installation. Attempting to perform the conversion without the necessary expertise and tools can be dangerous and may violate local building codes.
The first step is to prepare the fireplace. This involves removing any existing grates, ash catchers, or other accessories from the firebox. The firebox should then be thoroughly cleaned to remove any remaining ash or debris. If necessary, the firebox walls may need to be repaired or resurfaced to ensure a proper fit for the gas insert.
The second step involves preparing the chimney. As mentioned previously, a professional chimney sweep should inspect and clean the chimney to remove any creosote buildup or other obstructions. In most cases, a stainless-steel liner will need to be installed to adapt the chimney for use with a gas appliance. The liner is typically inserted through the top of the chimney and connected to the flue collar on the gas insert. The liner prevents the corrosive byproducts of gas combustion from damaging the original chimney structure and ensures proper venting.
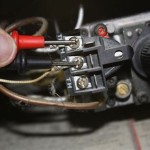
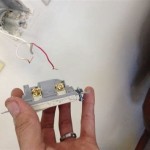
The third step involves installing the gas line. A qualified gas technician will run a dedicated gas line from the gas meter to the fireplace. The gas line must be sized appropriately to meet the insert's BTU rating. A shut-off valve should be installed near the fireplace to allow for easy maintenance and repairs. All gas line connections must be leak-tested to ensure that they are properly sealed.
The fourth step involves installing the gas insert. The insert is carefully positioned within the firebox and connected to the gas line. The exhaust vent is then connected to the stainless-steel liner in the chimney. The insert is secured to the firebox using screws or brackets. The gas insert should be installed according to the manufacturer's instructions.
The fifth step involves testing the gas insert. The gas line should be leak-tested again after the insert is installed. The insert should be lit and allowed to burn for a period of time to ensure that it is functioning properly. The flame should be stable and the exhaust should be venting properly through the chimney. Any issues or malfunctions should be addressed immediately.
The final step involves finishing the installation. This may include installing a decorative surround around the insert to conceal the edges of the firebox and create a more finished look. The surround should be installed according to the manufacturer's instructions. The area around the fireplace should be cleaned and any debris removed.
Following the installation, it is crucial to schedule a professional inspection to ensure that the conversion has been performed correctly and that the gas insert is operating safely. The inspector will verify that all connections are properly sealed, that the exhaust is venting correctly, and that the insert meets all applicable safety standards. Regular maintenance, including annual inspections and cleaning, is essential to ensure the long-term safety and efficiency of the gas insert.
Converting a wood-burning fireplace to a gas insert can significantly enhance the comfort and convenience of a home. By carefully considering the factors outlined in this article and working with qualified professionals, homeowners can achieve a safe and efficient conversion that provides years of reliable heating and enjoyment.

Convert From Wood To Gas With A Insert The Kernel Burner

Wood To Gas Fireplace Conversion In Wisconsin Free Quote Badgerland Waesha

Can A Wood Burning Fireplace Be Converted To Gas The Flame Company

What S The Cost To Convert A Wood Fireplace Gas Orange County Register

Convert From Wood To Gas With A Insert The Kernel Burner

Convert To Gas Installing Fireplace Inserts Doctor Flue

Wood Burner Conversion New Jersey Fireplaces Kjb

Converting A Wood Burning Fireplace And Installing Gas

Convert A Wood Fireplace To Gas Full Service Chimney

Wood Fireplaces Gas Conversion That Counts
Related Posts