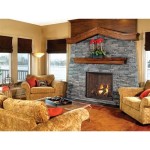
Converting Your Outdoor Fireplace to Propane: A Comprehensive Guide
Outdoor fireplaces offer a captivating ambiance, providing warmth and a focal point for gatherings. Traditionally fueled by wood, these fireplaces can be converted to utilize propane, offering several benefits, including convenience, ease of use, and reduced emissions. This article provides a detailed guide on converting an outdoor fireplace to propane, outlining the necessary steps, considerations, and safety precautions.
Before embarking on this project, it's essential to understand the implications of altering a fireplace's fuel source. Consult local building codes and regulations regarding propane installations and modifications to existing structures. In many jurisdictions, a permit may be required for propane line installation and fireplace alterations. Failure to comply with local regulations can result in fines or legal ramifications.
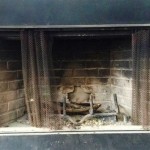
A thorough assessment of the existing fireplace is crucial. Evaluate the fireplace's structural integrity, ventilation, and overall condition. Check for cracks, damage, or deterioration in the firebox, chimney, and surrounding materials. Addressing any existing issues before converting to propane will ensure the fireplace operates safely and efficiently.
Key Point 1: Assessing Compatibility and Selecting the Right Conversion Kit
The first critical step in converting an outdoor fireplace to propane is determining the fireplace's compatibility with propane fuel. Not all fireplaces are suitable for propane conversion. The design, construction materials, and existing venting system must be able to accommodate the different fuel characteristics. Propane burns cleaner than wood but requires a different air-to-fuel ratio for optimal combustion.
Propane conversion kits are readily available from various manufacturers and retailers. These kits typically include a propane burner, connector fittings, a regulator, and installation instructions. Selecting the correct conversion kit is paramount. Factors to consider when choosing a kit include the fireplace's size, BTU (British Thermal Unit) rating, and the desired aesthetic appearance. The BTU rating represents the amount of heat the burner can produce per hour. Choosing a kit with an adequate BTU rating is crucial for achieving the desired level of warmth and flame size.
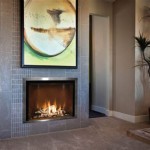
Different types of propane burners are available, each with its unique characteristics. Linear burners produce a long, continuous flame, while H-burners provide a more distributed flame pattern. Pan burners offer a more traditional, circular flame appearance. The choice of burner type depends on personal preference and the fireplace's design. Some kits include decorative elements, such as ceramic logs or lava rocks, to enhance the visual appeal of the propane fireplace.
When selecting a conversion kit, prioritize those that are certified by recognized testing laboratories, such as UL (Underwriters Laboratories) or CSA (Canadian Standards Association). Certification ensures the kit meets established safety standards and has been tested for performance and reliability. Review the kit's specifications carefully, ensuring it is compatible with the fireplace's dimensions and venting system.
It is also important to consider the location and nature of the propane supply. Will the fireplace be connected to a main propane line, or will it use portable propane tanks? This determination will affect the choice of conversion kit and the associated installation requirements.
Key Point 2: Propane Line Installation and Safety Precautions
Installing a propane line is a critical aspect of the conversion process and requires careful planning and execution. The propane line must be installed according to local building codes and regulations. Using a qualified and licensed plumber or gas technician is highly recommended to ensure the installation is performed safely and correctly.
The propane line should be buried underground at the required depth, typically below the frost line in colder climates. The line must be constructed of approved materials, such as polyethylene or coated copper tubing, specifically designed for underground propane service. Proper backfilling and compaction are essential to protect the propane line from damage.
Before connecting the propane line to the fireplace, a pressure test is necessary to verify the integrity of the line and connections. This test involves pressurizing the propane line with compressed air and monitoring for any leaks. A leak detection solution can be applied to all joints and connections to identify even minor leaks.
Safety is paramount throughout the propane line installation process. Ensure the propane supply is shut off before commencing any work on the gas line. Use only approved tools and fittings designed for propane applications. Avoid using open flames or sparks near the propane line. Wear appropriate safety gear, including gloves and eye protection. Ensure that the location has adequate ventilation during all phases of installation.
Once the propane line is installed and tested successfully, connect it to the fireplace's gas valve according to the conversion kit's instructions. Ensure all connections are tight and leak-free. Install the propane regulator to control the gas pressure to the burner. The regulator is essential for maintaining a consistent flame and preventing over-pressurization of the gas line.
Consider installing a shut-off valve near the fireplace to allow for easy isolation of the propane supply in case of emergencies or maintenance. This valve should be readily accessible and clearly labeled.
Key Point 3: Installing the Propane Burner and Testing the System
With the propane line installed and connected, the next step is installing the propane burner kit within the fireplace. Carefully follow the manufacturer's instructions for proper installation and placement of the burner. Ensure the burner is securely mounted and positioned correctly within the firebox.
Connect the burner to the propane supply line using the provided fittings and connectors. Ensure all connections are tight and leak-free. Apply leak detection solution to all connections and monitor for any signs of leaks. If leaks are detected, tighten the connections or replace the fittings as necessary. Never use the fireplace if propane leaks are present.
Once the burner is installed and all connections have been verified, perform a test run of the propane fireplace. Slowly open the propane supply valve and ignite the burner according to the manufacturer's instructions. Observe the flame characteristics, ensuring it is a clean, blue flame with minimal yellow tipping. An excessive amount of yellow in the flame indicates incomplete combustion and may require adjustments to the air-to-fuel mixture.
Adjust the burner's air shutter or air mixer to optimize the flame quality. The air shutter controls the amount of air that mixes with the propane, influencing the combustion efficiency. Experiment with different air shutter settings until the flame is clean and stable. Consult the conversion kit's instructions for specific guidance on air shutter adjustments.
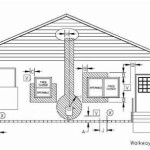
Inspect the venting system during the test run to ensure proper draft and exhaust of combustion gases. A properly functioning venting system is crucial for preventing carbon monoxide buildup. Ensure that the chimney is clear of obstructions and that the flue is open. If the fireplace has a damper, ensure it is fully open during operation. If there's any doubt about the ventilation quality, consult with a chimney sweep to ascertain its integrity.
After the initial test run, allow the fireplace to burn for several hours to observe its performance and stability. Monitor the flame characteristics, temperature, and overall operation. Check for any unusual noises, odors, or malfunctions. If any issues arise, shut off the propane supply immediately and troubleshoot the problem. Consult the conversion kit's instructions or contact a qualified technician for assistance.
Once the propane fireplace is operating safely and efficiently, consider adding decorative elements, such as ceramic logs or lava rocks, to enhance the aesthetic appeal. Arrange the decorative elements carefully to ensure they do not obstruct the burner or interfere with the flame. Keep combustible materials away from the fireplace to prevent fire hazards.
Regular maintenance is essential for ensuring the continued safe and efficient operation of the propane fireplace. Inspect the burner, connections, and venting system periodically. Clean the burner and surrounding area to remove debris and soot buildup. Have the venting system inspected and cleaned annually by a qualified chimney sweep.
Converting an outdoor fireplace to propane offers numerous benefits, including convenience, ease of use, and reduced emissions. However, it is a complex project that requires careful planning, execution, and adherence to safety precautions. Following this guide and consulting with qualified professionals will ensure a successful and safe conversion.
Proper ventilation and a reliable carbon monoxide detector are key for safety. Ensure a carbon monoxide detector is near the home or any enclosed structure near the now propane-fueled outdoor fireplace.

Convert Your Wood Burning Fireplace To Propane Ny

Convert A Wood Burning Fire Pit To Burn Propane With Easyfirepits

How To Convert A Wood Fire Pit Gas Firepits Direct Learning Center

Convert Wood Burning Fireplace To Propane North Ina

Forest Ridge Outdoor Fireplace Propane Natural Gas Fire Table

Sedona Outdoor Fireplace Round Propane Natural Gas Fire Table

Can A Wood Burning Fireplace Be Converted To Gas The Flame Company

How To Convert A Wood Fireplace Propane

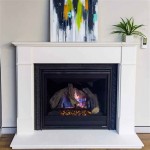
Propane Fireplace Installation

How To Convert Your Wood Burning Fireplace Electric Or Gas
Related Posts