Cleaning a Gas Fireplace Pilot Light: A Comprehensive Guide
A gas fireplace offers a convenient and aesthetically pleasing heating solution for many homes. However, like any appliance using gas, regular maintenance is crucial for safe and efficient operation. One of the most common issues homeowners encounter is a malfunctioning pilot light. The pilot light is a small, constantly burning flame that ignites the main burners when heat is requested. If the pilot light is dirty, weak, or extinguished, the fireplace will fail to function correctly. Cleaning the pilot light assembly is a key maintenance step that can often restore proper operation and prevent more serious problems.
This article provides a detailed guide on how to clean a gas fireplace pilot light, covering the necessary safety precautions, tools, and a step-by-step cleaning process. It also addresses common causes of pilot light problems and offers troubleshooting tips to ensure the fireplace operates safely and efficiently.
Safety First: Preparing to Clean the Pilot Light
Before commencing any maintenance on a gas appliance, safety must be the paramount concern. Gas leaks are potentially dangerous, and electrical components can pose a shock hazard. The following steps are crucial to ensure a safe cleaning process:
Turn off the Gas Supply: Locate the gas shut-off valve for the fireplace. This valve is typically found on the gas supply line leading to the fireplace, often near the fireplace itself. Turn the valve to the "off" position. This cuts off the gas supply and prevents the possibility of gas leaks during the cleaning process. Allow ample time for any residual gas in the lines to dissipate.
Turn off the Electrical Power: If the fireplace has an electric ignition system or a blower fan, switch off the circuit breaker that supplies power to the fireplace. This eliminates the risk of electric shock while working with the internal components.
Allow the Fireplace to Cool Down: It is essential to let the fireplace cool down completely before starting to clean the pilot light. The components can be extremely hot after the fireplace has been in operation, posing a burn risk.
Gather Necessary Tools and Materials: Before dismantling any parts, assemble the tools and materials required for the cleaning process. This includes a small adjustable wrench, a screwdriver set (both flathead and Phillips head), a vacuum cleaner with a hose attachment, a can of compressed air, a soft brush (such as a toothbrush), and a clean, lint-free cloth. Having everything readily available will streamline the cleaning process and minimize downtime.
Work in a Well-Ventilated Area: While cleaning the pilot light, ensure the area is well-ventilated. This helps to dissipate any residual gas odors and prevent the accumulation of potentially harmful fumes.
By adhering to these safety precautions, the risk of accidents and injuries can be significantly reduced, ensuring a safe and effective cleaning process.
Identifying the Pilot Light Assembly and Common Problems
Understanding the components of the pilot light assembly and common problems associated with it is essential for effective cleaning and troubleshooting. The pilot light assembly is a small unit located near the main burner, consisting of several key components:
Pilot Orifice: This is a tiny opening that regulates the flow of gas to the pilot light. It is often the primary culprit behind pilot light problems, as it can become clogged with dust, debris, or carbon deposits.
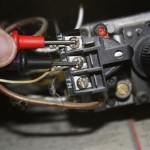
Thermocouple or Thermopile: This safety device is responsible for sensing the presence of the pilot flame. When the pilot light is lit, the thermocouple generates a small electrical current that keeps the main gas valve open. If the pilot light goes out, the thermocouple cools down, shutting off the gas supply to prevent a gas leak. A faulty or dirty thermocouple can prevent the pilot light from staying lit.
Pilot Hood or Shield: This protective covering helps to shield the pilot flame from drafts and ensures a stable and consistent flame. It can also become dirty or damaged, affecting the pilot light's performance.
Pilot Gas Line: This small tube delivers gas from the main gas valve to the pilot orifice. Obstructions or leaks in the gas line can disrupt the gas flow to the pilot light.
Common problems associated with the pilot light assembly include:
Clogged Pilot Orifice: This is the most frequent cause of pilot light problems. Dust, debris, and carbon deposits can accumulate in the tiny orifice, restricting gas flow and causing a weak or flickering flame.
Faulty Thermocouple: A weak or failing thermocouple may not generate enough electrical current to keep the main gas valve open, causing the pilot light to go out shortly after being lit.
Drafts: Strong drafts can blow out the pilot light, especially if the pilot hood is damaged or missing.
Low Gas Pressure: Insufficient gas pressure can result in a weak pilot flame that is easily extinguished.
Dirty Pilot Assembly: Accumulated dust and debris on the pilot hood, gas line, or other components can interfere with the pilot light's performance.
By identifying these components and understanding common problems, homeowners can effectively troubleshoot pilot light issues and perform targeted cleaning and maintenance to restore proper operation.
Step-by-Step Guide to Cleaning the Pilot Light
Once the safety precautions have been taken and the tools are assembled, the cleaning process can begin. The following steps provide a detailed guide on how to clean a gas fireplace pilot light effectively:
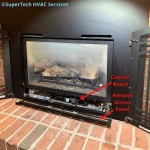
Remove the Fireplace Front: Depending on the fireplace model, the front panel or decorative logs may need to be removed to access the pilot light assembly. Consult the owner's manual for specific instructions on how to remove these components safely.
Locate the Pilot Light Assembly: Identify the pilot light assembly, which is typically located near the main burner. It will consist of the pilot orifice, thermocouple, pilot hood, and pilot gas line.
Vacuum the Area: Use a vacuum cleaner with a hose attachment to thoroughly clean the area around the pilot light assembly. Remove any loose dust, debris, or cobwebs that may be present.
Clean the Pilot Orifice: This is the most crucial step in the cleaning process. The pilot orifice is very small and can easily become clogged. There are several methods for cleaning the pilot orifice:
Compressed Air: Use a can of compressed air to blow out any debris from the pilot orifice. Direct the nozzle of the compressed air can towards the orifice and apply short bursts of air. Be careful not to inhale any dust or debris.
Soft Brush: Use a soft brush, such as a toothbrush, to gently scrub the pilot orifice and remove any stubborn deposits. Avoid using abrasive materials that could damage the orifice.
Pilot Orifice Cleaning Tool: Some fireplace maintenance kits include a specialized pilot orifice cleaning tool. This tool is designed to safely and effectively remove blockages from the tiny orifice. Follow the instructions provided with the cleaning tool.
Clean the Thermocouple: The thermocouple can also accumulate dirt and debris, affecting its ability to sense the pilot flame. Use a clean, lint-free cloth to gently wipe down the thermocouple. Remove any dust or deposits that may be present.
Clean the Pilot Hood or Shield: The pilot hood or shield helps to protect the pilot flame from drafts. Use a soft brush or a clean cloth to remove any dust or debris from the pilot hood.
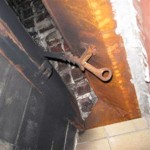
Inspect the Pilot Gas Line: Visually inspect the pilot gas line for any signs of damage, such as cracks or leaks. If any damage is detected, the gas line should be replaced by a qualified technician.
Reassemble the Fireplace: Once the pilot light assembly has been thoroughly cleaned, carefully reassemble the fireplace components, including the decorative logs and front panel. Ensure that all parts are properly secured and in their original positions.
Test the Pilot Light: After reassembling the fireplace, turn the gas supply back on and attempt to relight the pilot light. Follow the instructions provided in the owner's manual for lighting the pilot light. Observe the pilot flame to ensure it is strong, steady, and blue in color. A weak, flickering, or yellow flame may indicate a persistent problem.
By following these steps carefully, homeowners can effectively clean the gas fireplace pilot light and restore proper operation to the fireplace.
Troubleshooting Common Pilot Light Problems
Even after cleaning the pilot light, some problems may persist. The following troubleshooting tips can help diagnose and resolve common pilot light issues:
Pilot Light Won't Light: If the pilot light fails to light after cleaning, ensure that the gas supply is turned on and that the gas valve is in the "pilot" position. Check the igniter to ensure it is sparking. If the igniter is not working, it may need to be replaced. Confirm that the pilot orifice is completely clear of obstructions.
Pilot Light Goes Out After Releasing the Pilot Knob: This is often caused by a faulty thermocouple. The thermocouple may not be generating enough electrical current to keep the gas valve open. Try cleaning the thermocouple as described above. If that does not resolve the issue, the thermocouple may need to be replaced.
Weak or Flickering Pilot Flame: A weak or flickering pilot flame may be caused by low gas pressure or a partially clogged pilot orifice. Check the gas pressure to ensure it is within the recommended range. Clean the pilot orifice thoroughly. Also, check for drafts that may be affecting the flame.
Yellow or Orange Pilot Flame: A yellow or orange flame indicates incomplete combustion, which can be caused by insufficient air supply or contaminants in the gas. Ensure that the fireplace is properly ventilated. Clean the burner and pilot assembly to remove any debris.
Gas Odor: If a gas odor is detected, immediately turn off the gas supply and ventilate the area. Do not attempt to light the pilot light or operate the fireplace until the source of the gas leak has been identified and repaired by a qualified technician.
Consult a Professional: If the pilot light problems persist after attempting these troubleshooting steps, it is recommended to consult a qualified gas fireplace technician. A professional can diagnose and repair more complex issues, ensuring the fireplace operates safely and efficiently.
Regular cleaning and maintenance of the gas fireplace pilot light are essential for safe and efficient operation. By following the steps outlined in this guide, homeowners can address common pilot light problems and prolong the lifespan of their gas fireplace.

Gas Fireplace Pilot Light Won T Stay Lit Easy Fix

How To Clean The Pilot Assembly On A Gas Fireplace Diy Guide For Homeowners

How To Clean Your Gas Fireplace Pilot Cleaning

How To Clean A Gas Fireplace The Proper Way

Diy Gas Fireplace Won T Light How To Clean Your Thermopile And Thermocouple

Diy Gas Fireplace Won T Light How To Clean Your Thermopile And Thermocouple

How To Clean Pilot Light On Gas Fireplace Countyoffice Org

How A Pilot Light Works Www Mygasfireplacerepair Com

My Firebrick Gas Insert Pilot Light Works But Burner Doesn T Cleaning The Sensor Rod

Should You Turn Off The Pilot On Your Fireplace This Summer