Changing a Thermocouple in a Gas Fireplace
A thermocouple is a critical safety device in a gas fireplace. It generates a small electrical current when heated by the pilot light. This current signals the gas valve to stay open, allowing gas to flow to the main burner. If the thermocouple malfunctions, the gas supply is cut off, preventing gas leaks and potential hazards. This article details the process of changing a thermocouple in a gas fireplace.
Safety Precautions
Before beginning any work on a gas appliance, safety is paramount. Turn off the gas supply to the fireplace at the shut-off valve. This valve is typically located near the fireplace, often on the gas line leading to the unit. Confirm the gas is off by attempting to light the pilot light. Allow the fireplace and its components to cool completely before proceeding. This prevents burns and allows for safer handling of the parts.
Working with gas appliances requires careful attention. If there's any uncertainty or discomfort with the process, it's highly recommended to contact a qualified gas appliance technician. Improper handling of gas lines and components can lead to dangerous situations.
Locating and Identifying the Thermocouple
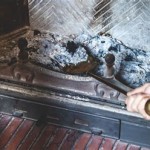
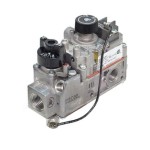
The thermocouple is typically located near the pilot light assembly. It's a small, copper-colored tube, often about 12-18 inches long, with one end connected to the gas control valve and the other positioned in the pilot flame. The end connected to the gas control valve usually has a small nut or screw securing it. Carefully trace the path of the thermocouple to ensure proper identification before proceeding.
Visually inspect the thermocouple for any signs of damage, such as corrosion, kinks, or a broken tip. A damaged thermocouple will not function correctly and must be replaced.
Removing the Old Thermocouple
Once the thermocouple is located, the next step is to disconnect it from the gas control valve. Use a appropriately sized wrench to loosen and remove the nut securing the thermocouple to the valve. It is important to use the correct size wrench to avoid stripping the nut.
Next, carefully detach the thermocouple from the pilot assembly. This connection may vary depending on the fireplace model. Some thermocouples are simply held in place by friction or a small clip, while others may have a small screw or nut. Observe the connection carefully before attempting to disconnect it. Gentle manipulation is often required to avoid damaging the pilot assembly.
Installing the New Thermocouple
The new thermocouple should be the same type and length as the old one. Consult the fireplace's owner's manual or contact the manufacturer to confirm the correct replacement part. Insert the new thermocouple into the pilot assembly, ensuring it's securely positioned in the same manner as the old one. This often involves aligning the thermocouple tip with a specific location within the pilot assembly.
Attach the other end of the new thermocouple to the gas control valve, using the nut that was previously removed. Tighten the nut securely, but avoid overtightening, which could damage the thermocouple or the valve. The connection should be firm and snug.
Testing the New Thermocouple
After installing the new thermocouple, turn the gas supply back on. Follow the manufacturer's instructions for lighting the pilot light. Once the pilot light is lit, hold the control knob in the pilot position for a minute or two. This allows the thermocouple to heat up and generate the necessary electrical current.
Release the control knob. If the pilot light stays lit, the thermocouple is functioning correctly. If the pilot light goes out, double-check all connections and ensure the thermocouple is properly positioned in the pilot flame. If the problem persists, consult a qualified gas appliance technician. A faulty thermocouple may not be the cause of the problem, and additional troubleshooting may be necessary.
Maintenance and Troubleshooting
Regular maintenance can extend the life of a thermocouple and ensure safe fireplace operation. Keep the area around the pilot assembly clean and free of dust and debris. Periodically inspect the thermocouple for any signs of damage or corrosion.
If the pilot light frequently goes out, it may indicate a failing thermocouple or another issue with the fireplace. Troubleshooting steps might include checking the gas supply, cleaning the pilot orifice, or inspecting the gas control valve. However, if the issue persists, contacting a qualified technician is the safest course of action.

Gas Fireplace Won T Stay Lit Magic Touch Mechanical

Know How To Replace A Gas Fireplace Thermocouple

How A Pilot Light Works Www Mygasfireplacerepair Com

Gas Fireplace Won T Stay Lit Magic Touch Mechanical

Fireplace Won T Stay Lit This Is How You Fix It

How To Test Your Thermopile Www Mygasfireplacerepair Com

Thermo Thermopiles Friendly Fires

Thermo Thermopiles Friendly Fires

Diy Gas Fireplace Repair No Flame Problem Remodeling Cost Calculator

Gas Fireplace Pilot Lights Your Complete Guide Universe
Related Posts