Built-In Cabinets Around Fireplace: A DIY Guide
Fireplaces often serve as the focal point of living spaces. Enhancing their functionality and aesthetic appeal can be significantly achieved by incorporating built-in cabinets. These cabinets not only provide storage space but also frame the fireplace, creating a cohesive and visually balanced design. This comprehensive guide explores the process of constructing built-in cabinets around a fireplace as a do-it-yourself (DIY) project, offering insights into planning, material selection, construction techniques, and finishing touches.
Planning and Design Considerations
The initial phase of any DIY project involves meticulous planning. This stage is crucial for determining the dimensions, style, and functionality of the built-in cabinets. Several factors should be considered during the planning process, including the fireplace's existing structure, the room's overall design aesthetic, and the intended use of the cabinets.
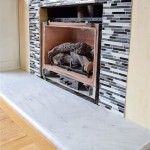
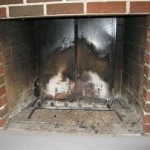
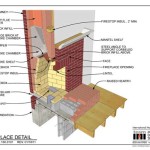
Firstly, assess the fireplace itself. Measure the height, width, and depth of the fireplace and the surrounding area. Note the type of material used in the fireplace construction (brick, stone, concrete) as this might influence the method of attaching the cabinets. Determine the clearance requirements for combustible materials. Building codes often specify minimum distances between combustible materials and the firebox. Adherence to these codes is paramount for safety and is especially important if the fireplace is operational. If there is any doubt, consult with a building inspector before construction.
Secondly, consider the room's existing design. Analyze the style of the room (modern, traditional, rustic) and select cabinet designs that complement this aesthetic. For instance, a modern room may benefit from sleek, minimalist cabinets with clean lines, while a traditional room may call for cabinets with raised panel doors and decorative moldings. Consider the color scheme of the room and choose cabinet finishes that harmonize with the existing décor. The cabinets should enhance, not detract from, the existing visual harmony.
Thirdly, define the intended use of the cabinets. Will they primarily serve as storage for books, media equipment, or decorative items? Determining the intended use will influence the cabinet's internal configuration, including the number of shelves, drawers, and compartments. Consider incorporating features such as adjustable shelves, pull-out drawers, or media storage compartments to maximize the functionality of the cabinets.
Lastly, create detailed drawings or sketches of the proposed built-in cabinets. These drawings should include precise measurements, material specifications, and construction details. Utilizing software programs such as SketchUp or AutoCAD can aid in creating accurate and professional-looking drawings. These digital representations allow for visualization of the finished product and enable adjustments to be made before any physical construction begins. Thorough planning minimizes errors and ensures a smoother construction process.
Material Selection and Preparation
Choosing the right materials is essential for ensuring the durability, aesthetics, and longevity of the built-in cabinets. Common materials used for cabinet construction include plywood, medium-density fiberboard (MDF), solid wood, and various hardware components. Each material possesses unique characteristics that make it suitable for different parts of the project.
Plywood is a cost-effective and versatile material that is commonly used for cabinet boxes and shelves. It offers structural stability and resistance to warping, making it a practical choice for large surfaces. MDF is a smooth, stable material that is ideal for cabinet doors, drawer fronts, and decorative moldings. It paints well and can be easily shaped and routed. Solid wood is typically used for face frames, doors, and decorative elements, providing a classic and elegant appearance. Hardwoods such as oak, maple, and cherry are popular choices for their durability and aesthetic appeal.
Hardware components, such as hinges, drawer slides, knobs, and pulls, play a crucial role in the functionality and aesthetics of the cabinets. Select high-quality hardware that is durable and matches the overall style of the cabinets. Consider soft-close hinges and drawer slides for enhanced functionality and longevity. Inspect all materials for defects before starting the construction process. Ensure that the wood is straight, free of knots, and properly dried. Preparing the materials beforehand, such as cutting the plywood and MDF to the required dimensions, can save time and effort during the construction phase.
When selecting materials, bear in mind that proximity to the fireplace will impact material selection. High heat areas should be lined with non-combustible materials or have significant clearance as earlier mentioned. Consult local building codes for specifics. This preplanning prevents rework and safety compromises.
Construction Techniques and Assembly
The construction phase involves assembling the cabinet boxes, attaching the face frames, installing the doors and drawers, and integrating the cabinets with the fireplace surround. Precision and attention to detail are crucial for achieving a professional-looking result. Begin by constructing the cabinet boxes. Cut the plywood or MDF panels to the required dimensions using a circular saw or table saw. Assemble the panels using wood glue and screws or nails. Ensure that the corners are square and the joints are strong. Reinforce the joints with additional screws or nails if necessary.
Next, attach the face frames to the cabinet boxes. The face frame provides structural support and enhances the aesthetic appeal of the cabinets. Cut the solid wood pieces to the required dimensions and assemble them using wood glue and pocket screws or biscuits. Attach the face frame to the cabinet box using wood glue and clamps. Allow the glue to dry completely before removing the clamps. Ensure that the face frame is flush with the cabinet box and that the joints are tight and seamless.
Install the doors and drawers. Measure the openings for the doors and drawers and cut the door and drawer fronts to the required dimensions. Attach the hinges to the doors and the drawer slides to the drawer boxes. Install the doors and drawers into the cabinet openings. Adjust the hinges and drawer slides to ensure that the doors and drawers open and close smoothly and evenly. Install the knobs and pulls to complete the doors and drawers.
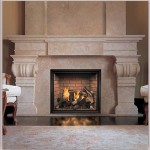
Integrating the cabinets with the fireplace surround requires careful planning and execution. Position the cabinets around the fireplace, ensuring that they are level and plumb. Attach the cabinets to the wall using screws or nails. If the fireplace surround is made of brick or stone, use masonry screws or anchors to secure the cabinets. Consider incorporating a mantel shelf above the fireplace to tie the cabinets and the fireplace together visually. The mantel can be made of solid wood or a combination of wood and other materials, such as stone or tile.
During assembly, keep in mind that precision is key. Use levels and squares frequently to ensure that all elements are aligned correctly. Small errors during the construction phase can compound and lead to noticeable imperfections in the final product. Taking the time to double-check measurements and alignments will save time and frustration in the long run.
Finishing and Detailing
The finishing phase involves sanding, priming, painting or staining, and applying protective coatings to the cabinets. This stage is crucial for enhancing the aesthetics and durability of the built-in cabinets. Begin by sanding the entire surface of the cabinets using fine-grit sandpaper. Remove any imperfections, such as scratches, dents, or glue residue. Sand the edges and corners of the cabinets to create a smooth, rounded profile.
Apply a primer to the cabinets. Primer helps to seal the wood and create a uniform surface for the paint or stain. Choose a primer that is compatible with the paint or stain that will be used. Apply the primer evenly using a brush, roller, or spray gun. Allow the primer to dry completely before proceeding to the next step.
Paint or stain the cabinets. Choose a paint or stain that complements the room's design and matches the overall aesthetic of the fireplace. Apply the paint or stain evenly using a brush, roller, or spray gun. Apply multiple coats of paint or stain, allowing each coat to dry completely before applying the next. Sand the cabinets lightly between coats to create a smooth, even finish.
Apply a protective coating to the cabinets. A protective coating, such as polyurethane or varnish, helps to protect the paint or stain from scratches, stains, and moisture. Apply the protective coating evenly using a brush, roller, or spray gun. Allow the protective coating to dry completely before using the cabinets. Add decorative elements to the cabinets to enhance their aesthetic appeal. Consider adding moldings, trim, or decorative hardware to create a custom look. Install shelves, drawers, and other accessories to customize the functionality of the cabinets.
Clean up the work area and inspect the finished cabinets for any imperfections. Touch up any areas that need attention. Ensure that the cabinets are properly installed and that all doors and drawers open and close smoothly. This meticulous attention to detail is what separates a professional-looking DIY project from an amateur one.
Safety Considerations
DIY projects, especially those involving power tools and potentially combustible materials, require strict adherence to safety protocols. Prioritize safety throughout the entire project to prevent accidents and injuries.
Always wear appropriate personal protective equipment (PPE), including safety glasses, gloves, and a dust mask or respirator. Safety glasses protect the eyes from flying debris, gloves protect the hands from cuts and abrasions, and a dust mask or respirator protects the lungs from dust and fumes. Use power tools safely and responsibly. Read and understand the operating instructions for each tool before using it. Keep the work area clean and well-lit. Never operate power tools when tired or under the influence of drugs or alcohol.
Be mindful of fire safety, especially when working near a fireplace. Keep flammable materials away from the fireplace. Ensure that the fireplace is properly ventilated and that the chimney is clean and in good working order. Install smoke detectors and carbon monoxide detectors in the room to provide early warning of a fire or carbon monoxide leak. Follow all building codes and regulations related to fireplace construction and safety. Consult with a building inspector or fire marshal if you have any questions or concerns.
Proper ventilation is crucial when applying primers, paints, and finishes. Many of these products contain volatile organic compounds (VOCs) that can be harmful to your health. Work in a well-ventilated area or use a respirator to avoid inhaling fumes. Dispose of waste materials properly. Oil-soaked rags, paint cans, and other flammable materials should be disposed of in accordance with local regulations.
By adhering to these safety guidelines, the risk of accidents and injuries can be significantly reduced, making the DIY project a safe and enjoyable experience.

Diy Fireplace Surround And Built Ins Our Blessed Life

Diy Fireplace Surround And Built Ins Our Blessed Life

Diy Fireplace Surround And Built Ins Our Blessed Life

How To Design And Build Gorgeous Diy Fireplace Built Ins The Sweetest Digs

Iheart Organizing Diy Fireplace Built In Tutorial

How To Build Easy Custom Built In Shelving Basic

Diy Electric Fireplace With Built Ins The Dabbling Crafter

Iheart Organizing Diy Fireplace Built In Tutorial

How To Design And Build Gorgeous Diy Fireplace Built Ins The Sweetest Digs

My Big Finish Diy Fireplace Built Ins
Related Posts