DIY Built-In Bookshelves Around Fireplace: A Comprehensive Guide
Built-in bookshelves flanking a fireplace are a popular design choice, offering a combination of aesthetic appeal and functional storage. This architectural feature transforms a standard fireplace into a focal point, enhancing the room's character while providing customized space for books, decorative items, and media equipment. This article provides a detailed guide to planning and executing a DIY built-in bookshelf project around a fireplace, covering essential considerations, construction techniques, and finishing touches.
The project’s complexity varies depending on existing fireplace surround, skill level, and desired level of customization. Simpler designs might involve pre-fabricated shelving units integrated into the existing space, while more ambitious projects require custom-built cabinetry. A successful project requires a well-defined plan, careful measurements, and adherence to safety guidelines.
I. Planning and Design Considerations
The initial phase of any DIY built-in project involves meticulous planning. This phase lays the groundwork for a successful outcome, preventing costly mistakes and ensuring the finished product meets expectations.
First, assess the existing fireplace and surrounding area. Measure the width, height, and depth available on either side of the fireplace. Note any architectural features, such as moldings, baseboards, or uneven walls, that will influence the design. Photographing the area from different angles can be helpful for visualizing the final product and identifying potential challenges. Take precise measurements multiple times to ensure accuracy. Minor discrepancies can lead to significant problems during the construction phase.
Next, determine the desired functionality of the bookshelves. Consider the types of items they will hold – books, decorative objects, media equipment, or a combination thereof. This will dictate the required shelf depth, height, and spacing. Deeper shelves are necessary for larger items or electronics, while shallower shelves might suffice for paperback books or displaying artwork.
Consider the style of the bookshelves and how it complements the existing décor. Options range from traditional designs with intricate moldings and raised panel doors to contemporary styles with clean lines and minimalist hardware. Research different styles and gather inspiration from magazines, websites, and home improvement stores. Sketch out several design options, paying attention to proportions, symmetry, and overall aesthetic appeal.
Choose the materials carefully, taking into account cost, durability, and aesthetic preferences. Common materials include solid wood, plywood, MDF (Medium-Density Fiberboard), and pre-fabricated shelving units. Solid wood offers a classic look and durability but can be more expensive. Plywood provides good strength and stability at a more affordable price point. MDF is a smooth, paintable surface but is less resistant to moisture. Consider using a combination of materials to optimize cost and performance.
Develop a detailed construction plan, including dimensions, material lists, and step-by-step instructions. This plan serves as a roadmap throughout the project, ensuring consistency and accuracy. Use design software or drafting tools to create detailed drawings. Consult online resources, books, and videos for guidance and inspiration.
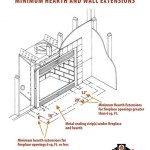
Finally, address safety considerations. Since the bookshelves will be located near a fireplace, choose fire-resistant materials and ensure proper ventilation. Consult local building codes and regulations to ensure compliance. Use appropriate safety equipment, such as eye protection, gloves, and dust masks, throughout the project.
II. Construction Techniques and Assembly
Once the planning phase is complete, the construction phase begins. This involves cutting, assembling, and installing the various components of the built-in bookshelves. Precision, patience, and attention to detail are crucial for achieving a professional-looking result.
Begin by preparing the area. Cover the floor with drop cloths to protect it from dust and debris. Remove any furniture or obstacles that might impede access. Ensure adequate lighting and ventilation. Gather all necessary tools and materials, including a saw, drill, screwdriver, level, measuring tape, and clamps. Set up a dedicated workspace for cutting and assembling the components.
Cut the materials according to the dimensions specified in the construction plan. Use a saw with a sharp blade to ensure clean, accurate cuts. Use a miter saw for angled cuts. Label each piece clearly to avoid confusion during assembly. Sand the edges of the cut pieces to remove any splinters or rough spots. For paint-grade projects, consider using a wood filler to conceal any imperfections in the wood.
Assemble the bookshelf carcasses, which are the main structural frames. Join the side panels, top, and bottom using screws, nails, or wood glue. Clamps will hold the pieces together firmly while the adhesive dries. Ensure the carcasses are square and level before proceeding. Use a level to check both horizontally and vertically.
Install the shelves. Depending on the design, shelves can be fixed or adjustable. Fixed shelves are glued and screwed into place, providing greater stability. Adjustable shelves are supported by shelf pins inserted into pre-drilled holes. Use a shelf-pin jig to ensure consistent spacing and alignment of the holes. Consider using thicker shelves for heavier items to prevent sagging.
Attach the face frames, which are the decorative trim pieces that conceal the exposed edges of the plywood or MDF. Face frames can be made from solid wood or MDF and are typically attached with glue and nails or screws. Miter the corners for a seamless transition. Sand and fill any gaps or imperfections in the face frames.
Install any desired doors or drawers. Doors can be hinged or sliding. Drawers require drawer slides for smooth operation. Choose hardware that complements the overall style of the bookshelves. Adjust the hinges and slides to ensure proper alignment and function.
Securely attach the built-in bookshelves to the wall. Use screws or bolts to fasten the carcasses to the wall studs. Shim the bookshelves as needed to ensure they are level and plumb. Conceal the fasteners with wood filler or decorative plugs.
III. Finishing and Installation
The final stage involves finishing and installing the built-in bookshelves. This enhances the aesthetic appeal and protects the material from damage. Proper finishing adds value to the project and integrates the bookshelves seamlessly into the room.
Prepare the surface for finishing. Sand all surfaces smooth using progressively finer grits of sandpaper. Remove any dust or debris with a tack cloth. Fill any remaining gaps or imperfections with wood filler. Apply a primer to seal the wood and provide a uniform surface for the topcoat. Sand the primer lightly to remove any imperfections.
Apply the desired finish. Options include paint, stain, varnish, or lacquer. Paint provides a durable, opaque finish. Stain enhances the natural grain of the wood. Varnish and lacquer offer a clear, protective coating. Choose a finish that complements the existing décor and provides the desired level of protection. Apply multiple coats of finish, allowing each coat to dry completely before applying the next. Sand lightly between coats to remove any imperfections.
Install the moldings and trim. These decorative elements add a finishing touch and integrate the bookshelves seamlessly into the room. Options include crown molding, baseboard molding, and decorative trim pieces. Miter the corners for a seamless transition. Attach the moldings with glue and nails.
Install any hardware, such as knobs, pulls, and shelf pins. Choose hardware that complements the overall style of the bookshelves. Ensure the hardware is properly aligned and securely attached. Tighten all screws and bolts.
Caulk any gaps between the bookshelves and the wall or floor. Use a paintable caulk that matches the color of the trim. Apply the caulk smoothly and evenly. Wipe away any excess caulk with a damp cloth.
Clean up the area. Remove any dust, debris, or leftover materials. Vacuum the floor and wipe down all surfaces. Arrange the books and decorative items on the shelves. Adjust the lighting to highlight the built-in bookshelves.
Finally, inspect the finished project carefully. Check for any defects or imperfections. Make any necessary adjustments or repairs. Enjoy the finished product and the added value it brings to the home. Maintenance involves regular dusting and cleaning, as well as periodic inspection for any signs of damage or wear. A well-maintained set of built-in bookshelves will provide years of enjoyment and enhance the ambiance of the room.

Thrifty And Chic Diy Projects Home Decor

Thrifty And Chic Diy Projects Home Decor

Iheart Organizing Diy Fireplace Built In Tutorial
:max_bytes(150000):strip_icc()/freeandunfettered-24c0b3d4e3a5492fbf4cb5325c0de5ac.jpg?strip=all "How To Make Diy Built In Bookshelves 20 Ideas Tutorials")
How To Make Diy Built In Bookshelves 20 Ideas Tutorials

Diy Built In Bookshelves From Billy Bookcases With Fireplace Living Room Around Bookcase

Thrifty And Chic Diy Projects Home Decor

White Built In Bookshelves Around The Fireplace Green With Decor

Gorgeous Office Bookshelves With A Built In Electric Fireplace Twelve On Main

How To Design And Build Gorgeous Diy Fireplace Built Ins The Sweetest Digs

Diy Fireplace Surround And Built Ins Our Blessed Life