Brick Around Fireplace: A Comprehensive Guide
A fireplace serves as a focal point in a room, providing warmth and aesthetic appeal. The material surrounding the firebox, often brick, significantly contributes to its overall appearance and functionality. Brick offers a timeless aesthetic, durability, and thermal properties that make it a popular choice for facing a fireplace. This article provides a comprehensive overview of using brick around a fireplace, covering design considerations, installation processes, and maintenance tips.
Design Considerations for Brick Fireplace Surroundings
The design of a brick fireplace surround involves several key considerations to ensure both aesthetic cohesion and practical functionality. These considerations encompass brick selection, layout patterns, size of the surround, and integration with the existing room decor. Careful planning during the design phase is crucial for achieving a visually appealing and structurally sound fireplace.
Brick Selection: The choice of brick plays a pivotal role in defining the fireplace's character. Different types of brick offer varying textures, colors, and sizes. Standard clay bricks are a common choice, known for their durability and affordability. However, options such as reclaimed brick, which provides a rustic and weathered appearance, or glazed brick, which offers a sleek and modern finish, can also be considered. The color of the brick should complement the existing room's color scheme. For example, a dark brick might suit a room with lighter walls and furnishings, while a lighter brick might brighten a darker space. Texture is another important element; a rough texture can add character and visual interest, while a smooth texture can create a more refined look.
Layout Patterns: The pattern in which the bricks are laid significantly impacts the overall aesthetic. The running bond pattern, where each brick is offset by half its length in the row below, is a classic and widely used option. Other patterns include the stacked bond, where bricks are aligned directly above each other, the herringbone pattern, which creates a dynamic and visually engaging arrangement, and the Flemish bond, which alternates headers and stretchers in each course. The choice of pattern should align with the desired style and the room's architectural features. A more complex pattern can add visual interest but might also require more skilled installation.
Size and Proportion: The size of the brick surround must be in proportion to the fireplace opening and the overall dimensions of the room. A surround that is too small might appear insignificant, while one that is too large can overwhelm the space. Consider the height and width of the firebox and the available wall space around it. The surround should extend sufficiently to create a visually balanced frame around the fireplace. The depth of the surround, or how far it projects from the wall, can also be adjusted to create different visual effects. A deeper surround can add depth and dimension to the fireplace, while a shallower one can create a more streamlined appearance.
Integration with Room Decor: The brick surround should seamlessly integrate with the existing decor of the room. Consider the style of the furniture, the color of the walls, and the type of flooring. The brick should complement these elements rather than clash with them. Incorporating decorative elements, such as a mantelpiece or a decorative hearth, can further enhance the integration. A mantelpiece can provide a focal point above the fireplace, while a hearth can add a sense of grounding and stability. The materials and finishes of these elements should be chosen to coordinate with the brick.
Proper planning during the design phase ensures that the brick fireplace surround will be both aesthetically pleasing and functionally appropriate for the space.
Installation Process of Brick Around a Fireplace
The installation of brick around a fireplace is a multi-step process that requires careful attention to detail. The process includes preparing the surface, mixing the mortar, laying the bricks, and finishing the joints. A thorough understanding of each step is crucial for achieving a durable and aesthetically pleasing result. It is important to consult local building codes and fire safety regulations before undertaking any fireplace renovation.
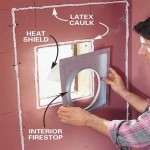
Surface Preparation: The first step in installing brick around a fireplace is to prepare the surface. This involves cleaning the existing surface to remove any dirt, dust, or debris. If there is existing material, such as drywall or wood, it must be properly prepared to accept the brick and mortar. This may involve attaching a layer of cement backer board to provide a stable and fire-resistant substrate. The backer board should be secured to the wall studs using screws. The surface should be level and plumb to ensure that the bricks are laid evenly. Any imperfections in the surface can be corrected using shims or mortar.
Mortar Mixing: The quality of the mortar is critical to the structural integrity of the brick surround. The mortar should be mixed according to the manufacturer's instructions, using a consistent ratio of cement, lime, and sand. Mortar should be mixed in small batches to ensure it remains workable. The consistency of the mortar should be similar to that of peanut butter; it should be thick enough to hold its shape but also pliable enough to spread easily. Avoid adding too much water, as this can weaken the mortar. Always use a mortar that is specifically designed for bricklaying because standard cement may lead to cracking.
Brick Laying: Laying the bricks requires precision and attention to detail. Start by laying a course of bricks along the base of the fireplace, using a level to ensure that they are perfectly horizontal. Apply a layer of mortar to the back of each brick before placing it on the wall. The mortar should be thick enough to fill the joints between the bricks but not so thick that it oozes out excessively. Use spacers to maintain consistent joint widths between the bricks. As each course is laid, use a level to check that the bricks are plumb and aligned. Periodically check the overall alignment of the brickwork with a plumb bob or laser level.
Cutting Bricks: Inevitably, some bricks will need to be cut to fit around the fireplace opening or to create specific design features. Use a brick saw or a masonry chisel to cut the bricks to the desired size and shape. Wear safety glasses and gloves when cutting bricks to protect yourself from flying debris. Ensure that the cut edges are clean and smooth to prevent chipping or cracking.
Joint Finishing: Once all the bricks have been laid, the joints need to be finished. This involves removing any excess mortar and creating a consistent and aesthetically pleasing joint profile. Several different joint profiles can be used, including concave, V-shaped, and flush joints. The choice of joint profile should be made based on the desired aesthetic. Use a jointing tool to compress and shape the mortar in the joints. The mortar should be allowed to partially set before finishing the joints. Brush the finished joints with a soft brush to remove any loose mortar particles.
The successful installation of brick around a fireplace requires meticulous attention to detail and adherence to proper techniques. By following these steps carefully, a durable and visually appealing fireplace surround can be achieved.
Maintaining Brick Around a Fireplace
Proper maintenance is essential to preserving the appearance and structural integrity of a brick fireplace surround. Regular cleaning, inspection, and repair are key components of a comprehensive maintenance plan. Addressing issues promptly can prevent more extensive damage and prolong the life of the fireplace.
Regular Cleaning: Over time, soot, dust, and other debris can accumulate on the surface of the brick. Regular cleaning can help to keep the brick looking its best. Use a soft brush or vacuum cleaner to remove loose dirt and dust. For more stubborn stains, a mild detergent solution can be used. Apply the solution to the brick with a sponge or cloth and then rinse with clean water. Avoid using harsh chemicals or abrasive cleaners, as these can damage the brick. For soot stains, a specialized soot cleaner may be necessary. Always test any cleaning solution on a small, inconspicuous area of the brick before applying it to the entire surface.
Inspection for Cracks and Damage: Inspect the brick surround regularly for cracks, chips, or other signs of damage. Cracks can be caused by thermal expansion and contraction, settling of the foundation, or other factors. Small cracks can often be repaired with mortar, but larger cracks may indicate more serious structural problems. Chips and other surface damage can be repaired with patching compounds designed for brick. Pay particular attention to the joints between the bricks, as these are often the first areas to show signs of deterioration.
Mortar Repair: Damaged or deteriorated mortar joints should be repaired promptly to prevent water from seeping into the brickwork. This process, known as repointing, involves removing the old mortar and replacing it with new mortar. Use a chisel and hammer to carefully remove the old mortar, being careful not to damage the bricks. Clean the joints thoroughly before applying the new mortar. Use a pointing trowel to pack the mortar into the joints, ensuring that it is fully compacted. Finish the joints to match the existing profile. Allow the mortar to cure properly before exposing it to moisture or extreme temperatures.
Waterproofing and Sealing: Brick is naturally porous and can absorb moisture. Excessive moisture can lead to spalling (flaking or crumbling of the brick surface) and other forms of damage. Applying a waterproofing sealant to the brick can help to prevent moisture absorption. Choose a sealant that is specifically designed for brick and follow the manufacturer's instructions carefully. The sealant should be applied to a clean, dry surface. Reapply the sealant periodically as needed, typically every few years.
Preventative Measures: Several preventative measures can be taken to minimize the risk of damage to the brick surround. Ensure that the fireplace is properly ventilated to prevent the buildup of excessive heat and moisture. Avoid burning unseasoned wood, as this can produce more soot and creosote, which can stain the brick. Have the chimney inspected and cleaned regularly to prevent chimney fires, which can damage the fireplace structure. Addressing issues proactively can help to maintain the beauty and functionality of the fireplace for years to come.
By following these maintenance guidelines, the life and aesthetic of the brick around the fireplace can be preserved, ensuring safety and visual appeal for years to come.

Antique Brick And White Molding Fireplace Makeover Maison De Pax

Our Ugly Brick Fireplace He Vetoes Painting It Laurel Home

Building An Electric Fireplace With Brick Facade

Mortar Wash Brick Fireplace Makeover Dimples And Tangles

Antique Brick And White Molding Fireplace Makeover Maison De Pax
.png?strip=all "Blog Contact Cherokee Brick")
Blog Contact Cherokee Brick

What You Should Know About Painting Fireplace Bricks Vertical Chimney Care

How To Diy A Fireplace Surround Using Thin Bricks The Sommer Home

How To Paint A Brick Fireplace Beamin Moore

Diy Fireplace Makeover How To Add Brick A