Tile Over Fireplace: A Comprehensive Guide
The application of tile to a fireplace surround is a popular renovation project undertaken both for aesthetic enhancement and functional improvement. Fireplaces, traditionally the focal point of a room, can be significantly updated through the strategic use of tiling. This article provides a comprehensive overview of the considerations, materials, and processes involved in successfully tiling over a fireplace, ensuring a durable and visually appealing result.
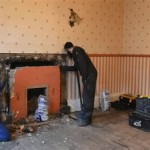
Before commencing any tiling project, a thorough assessment of the existing fireplace structure is crucial. This assessment should consider the material of the existing surround (brick, concrete, wood), its structural integrity, and its potential for accepting tile. Determining the substrate's composition will influence the selection of appropriate adhesives and preparation methods. For instance, tiling directly over painted wood is generally discouraged due to poor adhesion. Similarly, loose or crumbling brickwork must be repaired before tiling can begin.
Understanding building codes and safety regulations is also paramount. Local ordinances often specify minimum clearances between combustible materials and the fireplace opening. These regulations are designed to prevent fire hazards and ensure the safety of the occupants. It is advisable to consult with a qualified building inspector or contractor to ensure compliance with all applicable codes before proceeding with the tiling installation.
Selecting the Right Tile
The selection of tile for a fireplace surround involves considering both aesthetic preferences and functional requirements. Tile materials vary widely in terms of their heat resistance, durability, and ease of maintenance. Common options include ceramic, porcelain, natural stone, and glass tiles. Each material possesses distinct characteristics that make it suitable for different applications.
Ceramic tiles are often a cost-effective choice, offered in a wide array of colors, patterns, and sizes. They are relatively easy to cut and install, making them suitable for DIY projects. However, ceramic tiles are generally less dense and less heat-resistant than porcelain tiles. Porcelain tiles, manufactured at higher temperatures, are denser, more durable, and less porous, making them a better option for fireplaces that experience frequent or prolonged use. Their low porosity also makes them more resistant to stains and moisture damage.
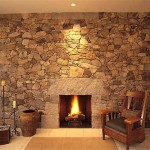
Natural stone tiles, such as slate, granite, and marble, offer a unique and luxurious aesthetic. Each stone tile exhibits natural variations in color and texture, adding character and visual interest to the fireplace surround. However, natural stone tiles often require sealing to protect them from stains and moisture. They can also be more expensive and require specialized cutting tools.
Glass tiles can create a striking visual effect with their reflective surfaces and vibrant colors. They are available in various sizes and shapes, including mosaic tiles, which allow for intricate designs. Glass tiles are generally heat-resistant and easy to clean, but they can be more susceptible to scratching and cracking than ceramic or porcelain tiles. The grout color chosen can also significantly affect the overall appearance of glass tile installations.
Preparing the Surface for Tiling
Proper surface preparation is essential for ensuring a strong and long-lasting bond between the tile and the substrate. This process typically involves cleaning, leveling, and priming the existing surface. Removing any existing paint, wallpaper, or loose debris is crucial. A wire brush or scraper can be used to effectively remove these materials.
Leveling the surface is equally important. Uneven surfaces can result in uneven tile lines and create stress points that can lead to cracking. Self-leveling compounds or thin-set mortar can be used to fill in low spots and create a smooth, even surface. A level and straightedge should be used to verify flatness across the entire area to be tiled.
Priming the surface enhances adhesion between the substrate and the thin-set mortar. A suitable primer should be selected based on the type of substrate. Porous surfaces, such as brick or concrete, may require a primer that seals the surface and prevents excessive absorption of moisture from the thin-set. Non-porous surfaces, such as smooth concrete, may require a primer that provides a textured surface for better adhesion. The primer should be applied according to the manufacturer's instructions and allowed to dry completely before proceeding with tiling.
Applying the Tile
The application of tile involves mixing and applying thin-set mortar, setting the tiles, and grouting the joints. Thin-set mortar, a cement-based adhesive, is mixed with water to create a paste-like consistency. The consistency should be such that it holds its shape but is still pliable enough to spread easily. Adhering strictly to the manufacturer's instructions regarding water-to-mortar ratio is crucial for achieving optimal bonding strength.
The thin-set mortar is applied to the prepared surface using a notched trowel. The size and shape of the notches determine the thickness of the mortar bed and the amount of adhesion provided. A larger notch size is generally required for larger tiles. The mortar should be applied in small sections, working from the bottom up, to prevent it from drying out before the tiles are set.
The tiles are then pressed firmly into the thin-set mortar, ensuring full contact with the adhesive. Tile spacers are used to maintain uniform grout lines. Regularly check the level of the tiles with a level and make adjustments as needed. After the thin-set mortar has cured for the recommended time (typically 24-48 hours), the tile spacers can be removed.
Grouting involves filling the spaces between the tiles with grout, a cement-based mixture. The grout should be mixed according to the manufacturer's instructions and applied using a grout float. The excess grout should be wiped away with a damp sponge. Several passes may be required to remove all the excess grout and smooth the grout lines. After the grout has cured, a grout sealer can be applied to protect the grout from stains and moisture penetration.
/102661017-6a23c040b71843379188b96b21ac1a08.jpg?strip=all "How To Tile A Fireplace")
How To Tile A Fireplace

How To Tile Over A Marble Fireplace Surround Porch Daydreamer

Fireplace Makeover How To Tile Over A Surround Love Remodeled

4 Great Ways To Give Your Fireplace A Makeover Using Tiles

How To Tile A Fireplace Even If It S Brick The Handyman Daughter

How To Tile Over A Fireplace Hunker

Fireplace Makeover How To Tile Over A Surround Love Remodeled
:strip_icc()/101343186-8909e34a95d74e0087ce39e27577ca41.jpg?strip=all "How To Tile A Fireplace Hearth")
How To Tile A Fireplace Hearth

How To Tile A Brick Fireplace Jenna Kate At Home

Diy Fireplace Makeover With Vinyl Tiles Sew Much Ado
Related Posts