Air Stone Over Brick Fireplace: A Modern Transformation
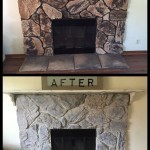
Brick fireplaces, while often possessing a classic charm, can sometimes feel dated or out of sync with a homeowner's evolving aesthetic. Over time, design preferences change, and the rough texture and reddish-brown hue of brick can clash with modern interior design schemes. One popular method for updating a brick fireplace is by installing air stone, a lightweight concrete veneer, over the existing brick structure. This article explores the process, benefits, and considerations involved in applying air stone over a brick fireplace, providing a comprehensive overview for those considering this transformative project.
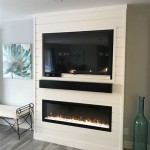
Air stone offers a versatile and aesthetically pleasing alternative to simply painting or demolishing a brick fireplace. It provides a more textural and dimensionally rich surface, allowing for a wide range of design possibilities. From contemporary linear designs to rustic stacked stone appearances, air stone can be customized to complement various interior styles. The application process, while not entirely simple, is generally less disruptive and more cost-effective than completely removing and rebuilding a fireplace.
Preparation is Paramount: Assessment and Cleaning
Before embarking on the air stone installation, thorough preparation is crucial. The first step involves a careful assessment of the brick fireplace's existing condition. Any loose or crumbling bricks should be repaired or replaced to provide a stable substrate for the air stone. Cracks and gaps need to be filled with appropriate patching compounds to ensure a smooth and even surface. Ignoring these underlying issues can compromise the longevity and appearance of the finished project.
Cleaning the brick surface is equally important. Over years of use, brick fireplaces accumulate soot, dust, and grease, which can interfere with the adhesion of the adhesive used to secure the air stone. A wire brush can be used to scrub away loose debris, followed by a thorough cleaning with a degreasing solution. Trisodium phosphate (TSP) is a commonly used cleaner for this purpose, but it is important to follow the manufacturer's instructions and wear appropriate protective gear, such as gloves and eye protection. After cleaning, the brick surface should be rinsed thoroughly with clean water and allowed to dry completely before proceeding.
In addition to cleaning, consider the fireplace's overall design and how the air stone will integrate with the existing structure. Measure the dimensions of the fireplace carefully to determine the amount of air stone needed. Factor in any cuts or waste that may occur during the installation process. It's generally advisable to purchase slightly more air stone than calculated to account for potential errors or future repairs. Furthermore, plan the layout of the air stone to achieve the desired aesthetic effect. Consider the pattern, color variations, and overall symmetry of the design.
Adhesive Application and Air Stone Installation
Selecting the correct adhesive is vital for ensuring a strong and lasting bond between the air stone and the brick surface. A high-quality polymer-modified thin-set mortar is generally recommended for this application. This type of mortar provides excellent adhesion, flexibility, and water resistance, crucial for withstanding the heat and temperature fluctuations associated with fireplace use. Always consult the air stone manufacturer's recommendations for the specific type of adhesive that is best suited for their product.
The adhesive should be mixed according to the manufacturer's instructions, creating a smooth, creamy consistency. Apply the thin-set mortar to the back of each air stone unit using a notched trowel. The notches create ridges in the mortar, which help to create a stronger bond by increasing the surface area. Press the air stone firmly onto the brick surface, ensuring that it is properly aligned and level. Use spacers to maintain consistent spacing between the air stone units. This creates a more uniform and professional look. The spacing also allows for grout to be applied later, if desired.
As the air stone is being installed, periodically check for level and plumb. Minor adjustments can be made while the mortar is still wet. Use a rubber mallet to gently tap the air stone into place if necessary. Work in small sections, allowing the mortar to set slightly before moving on to the next area. This prevents the air stone from sliding or shifting out of position. It is also advisable to dry-fit the air stone before applying the mortar. This allows for a visual assessment of the layout and ensures that the cuts will be made correctly. Making precise cuts is essential for achieving a seamless and professional finish, especially around corners and edges.
Grouting, Sealing, and Post-Installation Care
Once the air stone has been installed and the mortar has fully cured, typically after 24 to 48 hours, the joints can be grouted. Grouting fills the gaps between the air stone units, creating a more unified and finished appearance. The choice of grout color can significantly impact the overall aesthetic. A contrasting grout color can accentuate the individual air stone units, while a matching grout color can create a more seamless and monolithic look. A sanded grout is generally recommended for larger joints.
Applying the grout involves spreading it evenly over the air stone surface, filling the joints completely. Use a grout float to work the grout into the gaps, ensuring that there are no voids or air pockets. After the grout has partially set, use a damp sponge to wipe away the excess grout from the surface of the air stone. Be careful not to remove too much grout from the joints. Rinse the sponge frequently to avoid smearing the grout. After the grout has fully cured, typically after 72 hours, polish the air stone surface with a clean, dry cloth to remove any remaining grout haze.
Sealing the air stone is an optional but recommended step. A sealant provides a protective barrier against moisture, stains, and soot. It also makes the air stone easier to clean. Choose a sealant that is specifically designed for use on concrete or stone surfaces. Apply the sealant according to the manufacturer's instructions, typically with a brush or roller. Allow the sealant to dry completely before using the fireplace. Depending on the type of sealant used, it may be necessary to reapply it periodically.
Regular maintenance is essential for preserving the appearance of the air stone fireplace. Clean the surface regularly with a mild detergent and water. Avoid using harsh chemicals or abrasive cleaners, as these can damage the air stone. Wipe up spills immediately to prevent staining. Inspect the air stone periodically for any signs of damage, such as cracks or loose pieces. Repair any damage promptly to prevent further deterioration. Proper care and maintenance will ensure that the air stone fireplace remains beautiful and functional for years to come.
Installing air stone over a brick fireplace is a significant undertaking that requires careful planning, meticulous execution, and appropriate materials. While it can dramatically enhance the appearance of the fireplace and transform the entire room, it is essential to approach the project with a clear understanding of the steps involved and the potential challenges. When executed properly, air stone provides a durable, aesthetically pleasing, and cost-effective solution for updating a dated brick fireplace.

Brick Fireplace Makeover Pine And Prospect Home

Airstone Fireplace Makeover The Lettered Cottage

Brick Fireplace Makeover Pine And Prospect Home

Airstone Fireplace Makeover

Diy Stone Fireplace With Airstone Binkies And Briefcases

How Do You Apply Airstone Brick On Fireplace Wall With A Mantel Hometalk

Brick Fireplace Makeover Pine And Prospect Home

Diy Stone Fireplace With Airstone Binkies And Briefcases

Installing Some Airstone Over Top A Brick Fireplace

The Fireplace Makeover Part 2 Airstone Faux Rock Beckwith S Treasures
Related Posts