How to Reface a Brick Fireplace: A Comprehensive Guide
Refacing a brick fireplace is a significant home improvement project that can dramatically alter the aesthetic of a living space. This process involves covering the existing brick with a new material, offering a fresh, updated look while maintaining the structural integrity of the original fireplace. This article provides a detailed guide on how to reface a brick fireplace, outlining the necessary steps, tools, and considerations for a successful outcome.
Before embarking on the refacing project, careful planning and preparation are essential. This encompasses evaluating the existing fireplace structure, selecting the appropriate refacing material, and gathering the necessary tools and safety equipment. Neglecting these preliminary steps can lead to complications and unsatisfactory results.
The first step is a thorough inspection of the existing brick fireplace. It is crucial to identify any structural issues, such as cracks, loose bricks, or water damage. Addressing these problems before refacing is paramount to ensure the longevity and safety of the fireplace. Minor cracks can often be repaired with masonry crack filler, while loose bricks may require re-mortaring. Significant structural damage may necessitate professional assessment and repair before proceeding with the refacing process.
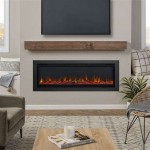
Selection of the refacing material is a critical decision that will greatly influence the final appearance of the fireplace. Numerous options are available, each with its own characteristics, advantages, and disadvantages. Common choices include stone veneer, tile, wood, and even metal panels. Stone veneer offers a natural, rustic look, while tile provides a clean, modern aesthetic. Wood can add warmth and character, while metal panels offer a sleek, contemporary design. The choice of material should be based on personal preferences, the overall style of the room, and the budget for the project.
Once the refacing material has been selected, it is necessary to gather the tools and materials required for the installation. These typically include a measuring tape, level, pencil, mortar or adhesive suitable for the chosen material, trowel, notched trowel (if using tile or stone veneer), wet saw (for cutting stone or tile), safety glasses, work gloves, drop cloths, and a mixing bucket. Ensure all tools are in good working order before starting the project.
Preparing the Brick Surface
Proper preparation of the brick surface is crucial for ensuring a strong and lasting bond between the brick and the refacing material. This involves cleaning the brick, roughening the surface to improve adhesion, and applying a bonding agent if necessary.
The first step in preparing the brick surface is to thoroughly clean it. This removes any dirt, dust, soot, or grease that could interfere with the adhesion of the mortar or adhesive. A wire brush and a solution of trisodium phosphate (TSP) or a similar degreasing cleaner can be used to scrub the brick. After scrubbing, rinse the brick thoroughly with clean water and allow it to dry completely. This may take several hours or even overnight, depending on the humidity levels.
After cleaning, the brick surface must be roughened to provide a better key for the mortar or adhesive. This can be achieved by scoring the surface with a chisel or grinder. The goal is to create small grooves and indentations that will allow the mortar or adhesive to grip the brick more effectively. Exercise caution when using power tools to avoid damaging the brick.
In some cases, a bonding agent may be required to further enhance the adhesion between the brick and the refacing material. This is particularly important when working with smooth brick surfaces or when using certain types of refacing materials. A bonding agent is typically applied with a brush or roller and allowed to dry according to the manufacturer's instructions.
Applying the Refacing Material
The application of the refacing material will vary depending on the specific material chosen. However, the general principles remain the same: careful measurement, precise cutting, and accurate placement.
Begin by measuring the dimensions of the fireplace and planning the layout of the refacing material. This will help to minimize waste and ensure a symmetrical and aesthetically pleasing result. Use a level to ensure that the refacing material is installed straight and plumb.
Cut the refacing material to the required sizes and shapes using a wet saw, tile cutter, or other appropriate tool. Accuracy is crucial, as even small errors can accumulate and lead to a crooked or uneven appearance. Dry-fit the pieces before applying the mortar or adhesive to ensure a proper fit.
Apply the mortar or adhesive to the back of the refacing material using a trowel or notched trowel, following the manufacturer's instructions. Press the refacing material firmly against the brick surface, ensuring good contact. Use spacers to maintain consistent spacing between the pieces, if necessary. Continuously check with a level to ensure plumb and alignment. Remove any excess mortar or adhesive immediately with a damp sponge.
Finishing Touches and Safety Precautions
Once the refacing material has been installed, some finishing touches may be necessary to complete the project. This may include grouting, sealing, or applying a protective coating.
If grout is required, apply it according to the manufacturer's instructions. Use a grout float to press the grout into the joints and then wipe away any excess with a damp sponge. Allow the grout to dry completely before sealing it, if necessary.
Consider applying a sealant or protective coating to the refacing material to protect it from stains, water damage, and other environmental factors. This is particularly important for porous materials such as stone veneer. Follow the manufacturer's instructions for application and drying time.
Throughout the refacing process, it is crucial to prioritize safety. Always wear safety glasses and work gloves to protect your eyes and hands. Use a dust mask or respirator when cutting or grinding materials to avoid inhaling harmful dust particles. Work in a well-ventilated area to minimize exposure to fumes from adhesives or sealants. If unsure about any aspect of the project, consult a qualified professional.

Reface A Fireplace With The Look Of Stone Or Brick Barron Designs

16 Red Brick Fireplace Makeover Ideas

Our Transformed Fireplace Before After Reface Diy Update
:max_bytes(150000):strip_icc()/MadetobeaMommaBefore-5bb2476446e0fb002607ad4f.jpg?strip=all "Before And After Fireplace Makeovers")
Before And After Fireplace Makeovers

A Step By Guide To Fireplace Refacing Diy Family Handyman

How To Plaster A Brick Fireplace So Much Better With Age

How I Refaced My 1970 S Brick Fireplace Easily And Inexpensively

16 Red Brick Fireplace Makeover Ideas

How To Cover A Brick Fireplace With Wood Stone Nina Hendrick Home Remodel Diy

15 Fabulous Fireplace Refacing Ideas Average But Inspired