Replacing A Fireplace Damper: A Comprehensive Guide
A fireplace damper is a crucial component of a functional and efficient fireplace system. Its primary role is to seal the chimney when the fireplace is not in use, preventing heat loss from the home during colder months and keeping out unwanted rain, snow, and debris. A malfunctioning damper can lead to significant energy waste and potentially allow pests or animals entry into the house. This article provides a comprehensive guide on how to replace a fireplace damper, covering the necessary steps, tools, and safety precautions.
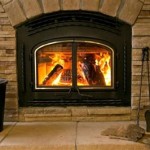
Before embarking on this project, it is essential to understand the different types of fireplace dampers. The two main types are throat dampers and top-mounted dampers. Throat dampers are located just above the firebox within the chimney throat. They are typically made of cast iron or steel and are operated by a lever or handle located inside the firebox. Top-mounted dampers, also known as chimney top dampers, are installed at the very top of the chimney flue. They offer a tighter seal than throat dampers and are often controlled by a cable that runs down the chimney to a handle near the fireplace.
Determining the appropriate replacement damper requires careful measurement of the existing damper or the chimney flue. For throat dampers, measure the width and depth of the firebox opening. For top-mounted dampers, measure the inside diameter of the chimney flue. These measurements will ensure that the new damper fits properly and creates an airtight seal. It is also prudent to note the make and model of the existing damper, if possible, to potentially find a direct replacement.
Assessing the Existing Damper and Chimney
The first step in replacing a fireplace damper is to thoroughly inspect the existing damper and the surrounding chimney area. This inspection will help identify any contributing factors to the damper's failure and reveal any additional repairs that may be necessary. Look for signs of rust, corrosion, or physical damage to the damper itself. Examine the linkage that connects the damper to the control handle, ensuring it moves freely and is not broken or bent. Visually inspect the mortar joints around the damper frame for cracks or crumbling mortar. Use a flashlight to examine the chimney flue for any signs of creosote buildup, which can indicate a need for professional chimney cleaning before installing the new damper.
If the damper is stuck in the open or closed position, attempt to free it by applying penetrating oil to the moving parts. Allow the oil to soak in for several hours or overnight. Gently try to move the damper back and forth to loosen any debris or rust that may be preventing it from operating properly. Avoid using excessive force, as this could further damage the damper or the surrounding chimney structure. If the damper remains stuck after lubrication, it may be necessary to disassemble it for further inspection and cleaning.
Addressing any underlying issues, such as creosote buildup or damaged mortar, is crucial for ensuring the longevity and proper function of the new damper. Creosote is a highly flammable substance that accumulates in the chimney flue as a byproduct of burning wood. It can pose a significant fire hazard if not properly removed. Damaged mortar joints can allow water to seep into the chimney, which can contribute to further deterioration and damage to the damper. Addressing these issues before installing the new damper will help prevent future problems and ensure the safety and efficiency of the fireplace.
Removing the Old Damper
The removal process varies depending on the type of damper. For a throat damper, the removal typically involves detaching it from its mounting brackets or screws. Begin by disconnecting the damper control handle from the damper blade. This may involve loosening a setscrew or removing a retaining pin. Once the handle is disconnected, carefully lift the damper blade out of the firebox. If the damper is heavily corroded or stuck, use a penetrating oil to loosen any rust or debris. If the damper is secured with screws, use a screwdriver to remove them. If the screws are stripped or broken, a screw extractor may be necessary. For a top-mounted damper, the removal typically involves disconnecting the cable from the control handle and loosening the clamps that secure the damper to the chimney flue. Carefully lower the old damper down the chimney or remove it from the top, taking precautions to avoid dropping it and causing damage.
When removing the old damper, it is important to wear appropriate safety gear, including gloves, safety glasses, and a dust mask. This will protect against potential hazards such as sharp edges, debris, and airborne particles. If working at heights, such as on the roof to remove a top-mounted damper, ensure that proper fall protection measures are in place, such as a safety harness and lifeline. It is also advisable to have a helper present to assist with the removal process, especially when dealing with heavy or unwieldy dampers.
After the old damper has been removed, thoroughly clean the area where the new damper will be installed. Remove any loose debris, soot, or rust. Use a wire brush to scrub the surface and ensure it is free from any obstructions. If there are any damaged mortar joints, repair them using a suitable mortar mix. This will provide a solid and level surface for the new damper to be installed. Ensure the chimney flue is clear and free of obstructions before proceeding with the installation of the new damper. A chimney sweep can be employed to provide a professional cleaning of the chimney flue prior to damper replacement.
Installing the New Damper
The installation process varies depending on the type of damper. For a throat damper, carefully position the new damper within the firebox, aligning it with the mounting brackets or screw holes. Secure the damper in place using screws or bolts, ensuring that it is level and properly aligned. Reconnect the damper control handle to the damper blade, ensuring that the linkage moves freely and allows the damper to open and close smoothly. For a top-mounted damper, position the new damper on top of the chimney flue, aligning it with the opening. Secure the damper in place using clamps or screws, ensuring that it is properly sealed to prevent air leaks. Connect the cable to the control handle, ensuring that it operates smoothly and allows the damper to open and close fully.
When installing the new damper, it is crucial to follow the manufacturer's instructions carefully. These instructions will provide specific details on the installation process and ensure that the damper is installed correctly. Use the correct tools and hardware as specified in the instructions. Avoid overtightening screws or bolts, as this could damage the damper or the surrounding chimney structure. Ensure that all connections are secure and properly sealed to prevent air leaks. A properly installed damper will create an airtight seal when closed, preventing heat loss and ensuring the efficiency of the fireplace.
After the new damper has been installed, test its operation to ensure that it opens and closes smoothly and seals tightly. Open and close the damper several times, checking for any obstructions or binding. Visually inspect the damper to ensure that it is properly aligned and that there are no gaps or leaks. If the damper does not operate smoothly or does not seal tightly, adjust the linkage or tighten the clamps as necessary. Repeat the testing process until the damper is functioning properly. A properly functioning damper is essential for the safe and efficient operation of the fireplace.
In conclusion, replacing a fireplace damper is a manageable project for a homeowner with basic DIY skills. Careful planning, accurate measurements, and adherence to safety guidelines are key to a successful installation. Addressing any underlying issues with the chimney or fireplace structure is crucial for ensuring the longevity and efficient operation of the new damper.

Nicholas Chimney Sweeping Stove Fireplace Services Vienna Virginia

Removing A Fireplace Damper For Chimney Liner Installation Rockford

Fireplace Damper Repair Full Service Chimney Kansas City

How To Fix A Stuck Fireplace Damper The Blog At Fireplacemall

Don T Let A Leaky Chimney Damper Dampen Your Spring American Masonry

How To Make A Fireplace Damper Ehow

What Is A Chimney Damper Full Service

Fireplace Dampers Throat Vs Top Mount Swede Chimney Sweep Dryer Vent Cleaning

What Is A Chimney Damper Full Service

Chimney Dampers In Chicago Capital Corp
Related Posts