How To Replace a Brick Fireplace with Stone: A Comprehensive Guide
Replacing a brick fireplace with a stone alternative is a significant home renovation project that can dramatically alter the aesthetic of a room. This undertaking involves careful planning, meticulous demolition, structural considerations, and skilled installation. Although hiring a professional mason is often recommended, understanding the process can help homeowners make informed decisions and potentially tackle simpler aspects of the project themselves. This article provides a comprehensive guide to replacing a brick fireplace with stone, outlining the necessary steps and considerations for a successful transformation.
Planning and Preparation: Setting the Foundation for Success
Before commencing any physical work, thorough planning and preparation are essential. This phase involves assessing the existing structure, selecting the appropriate stone, obtaining necessary permits, and gathering the required tools and materials. A well-defined plan minimizes potential complications and ensures a smoother execution.
The initial step is to carefully examine the existing brick fireplace. Note its dimensions, including height, width, and depth. Pay close attention to any existing structural elements, such as the firebox, chimney, and hearth. Determine the type of brick used and its overall condition. This assessment will inform the selection of the replacement stone and any necessary structural modifications.
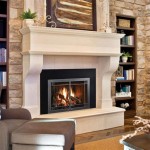
Selecting the right stone is crucial for both aesthetic appeal and structural integrity. Natural stone options include fieldstone, limestone, granite, and slate, each offering unique textures, colors, and characteristics. Manufactured stone veneer is also a viable alternative, providing a lighter weight and more uniform appearance. Consider the overall style of the room and choose a stone that complements the existing décor. Obtain samples of different stone types and compare them under various lighting conditions to ensure a satisfactory match.
Local building codes often require permits for fireplace renovations. Contact the local building department to determine the specific requirements for the project. This may involve submitting architectural drawings or obtaining inspections at various stages of the project. Failure to obtain the necessary permits can result in fines and delays.
Gather all the necessary tools and materials before starting the demolition process. Essential tools include a hammer, chisel, masonry saw, mortar mixer, level, trowel, safety glasses, gloves, and dust mask. Materials include mortar, stone, flashing, metal lath, and waterproofing membrane. Having everything readily available will streamline the process and prevent unnecessary interruptions.
Protect the surrounding area by covering floors and furniture with drop cloths. This will minimize dust and debris damage during the demolition phase. Ensure adequate ventilation and wear appropriate safety gear, including safety glasses, gloves, and a dust mask, to protect against potential hazards.
Demolition of the Existing Brick Fireplace: A Controlled Removal Process
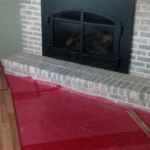
The demolition phase requires a methodical and controlled approach to avoid damaging the surrounding structure. Begin by carefully removing the existing fireplace surround, mantel, and any decorative elements. Use a hammer and chisel to gently chip away at the mortar joints, working from the top down. Avoid using excessive force, as this can damage the brick and surrounding walls.
Once the surround is removed, focus on the main body of the fireplace. Again, use a hammer and chisel to carefully remove the bricks, one by one. Start at the top and work your way down, being mindful of the structural integrity of the chimney and firebox. As you remove the bricks, dispose of them properly in a designated container. Avoid piling them in areas that could obstruct your work or create a safety hazard.
Inspect the firebox and chimney for any signs of damage or deterioration. Repair any cracks or loose bricks before proceeding with the stone installation. If the firebox is in poor condition, consider replacing it entirely. The chimney should also be inspected and cleaned to ensure proper ventilation. A professional chimney sweep can assess the chimney's condition and recommend any necessary repairs.
After the brick is removed, clean the exposed wall thoroughly. Remove any remaining mortar, dust, and debris. This will provide a clean surface for the stone to adhere to. Use a wire brush or scraper to remove stubborn mortar residue. Wipe down the wall with a damp cloth to remove any remaining dust.
Installation Of The Stone Veneer: Creating A New Fireplace Facade
The installation of the stone veneer is the most visually rewarding part of the project. This phase requires precision, patience, and attention to detail. Proper installation ensures a durable and aesthetically pleasing result. The process starts with preparing the wall surface and applying the mortar bed, followed by carefully placing the stones and finishing the mortar joints.
Begin by applying a waterproofing membrane to the exposed wall. This will protect the wall from moisture and prevent water damage. Overlap the membrane seams by at least six inches, and ensure it extends beyond the footprint of the fireplace. Then, install metal lath over the waterproofing membrane. Staple or nail the lath to the wall, overlapping the seams by at least two inches. The lath provides a rough surface for the mortar to adhere to.
Prepare the mortar according to the manufacturer's instructions. Use a mortar mixer to ensure a consistent and even mix. The mortar should have a thick, creamy consistency. Apply a layer of mortar to the metal lath using a trowel. The mortar bed should be approximately ¾ inch thick. Use a notched trowel to create grooves in the mortar bed. These grooves will help the stones adhere to the wall.
Begin placing the stones, starting at the bottom corner of the fireplace. Apply mortar to the back of each stone and press it firmly into the mortar bed. Use a level to ensure that the stones are aligned properly. Maintain consistent spacing between the stones. Use shims to adjust the spacing if necessary. Work your way up the fireplace, carefully placing each stone. Alternate the sizes and shapes of the stones to create a natural and random appearance.
Periodically check the alignment of the stones with a level. Adjust the stones as needed to ensure a straight and even surface. Use a rubber mallet to gently tap the stones into place. Remove any excess mortar that squeezes out between the stones. Use a damp sponge to clean the face of the stones. Allow the mortar to cure for at least 24 hours before proceeding to the next step.
After the mortar has cured, fill the mortar joints between the stones. Use a grout bag or a pointing trowel to apply the mortar to the joints. Pack the mortar tightly into the joints, ensuring they are completely filled. Remove any excess mortar from the face of the stones. Use a jointing tool to create a consistent and uniform finish on the mortar joints. There are several different jointing styles to choose from, including concave, flush, and raked. Choose a style that complements the overall aesthetic of the fireplace.
Allow the mortar joints to cure for at least 72 hours. During this time, keep the fireplace protected from the elements. After the mortar has cured, clean the face of the stones with a mild detergent and water. Use a soft brush to remove any remaining mortar residue. Rinse the stones thoroughly with clean water. Inspect the fireplace for any cracks or imperfections. Repair any damage as needed.
Finishing Touches: Completing the Fireplace Transformation
Once the stone veneer is installed and the mortar has cured, it's time to add the finishing touches. This involves installing the hearth, mantel, and any decorative elements. These additions enhance the aesthetic appeal of the fireplace and create a cohesive and inviting focal point in the room.
The hearth is the non-combustible area in front of the fireplace opening. It protects the surrounding flooring from sparks and embers. The hearth can be made of stone, brick, or concrete. Ensure the hearth extends at least 16 inches in front of the fireplace opening and 8 inches on either side. The hearth should be level and securely anchored to the floor. Use mortar to set the hearth in place. Allow the mortar to cure before using the fireplace.
The mantel is a decorative shelf that sits above the fireplace opening. It provides a focal point for the room and can be used to display photos, artwork, and other decorative items. The mantel can be made of wood, stone, or metal. Choose a mantel that complements the style of the fireplace and the overall décor of the room. Secure the mantel to the wall using appropriate fasteners. Ensure the mantel is level and securely attached.
Add any desired decorative elements, such as fireplace screens, tool sets, and decorative logs. These accessories enhance the functionality and aesthetic appeal of the fireplace. Choose accessories that complement the style of the fireplace and the overall décor of the room.
Finally, conduct a thorough inspection of the completed fireplace. Check for any cracks, loose stones, or other imperfections. Repair any damage as needed. Ensure the fireplace is properly ventilated and that the chimney is clear of obstructions. Have a professional chimney sweep inspect the chimney to ensure it is safe to use. Once you are satisfied with the final result, you can enjoy your newly transformed fireplace.

Read This Before Your Stone Fireplace Makeover Understanding Undertones

Pin By Tarra Wills Efkarpidis On For The Home Brick Fireplace Remodel Stone

Reface A Fireplace With The Look Of Stone Or Brick Barron Designs

Brick Fireplace Makeover Pine And Prospect Home

Stone Veneer Over A Brick Fireplace Updates The Look

How To Cover A Brick Fireplace With Stone

Transform Your Home Stone Veneer Over Brick Fireplace Guide

Did You Know Can Cover Your Existing Brick Fireplace Makeover Home Remodel

Stone Veneer Over A Brick Fireplace Updates The Look

Faux Stone Panels For Fireplaces
Related Posts