Cleaning a Gas Fireplace Pilot Light Igniter
A gas fireplace offers warmth and aesthetic appeal, providing a convenient alternative to traditional wood-burning fireplaces. One of the crucial components of a gas fireplace is the pilot light igniter, which is responsible for initiating the flame that heats the fireplace. Over time, this igniter can accumulate dust, debris, and carbon deposits, leading to ignition problems. Regular maintenance and cleaning of the pilot light igniter are essential for ensuring the reliable and efficient operation of the gas fireplace.
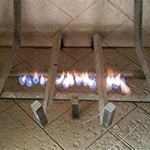
The pilot light igniter generates the initial spark needed to ignite the gas flowing to the pilot light. This small flame then ignites the main burner, producing the heat for the fireplace. If the igniter fails to function properly, the pilot light won’t light, rendering the fireplace unusable. Several factors can contribute to igniter failure, including dirt accumulation, corrosion, and worn-out components. Recognizing the signs of a faulty igniter and understanding the cleaning process are vital for maintaining a functional gas fireplace.
Before attempting to clean the pilot light igniter, it is imperative to prioritize safety. The gas supply to the fireplace must be completely shut off. This usually involves turning the gas valve to the "off" position. Allow sufficient time for the appliance to cool down before proceeding. It is also recommended to consult the manufacturer's instructions for specific safety precautions and guidelines related to the gas fireplace model.
Identifying Common Problems with Gas Fireplace Pilot Light Igniters
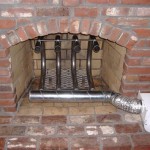
Several common issues can affect the functionality of a gas fireplace pilot light igniter. Recognizing these problems is the first step in troubleshooting and resolving ignition difficulties. One of the most frequent issues is a buildup of dust and debris on the igniter tip. This accumulation can obstruct the spark, preventing the pilot light from igniting. The debris can consist of dust particles, pet dander, or even spider webs.
Corrosion is another factor that can hinder the igniter's performance. Moisture and humidity can lead to the oxidation of the metal components of the igniter, resulting in a weakened or nonexistent spark. Corrosion is particularly prevalent in fireplaces located in damp or poorly ventilated areas. Visual inspection of the igniter may reveal signs of rust or discoloration.
A weak or faulty igniter module can also cause ignition problems. The igniter module is the electronic component that generates the high-voltage spark necessary to ignite the gas. Over time, this module can degrade or fail completely, requiring replacement. Testing the igniter module with a multimeter can help determine if it is functioning correctly. A reading outside the specified voltage range indicates a potential issue with the module.
Furthermore, a malfunctioning thermocouple or thermopile can indirectly affect the igniter's performance. The thermocouple/thermopile is a safety device that senses the presence of the pilot light flame. If the pilot light is not properly heating the thermocouple/thermopile, it will shut off the gas supply, preventing the main burner from igniting. In some cases, a dirty or corroded thermocouple/thermopile can mimic a faulty igniter.
Step-by-Step Guide to Cleaning a Gas Fireplace Pilot Light Igniter
Cleaning the pilot light igniter involves a systematic approach to remove dirt, debris, and corrosion. The following steps provide a detailed guide to safely and effectively cleaning the igniter:
1.
Safety First: Shut off the Gas Supply.
Before commencing any cleaning or maintenance work, ensure that the gas supply to the fireplace is completely shut off. Locate the gas valve, usually positioned near the fireplace, and turn it to the "off" position. Allow the fireplace to cool down completely to prevent any burns or accidents.2.
Accessing the Pilot Light Assembly:
Depending on the fireplace model, accessing the pilot light assembly may require removing a front panel or grate. Consult the manufacturer's instructions for specific guidance on how to access the pilot light assembly safely. Typically, screws or clips hold these components in place. Carefully detach them and set them aside in a safe location.3.
Visual Inspection:
Once the pilot light assembly is accessible, perform a thorough visual inspection of the igniter. Look for any signs of dirt, debris, corrosion, or damage. Note the condition of the igniter tip and any surrounding components. This visual assessment will help determine the extent of the cleaning required.4.
Cleaning the Igniter Tip:
Use a soft brush, such as a toothbrush or a small paintbrush, to gently remove any loose dirt or debris from the igniter tip. Avoid using abrasive materials or harsh chemicals, as these can damage the igniter. For stubborn debris, consider using a can of compressed air to blow away the particles. Be careful not to bend or break the igniter tip during the cleaning process.5.
Cleaning the Pilot Light Assembly:
In addition to cleaning the igniter tip, it is also advisable to clean the surrounding pilot light assembly. Use the soft brush to remove any dust or debris from the other components, such as the gas line connections and the thermocouple/thermopile. Again, avoid using abrasive materials or harsh chemicals.6.
Removing Corrosion (if present):
If visual inspection reveals signs of corrosion on the igniter tip or surrounding components, use a specialized electrical contact cleaner. This type of cleaner is designed to dissolve corrosion without damaging electrical components. Apply the cleaner sparingly to a clean cloth and gently wipe the affected areas. Allow the cleaner to sit for a few minutes before wiping it off with a dry cloth. Ensure that the cleaner does not come into contact with any plastic or rubber parts.7.
Reassembly:
Once the igniter and the pilot light assembly are thoroughly cleaned, carefully reassemble the fireplace. Ensure that all components are properly aligned and securely fastened. Refer to the manufacturer's instructions for guidance on the reassembly process.8.
Testing the Igniter:
After reassembly, turn the gas supply back on and attempt to light the pilot light. If the igniter sparks and the pilot light ignites successfully, the cleaning process has been successful. If the igniter still fails to spark or the pilot light does not ignite, further troubleshooting may be necessary. Consult a qualified gas fireplace technician for assistance.Preventative Measures to Prolong Igniter Life
Taking proactive measures can extend the lifespan of the gas fireplace pilot light igniter and minimize the frequency of cleaning. Regular maintenance and proper usage habits play a significant role in preventing ignition problems. One of the most effective preventative measures is scheduling annual professional maintenance for the gas fireplace. A qualified technician can inspect the igniter and other components, identify potential problems, and perform necessary cleaning and adjustments.
Keeping the area around the fireplace clean can also help prevent dust and debris from accumulating on the igniter. Regularly vacuuming or dusting the surrounding area can reduce the amount of airborne particles that settle on the fireplace components. It is also important to avoid placing objects, such as decorations or furniture, too close to the fireplace, as these can obstruct airflow and contribute to overheating.
During periods of inactivity, such as during the summer months, it is advisable to turn off the pilot light to conserve energy and prevent unnecessary wear and tear on the igniter. Some gas fireplaces have a pilot light control switch that allows users to easily turn the pilot light on and off as needed. Turning off the pilot light during prolonged periods of disuse can also reduce the risk of gas leaks.
Finally, ensuring proper ventilation in the room where the gas fireplace is located is essential for preventing moisture buildup and corrosion. Adequate ventilation helps to dissipate moisture and prevent the formation of condensation, which can lead to corrosion on the igniter and other metal components. Opening windows or using a dehumidifier can improve ventilation and reduce the risk of corrosion-related problems.

Gas Fireplace Repair Won T Work Start Or Light Piezo Ignitor Spark Igniter

How To Clean The Pilot Assembly On A Gas Fireplace Diy Guide For Homeowners

Diy Gas Fireplace Won T Light How To Clean Your Thermopile And Thermocouple

Gas Fireplace Pilot Lights Your Complete Guide Universe

Gas Fireplace Pilot Lights Your Complete Guide Universe

Fireplace Won T Stay Lit This Is How You Fix It

Gas Fireplace Pilot Light Won T Stay Lit Easy Fix

Gas Fireplace Won T Stay Lit Magic Touch Mechanical

Diy Gas Fireplace Won T Light How To Clean Your Thermopile And Thermocouple

Gas Fireplace Pilot Light Out How Can I It Again