How to Cover a Brick Fireplace With Tile
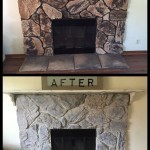
Covering a brick fireplace with tile offers a transformative aesthetic upgrade to any living space. This process allows homeowners to modernize the appearance of an existing fireplace, conceal outdated brick, and integrate the fireplace seamlessly with the overall design of the room. The project necessitates careful planning, preparation, and execution to ensure a durable and visually appealing result. A project of this nature typically takes anywhere from a weekend to a few days, depending on the size and complexity of the fireplace, as well as the chosen tile design.
This article provides a comprehensive guide on how to successfully cover a brick fireplace with tile, encompassing material selection, surface preparation, tile layout, installation techniques, and finishing touches. By following these instructions, individuals with moderate DIY skills can achieve professional-looking results and enhance the value and appeal of their homes.
Key Points Before Starting
Before embarking on the tiling project, several key considerations must be addressed to ensure a successful outcome. Failing to account for these points can lead to complications and potentially compromise the durability and appearance of the finished fireplace.
Assessing the Brick Surface: A thorough inspection of the existing brick is crucial. Look for loose or crumbling bricks, significant cracks, or uneven surfaces. Any structural issues must be addressed before tiling. Repoint any deteriorated mortar joints with fresh mortar. Leveling the surface is essential for proper tile adhesion and a professional finish. This may involve patching uneven areas with a concrete patching compound designed for masonry surfaces. The brick must be clean and free of dust, grease, soot, or any other contaminants that could interfere with the bonding of the mortar.
Selecting the Appropriate Tile: The choice of tile significantly impacts the overall aesthetic and performance of the fireplace. Consider the style of the room, the size of the fireplace, and personal preferences when selecting tile. Options range from classic ceramic and porcelain tiles to natural stone, glass, or mosaic tiles. Porcelain tile is a suitable choice due to its durability, resistance to heat, and low water absorption. Natural stone can provide a more rustic or elegant look, but it may require sealing and more maintenance. Glass tile can create a contemporary feel, but it may be more expensive and require specialized cutting tools. Ensure the chosen tile is rated for fireplace use and can withstand the fluctuating temperatures associated with a working fireplace. Furthermore, consider the tile's thickness and weight, as heavier tiles may require additional support or a stronger adhesive.
Planning the Tile Layout: Before applying any mortar, carefully plan the tile layout. This involves measuring the fireplace dimensions, determining the desired tile pattern, and accounting for grout lines. Use a level and a measuring tape to ensure the layout is symmetrical and consistent. Dry-laying the tile on the floor helps visualize the final appearance and allows for adjustments before committing to installation. Consider using spacers to maintain consistent grout lines throughout the installation. Mark the center point of the fireplace and work outwards, ensuring the tiles are evenly distributed. This step is critical for achieving a professional and visually appealing result.
Materials and Tools Required
Having the right tools and materials readily available is essential for efficient and accurate installation. Gather all necessary items before starting the project to avoid delays and ensure a smooth workflow.
Mortar: Select a high-quality, heat-resistant thin-set mortar specifically designed for use with tile and masonry surfaces. Choose a mortar that is suitable for the type of tile being used. Follow the manufacturer's instructions carefully when mixing the mortar, ensuring the correct consistency for optimal adhesion.
Grout: Choose a grout that complements the tile and the overall design of the fireplace. Options include sanded and unsanded grout, epoxy grout, and pre-mixed grout. Sanded grout is suitable for wider grout lines, while unsanded grout is typically used for narrow grout lines. Epoxy grout is highly durable and stain-resistant, making it a good choice for high-traffic areas. Choose a grout color that enhances the appearance of the tile and matches the desired aesthetic.
Tile Cutter: A tile cutter is necessary for cutting tiles to fit around the firebox opening and other architectural features. Manual tile cutters are suitable for straight cuts on ceramic or porcelain tiles. Wet saws are recommended for cutting harder materials like natural stone or glass tiles, as they provide more precision and reduce the risk of chipping or cracking.
Notched Trowel: A notched trowel is used to apply the thin-set mortar evenly to the brick surface. Choose a trowel with the appropriate notch size for the size and type of tile being used. The notch size determines the thickness of the mortar bed, which is crucial for proper tile adhesion.
Spacers: Tile spacers are used to maintain consistent grout lines between tiles. Choose the appropriate size spacers for the desired grout line width. Spacers help ensure a uniform and professional appearance.
Grout Float: A grout float is used to apply grout to the grout lines. The float should be held at a 45-degree angle to the tile surface, and grout should be pressed firmly into the joints.
Grout Sponge: A grout sponge is used to clean excess grout from the tile surface after grouting. The sponge should be damp, not wet, to prevent removing too much grout from the joints.
Level: A level is essential for ensuring the tiles are installed straight and even. Use a level to check the alignment of each tile and make adjustments as necessary.
Measuring Tape: A measuring tape is used for accurate measurements when planning the tile layout and cutting tiles.
Pencil: A pencil is used for marking cut lines on the tiles.
Safety Glasses: Safety glasses are essential for protecting the eyes from debris and dust during cutting and installation.
Gloves: Gloves are used to protect the hands from mortar and grout.
Step-by-Step Installation Guide
The installation process involves several key steps, each requiring careful attention to detail to ensure a successful outcome. Following these steps in order will minimize errors and produce a professional-looking result.
Surface Preparation: Thoroughly clean the brick surface using a wire brush and a solution of trisodium phosphate (TSP). Remove any loose mortar, dirt, or debris. Rinse the surface with clean water and allow it to dry completely. If the brick surface is uneven, apply a thin coat of concrete patching compound to level it out. Allow the patching compound to dry according to the manufacturer's instructions. Apply a bonding agent to the brick surface to improve the adhesion of the mortar.
Applying Mortar: Using a notched trowel, apply a layer of thin-set mortar to the brick surface. Hold the trowel at a 45-degree angle and spread the mortar evenly, creating ridges for the tiles to grip onto. Apply the mortar in small sections, working in manageable areas to prevent it from drying out before the tiles are installed.
Setting the Tiles: Press each tile firmly into the mortar, using a slight twisting motion to ensure good adhesion. Use tile spacers to maintain consistent grout lines between the tiles. Check the alignment of each tile with a level and make adjustments as necessary. Remove any excess mortar from the tile surface with a damp sponge.
Cutting Tiles: Use a tile cutter or wet saw to cut tiles to fit around the firebox opening and other architectural features. Measure carefully and mark the cut lines on the tiles with a pencil. Wear safety glasses and gloves when cutting tiles.
Grouting the Tiles: Allow the mortar to dry completely, typically for 24-48 hours, before grouting. Remove the tile spacers. Mix the grout according to the manufacturer's instructions. Using a grout float, apply grout to the grout lines, pressing it firmly into the joints. Hold the float at a 45-degree angle to the tile surface. Remove any excess grout from the tile surface with a damp sponge. Rinse the sponge frequently in clean water.
Cleaning and Sealing: Allow the grout to dry for the recommended time, typically 24-48 hours. Clean the tile surface with a clean, damp sponge to remove any grout haze. Apply a grout sealer to protect the grout from stains and moisture. Follow the manufacturer's instructions for applying the sealer. Allow the sealer to dry completely before using the fireplace.
By meticulously following these steps and prioritizing careful preparation, homeowners can transform their fireplace with tile, achieving a visually stunning and durable feature that adds both aesthetic appeal and value to their homes.

How To Tile A Fireplace Even If It S Brick The Handyman Daughter

How To Tile A Brick Fireplace Jenna Kate At Home

How To Tile A Fireplace Even If It S Brick The Handyman Daughter

A Step By Guide To Fireplace Refacing Diy Family Handyman

How To Tile Over A Brick Hearth Shine Your Light

Renovating With A Tile Over Brick Fireplace Design

Renovating With A Tile Over Brick Fireplace Design

How To Tile A Fireplace Even If It S Brick The Handyman Daughter

Slate Tile Over A Painted Brick Fireplace Ceramic Advice Forums John Bridge

How To Tile Over A Brick Fireplace Surround Shine Your Light
Related Posts