How To Build A Brick Fireplace Surround
Constructing a brick fireplace surround is a substantial home improvement project that can significantly enhance the aesthetic appeal and value of a living space. However, it necessitates meticulous planning, precise execution, and a solid understanding of masonry principles. This article will provide a detailed guide to the process, outlining the essential steps and considerations involved in building a brick fireplace surround.
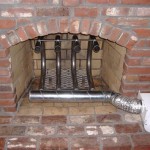
Prior to embarking on this endeavor, it is imperative to thoroughly assess the existing fireplace structure. The existing firebox and chimney must be in sound condition and meet local building codes. Any structural deficiencies should be addressed before proceeding with the brick surround installation. This might involve repairing cracks, replacing deteriorated mortar, or ensuring adequate chimney draft.
Furthermore, careful consideration must be given to the design of the brick surround. The chosen design should complement the existing architectural style of the room and provide a visual focal point. Factors such as brick color, pattern, and overall dimensions will impact the finished appearance. It is advisable to create detailed drawings or blueprints to visualize the final product and ensure accurate material calculations.
Safety precautions are paramount throughout the project. Eye protection, gloves, and a dust mask are essential when working with brick and mortar. Proper ventilation is necessary to avoid inhaling hazardous dust particles. Additionally, exercise caution when handling heavy materials and using power tools. Always adhere to manufacturer's instructions and safety guidelines.
Planning and Preparation
The initial phase involves meticulous planning and preparation. This includes gathering the necessary tools and materials, as well as preparing the work area. A comprehensive list of required tools includes a brick saw (wet saw recommended for dust control), a mortar mixer (or mixing tub and hoe), a trowel, a level, a plumb bob, a measuring tape, a brick hammer, a chisel, a joint filler tool (striker), and safety gear.
Material quantities will depend on the size and complexity of the surround design. Common materials include bricks (ensure they are fire-rated if the surround will be in close proximity to the firebox), mortar mix (Type N is generally suitable), fire-rated backer board (if required by local codes or for enhanced fire safety), metal lath (for supporting mortar on non-brick surfaces), and flashing (if the surround will extend to meet combustible materials). It is prudent to purchase slightly more materials than initially estimated to account for waste and potential errors.
The work area must be properly prepared to facilitate efficient and safe construction. This involves clearing the area around the fireplace of furniture and other obstructions. Protect the surrounding floor with drop cloths or plastic sheeting to prevent mortar stains. Ensure adequate lighting and ventilation are available. If necessary, construct a temporary scaffolding or platform to reach higher areas of the surround. Before beginning any work, consult local building codes and obtain any necessary permits.
Building the Brick Surround
The actual construction of the brick surround begins with preparing the foundation. If the existing floor is not level or structurally sound, a concrete footing may be necessary. The footing should extend beyond the footprint of the surround and be adequately reinforced. Allow the footing to cure completely before proceeding with the brickwork.
The first course of bricks is crucial for establishing a level and square base. Apply a generous layer of mortar to the foundation and carefully position the first brick, ensuring it is level and plumb. Continue laying the bricks, leaving consistent joint spacing (typically 3/8 inch) between each brick. Use shims or spacers to maintain uniform joint widths. Check the alignment frequently with a level and plumb bob.
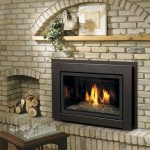
Subsequent courses of bricks are laid in a similar manner, using a mortar bed to bond each brick to the course below. Different brick patterns can be used to create visual interest. Common patterns include running bond (where each brick overlaps the one below by half its length), stack bond (where bricks are aligned directly above each other), and herringbone bond (where bricks are laid at a 45-degree angle). Choose a pattern that is aesthetically pleasing and structurally sound.
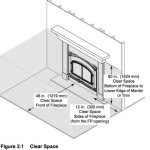
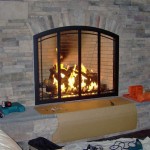
When constructing the surround around the firebox opening, it is essential to maintain proper clearances. Consult local building codes and the fireplace manufacturer's instructions to determine the minimum clearances required between the brickwork and the firebox. These clearances are necessary to prevent overheating and potential fire hazards. Fire-rated backer board may be required to provide additional insulation and protection.
As the brickwork progresses, periodically check the level and plumb of the surround. Make any necessary adjustments to ensure that the structure is straight and true. Use a brick hammer and chisel to remove excess mortar or make minor adjustments to brick placement. Clean any mortar smears from the brick surfaces with a damp sponge before the mortar dries completely.
Finishing and Detailing
Once the brickwork is complete, the mortar joints need to be finished and detailed. This involves removing excess mortar and creating a consistent and aesthetically pleasing joint profile. Use a joint filler tool (striker) to compress and smooth the mortar in the joints. Different joint profiles can be created, such as concave, V-joint, or flush joint. Choose a joint profile that complements the brick pattern and overall design.
After the mortar joints have been finished, allow the mortar to cure completely. The curing process typically takes several days to several weeks, depending on the ambient temperature and humidity. During this time, keep the brickwork damp to prevent the mortar from drying out too quickly. This will help to ensure a strong and durable bond.
Once the mortar has cured, the brick surround can be cleaned and sealed. Use a mild detergent and water to remove any remaining mortar residue or dirt. Rinse the brickwork thoroughly with clean water. Allow the brickwork to dry completely before applying a sealant. A brick sealant will help to protect the brick from moisture damage and staining. Choose a sealant that is specifically designed for use on brick and follow the manufacturer's instructions.
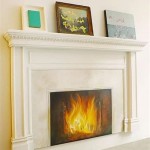
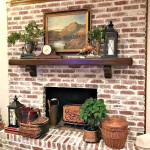
Finally, install any decorative elements, such as mantels, corbels, or trim. These elements can enhance the aesthetic appeal of the surround and provide a focal point. Ensure that these elements are securely attached to the brickwork using appropriate fasteners. The installation of a mantel requires careful consideration of weight distribution and support. Consult with a qualified contractor or structural engineer if necessary.
The completed brick fireplace surround should be visually appealing, structurally sound, and compliant with all applicable building codes. Regular maintenance, such as cleaning and inspection, will help to ensure its longevity and performance.

Easy Fireplace Mantel Diy

Diy Rustic Fireplace Mantel The Cure For A Boring

How To Build A Fireplace Surround Beneath My Heart

How To Make A Diy Fireplace Mantel The Idea Room

Diy Brick Fireplace

Fireplace Makeover The Lettered Cottage Diy Remodel

How To Build A Diy Built In Fireplace With An Electric Insert The Creative Mom

How To Make A Diy Fireplace Mantel The Idea Room Brick Decor Makeover Mantles

How To Build A Fireplace Surround Beneath My Heart

Diy Fireplace Mantel And Surround Jenna Kate At Home