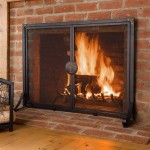
How to Replace Tile Around a Gas Fireplace with Wall Stickers
Replacing tile around a gas fireplace, especially when complicated by pre-existing wall stickers, requires careful planning, execution, and adherence to safety precautions. This project is achievable for a homeowner with intermediate DIY skills, but thoroughly understanding the process is essential before commencing work. The integrity of the fireplace surround is crucial not only for aesthetics, but also for fire safety and proper ventilation. This article provides a comprehensive guide to safely and effectively replacing tile around a gas fireplace that has wall stickers, covering preparation, removal of old materials, installation of new tiles, and final finishing.
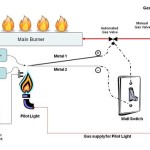
Before any physical work begins, there are several crucial preliminary steps. First and foremost, the gas supply to the fireplace must be shut off. This is non-negotiable and should be performed by a qualified gas technician to ensure safety. Locate the gas shut-off valve – it is typically located near the fireplace or outside the house. If unsure, consult a professional. Second, carefully inspect the existing tile, grout, and underlying substrate. Identify areas of damage, looseness, or water infiltration. This assessment will inform the amount of material needed and any necessary substrate repairs. Third, assess the type of wall stickers that are present. Their adhesive properties will influence the removal method. Some might peel off relatively easily, while others might require heat assistance or chemical solvents. Document the existing layout and design of the tile arrangement, especially if replicating it. Measure the dimensions of the area to be tiled precisely to calculate the quantity of new tiles, grout, and adhesive needed. Add a buffer of approximately 10% extra material to account for cuts, breakage, and future repairs. Finally, gather all necessary tools and materials before starting the demolition phase. This prevents interruptions and ensures a smooth work flow.
Key Point 1: Safe Removal of Existing Materials and Wall Stickers
The removal stage is often the most physically demanding and potentially messy. Prioritize personal safety by wearing safety glasses, gloves, and a dust mask. This protects eyes, hands, and respiratory system from debris and dust. Protect the surrounding area, including the fireplace unit itself and the floor, with drop cloths or plastic sheeting. Secure the coverings with painter's tape to prevent shifting. Start by removing the grout. A grout removal tool, either manual or powered, is required. For narrow grout lines, a manual grout saw is often sufficient. For wider grout lines, a powered oscillating multi-tool with a grout removal blade is more efficient. Work carefully to avoid damaging the surrounding tiles or the underlying substrate. Once the grout is removed, begin removing the tiles. Use a chisel and hammer to gently tap behind the tiles, working from the edges towards the center. Apply steady, controlled pressure. If the tiles are particularly difficult to remove, consider using a heat gun to soften the adhesive. Be extremely cautious when using heat near a gas fireplace, even with the gas supply shut off. Avoid overheating the surrounding materials. As tiles are removed, immediately dispose of them in a designated container to prevent tripping hazards and clutter. Now, address the removal of the wall stickers. The method will depend on the type of adhesive used. Try peeling them off carefully, starting at a corner. If the sticker resists removal, apply heat from a hairdryer to soften the adhesive. This may make it easier to peel away gradually. If heat is ineffective, try using a citrus-based adhesive remover. Apply the remover according to the manufacturer's instructions. Let it sit for the recommended time, then try peeling again. In some cases, a plastic scraper may be necessary to gently lift the edges of the sticker. Be careful not to scratch or damage the underlying surface. After removing the stickers, there may be adhesive residue remaining. Clean this residue with a suitable solvent, following the solvent manufacturer's instructions and wearing appropriate personal protective equipment. Thoroughly clean the substrate after removing all tiles, grout, and sticker residue. Use a vacuum cleaner to remove loose debris and dust. Wipe the surface with a damp sponge to remove any remaining contaminants. Allow the substrate to dry completely before proceeding to the next step.
Key Point 2: Preparing the Substrate and Installing New Tiles
The condition of the substrate is paramount for a successful tile installation. Inspect the substrate for any signs of damage, such as cracks, crumbling, or water damage. Repair any imperfections before installing new tiles. For small cracks, use a patching compound designed for masonry or concrete. Apply the compound according to the manufacturer's instructions and allow it to dry completely. For larger areas of damage, consider applying a concrete or cement backer board. This provides a stable, moisture-resistant surface for tiling. Cut the backer board to size using a scoring knife or circular saw. Attach the backer board to the existing substrate using screws specifically designed for backer board installation. Ensure that the screws are driven flush with the surface of the backer board to prevent interference with the tile installation. Before applying the thin-set mortar, prime the substrate with a suitable primer. This improves the adhesion of the thin-set and helps prevent moisture from being absorbed into the substrate. Select a thin-set mortar appropriate for the type of tile being used. Mix the thin-set according to the manufacturer's instructions. Use a notched trowel to apply the thin-set to the substrate. The size of the notch will depend on the size of the tiles. Hold the trowel at a 45-degree angle and create even ridges in the thin-set. Press the tiles firmly into the thin-set, using a slight twisting motion to ensure good contact. Use tile spacers to maintain consistent grout lines. Periodically check the tiles with a level to ensure they are flush and even. Make any necessary adjustments before the thin-set begins to set. For tiles that require cutting, use a wet saw. This provides clean, precise cuts and minimizes dust. Wear safety glasses when operating a wet saw. After all the tiles are installed, allow the thin-set to dry completely according to the manufacturer's instructions. This typically takes 24-48 hours.
Key Point 3: Grouting, Sealing, and Final Touches
After the thin-set has cured, it's time to grout the tiles. Remove the tile spacers. Prepare the grout according to the manufacturer's instructions, choosing a color that complements the tiles. Apply the grout using a grout float, working diagonally across the tile surface. Force the grout into the grout lines, ensuring they are completely filled. Remove excess grout from the tile surface with the grout float. Use a damp sponge to clean the tile surface, rinsing the sponge frequently. Wipe the tiles gently, avoiding excessive pressure that could remove grout from the grout lines. Allow the grout to haze over for a few minutes, then use a clean, dry cloth to buff the tiles. This removes any remaining grout residue. Allow the grout to cure completely according to the manufacturer's instructions. This typically takes several days. Once the grout has cured, apply a grout sealer. This protects the grout from staining and moisture penetration. Apply the sealer according to the manufacturer's instructions. Allow the sealer to dry completely. Inspect the finished tile installation for any imperfections. Touch up any areas as needed. Clean the surrounding area thoroughly, removing any debris or dust. Reattach any trim or molding that was removed during the demolition process. If applicable, carefully reinstall any fireplace accessories. Consult the gas technician to re-establish the gas supply and test the fireplace for proper operation. Ensure that the fireplace is functioning safely and efficiently before using it. Regularly clean the tile surface with a mild detergent and water to maintain its appearance. Avoid using abrasive cleaners or scouring pads, as these can damage the tile or grout. Periodically inspect the grout for cracks or damage and repair them as needed. With proper care and maintenance, the newly tiled fireplace surround will provide years of enjoyment and beauty.

Fireplace Makeover Diy Er Budget Friendly Adhesive Wallpaper Ashleigh Lauren

It Worked L And Stick Tile On Brick Fireplace

It Worked L And Stick Tile On Brick Fireplace

Fireplace Wall Sticker Mural Covering Decal Art L And Stick Self Adhesive Fire 8

Fireplace Wall Stickers Tenstickers

L And Stick Tile Fireplace Ideas Clever Mosaics

Longking Morocco Blue 11 7 In X Vinyl L And Stick Tile Backsplash Wall 9 5 Sq Ft Pack Lk17t32p10

Fireplace Wall Sticker Mural Covering Decal Art L And Stick Self Adhesive Fire 8

Kitchen Backsplash Ideas 2024 Er Friendly Wall Decals L And Stick The Tile Smart Waterproof Floor Tiles

Jeedeson L And Stick Kitchen Backsplash Tiles 12 In X Self Adhesive Wall For Gray Marble Vinyl 30 Pack Qt Dw001 30p The Home Depot
Related Posts