How To Replace Tile Around a Gas Fireplace Wallstick
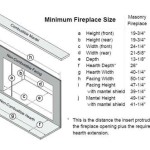
Replacing tile around a gas fireplace wallstick requires careful planning and execution due to the proximity of gas lines and the potential for damage to the fireplace unit itself. This article provides a detailed guide on how to safely and effectively replace the tile surrounding a gas fireplace wallstick, ensuring a professional and aesthetically pleasing result. It covers essential safety precautions, necessary tools and materials, step-by-step procedures for removal and installation, and considerations for selecting appropriate replacement tiles.Before commencing any work, it is paramount to understand the scope of the project. Determine the extent of the tile replacement. Is it a complete overhaul, or are only a few tiles being replaced? Assessing the damage or desired aesthetic change will inform the quantity of materials needed and the overall timeframe for completion. Take detailed photographs of the existing tile arrangement before starting the demolition. This will serve as a valuable reference during the reinstallation process, especially if replicating the original design.
### Safety Precautions are CrucialWorking around a gas fireplace necessitates strict adherence to safety protocols. Gas leaks are a severe hazard and can lead to explosions or asphyxiation. Before any demolition work begins, the gas supply to the fireplace must be shut off. Locate the gas shut-off valve, typically situated near the fireplace or at the gas meter. Turn the valve to the "off" position. To further ensure safety, consider contacting a qualified gas technician to inspect the shut-off valve and confirm that the gas supply is completely disconnected. This professional verification adds an extra layer of security, minimizing the risk of accidental gas leaks.
Protecting oneself from injury is equally important. Wear safety glasses to shield the eyes from flying debris during tile removal. Use work gloves to protect the hands from sharp edges and abrasive materials. If the demolition generates fine dust, wear a dust mask or respirator to prevent inhalation. This is particularly important if the existing tile contains asbestos, a hazardous material often found in older construction. If asbestos is suspected, professional testing and abatement are mandatory before any demolition begins.
Furthermore, protect the surrounding area from damage. Cover the fireplace unit itself with a drop cloth or plastic sheeting to prevent scratches or dents. Spread drop cloths on the floor to catch falling debris and protect the flooring. Secure the drop cloths with painter's tape to prevent them from shifting during the work. By taking these precautions, the risk of damage to the fireplace and surrounding surfaces is significantly reduced.
### Assembling the Necessary Tools and MaterialsHaving the right tools and materials readily available will streamline the tile replacement process and ensure a professional finish. A comprehensive list includes:
*Safety Gear:
Safety glasses, work gloves, dust mask or respirator. *Demolition Tools:
Hammer, chisel, grout removal tool (manual or powered), putty knife, scraper. *Installation Tools:
Trowel (appropriate size for the tile), notched trowel (specific notch size recommended by the tile adhesive manufacturer), tile cutter (manual or wet saw), tile nippers, level, measuring tape, pencil. *Materials:
Replacement tiles, tile adhesive (thin-set mortar), grout, grout sealant, backer board (if required), backer board screws, painter's tape, sponges, clean cloths, bucket, water. *Optional Tools:
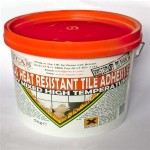
Angle grinder with a diamond blade (for cutting tiles in place), caulk gun (for applying sealant around the fireplace).The selection of replacement tiles is crucial for both aesthetics and functionality. Choose tiles that are compatible with the heat output of the fireplace. Porcelain and ceramic tiles are generally suitable for fireplace surrounds, but always consult the manufacturer's specifications. Consider the style and color of the existing décor to ensure a cohesive look. Order slightly more tiles than needed to account for cuts, breakage, and future repairs. The type of tile adhesive (thin-set mortar) should be specifically formulated for the type of tile being installed and the substrate to which it will be applied. Read the manufacturer's instructions carefully to ensure proper mixing and application.
Grout comes in a variety of colors and types. Choose a grout color that complements the tiles and the surrounding décor. Epoxy grout is more durable and stain-resistant than cement-based grout, making it a good choice for high-traffic areas or areas prone to spills. Grout sealant is essential for protecting the grout from moisture and stains. Apply grout sealant after the grout has cured according to the manufacturer's instructions.
### Step-by-Step Tile Removal and InstallationThe process of replacing tile around a gas fireplace wallstick involves several distinct phases, each requiring careful attention to detail.
1. Tile Removal:
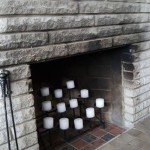
Begin by removing the existing grout. Use a manual grout removal tool or a powered grout saw to carefully remove the grout surrounding each tile. Avoid damaging the adjacent tiles or the substrate. Once the grout is removed, use a hammer and chisel to gently tap the tiles loose. Start at a corner or edge and work your way inward. Be careful not to apply excessive force, as this could damage the fireplace unit or the surrounding wall. As the tiles are removed, clean the substrate to remove any remaining adhesive or debris. A putty knife or scraper can be used to remove stubborn adhesive. If the substrate is damaged or uneven, it may need to be repaired or replaced before installing the new tiles.
2. Substrate Preparation:
The substrate is the surface to which the tiles will be attached. It must be clean, dry, and level to ensure proper adhesion. If the existing substrate is damaged or unsuitable, install a new backer board. Backer board is a cement-based material that provides a stable and moisture-resistant surface for tile installation. Cut the backer board to the appropriate size and shape using a utility knife or circular saw. Attach the backer board to the wall using backer board screws, spacing the screws according to the manufacturer's instructions. Ensure that the backer board is flush with the surrounding wall. Apply seam tape to the joints between the backer board panels to prevent cracking.
3. Tile Layout and Cutting:
Before applying the tile adhesive, dry-fit the tiles to determine the optimal layout. This will help to identify any areas that require cutting and ensure that the tiles are evenly spaced. Use tile spacers to maintain consistent grout lines. If cuts are necessary, use a manual tile cutter or a wet saw. A manual tile cutter is suitable for straight cuts, while a wet saw is better for more complex cuts. For small or irregular cuts, use tile nippers. Wear safety glasses when cutting tiles to protect the eyes from flying debris.
4. Tile Installation:
Mix the tile adhesive according to the manufacturer's instructions. Use a clean bucket and a mixing paddle to ensure a smooth and consistent consistency. Apply the adhesive to the substrate using a trowel. Use a notched trowel to create ridges in the adhesive, which will help to improve adhesion. Apply the adhesive in small sections, working from the bottom up. Press the tiles firmly into the adhesive, using a slight twisting motion to ensure good contact. Use tile spacers to maintain consistent grout lines. Use a level to ensure that the tiles are installed evenly.
Periodically check the alignment of the tiles and make any necessary adjustments before the adhesive sets. Remove any excess adhesive from the surface of the tiles with a damp sponge. Allow the adhesive to cure according to the manufacturer's instructions, typically 24-48 hours.
5. Grouting and Sealing:
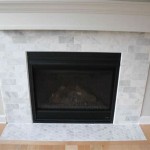
Once the adhesive has cured, remove the tile spacers. Mix the grout according to the manufacturer's instructions. Apply the grout to the tile joints using a grout float. Work the grout into the joints, ensuring that they are completely filled. Remove any excess grout from the surface of the tiles with a damp sponge. Allow the grout to dry for a few minutes, then use a clean, dry cloth to buff the tiles. Allow the grout to cure according to the manufacturer's instructions, typically 24-72 hours. Once the grout has cured, apply grout sealant to protect it from moisture and stains. Apply the sealant according to the manufacturer's instructions.
### Considerations for Fireplace Surround DesignThe design of the fireplace surround plays a significant role in the overall aesthetic of the room. When selecting replacement tiles, consider the following factors:
*Style:
Choose tiles that complement the existing décor of the room. Consider the style of the fireplace itself, as well as the furniture and other accessories. *Color:
Select a tile color that complements the surrounding walls and flooring. Neutral colors are a safe choice, but bolder colors can add visual interest. *Texture:
Experiment with different tile textures to create visual interest. Textured tiles can add depth and dimension to the fireplace surround. *Size:
Choose a tile size that is appropriate for the size of the fireplace surround. Larger tiles can make a small fireplace surround appear larger, while smaller tiles can add detail to a larger fireplace surround. *Pattern:
Consider using a tile pattern to add visual interest. Herringbone, subway, and mosaic patterns are popular choices.In addition to the tile itself, consider adding other decorative elements to the fireplace surround, such as a mantel, a hearth, or decorative trim. These elements can enhance the overall look and feel of the fireplace.
After the tile is installed and the adhesive and grout are properly cured, inspect the installation for any cracks, loose tiles, or imperfections in the grout. Repair any issues immediately to prevent further damage and maintain the integrity of the installation. Finally, restore gas service, checking for leaks by applying soapy water to gas lines and connections.

Fireplace Remodel Ideas Using L And Stick Tile

Fireplace Wall Sticker Mural Covering Decal Art L And Stick Self Adhesive Fire 1

How To Get The Look Of Expensive Real Tile With A Stencil

Fireplace Wall Sticker Mural Covering Decal Art L And Stick Self Adhesive Fire 8

Transform Your Space With Marble Effect Sticky Tiles Tiktok

Diy Fireplace Installation Framing And Final Connections

Fireplace Wall Sticker Decorative On The Fire Vinyl Wallpaper Mural Photo Wallpapers

How To Get The Look Of Expensive Real Tile With A Stencil

3d Mocha Whitewash Brick L And Stick Wall Tile Commomy

Sunwings Art Deco Hexagon 6 In X 7 L And Stick Backsplash Stone Composite Wall Tile Terracotta 45 Tiles 10 Sq Ft Hexl Org
Related Posts