How To Replace Tile Around a Gas Fireplace Wallset
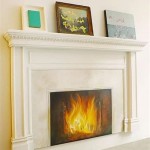
Replacing tile around a gas fireplace wallset can significantly enhance the aesthetic appeal of a living space. This project, while manageable for homeowners with some DIY experience, requires careful planning and execution to ensure safety and a professional-looking result. The following guide outlines the necessary steps, considerations, and precautions involved in successfully replacing tile around a gas fireplace wallset.
Before beginning, it is crucial to understand the importance of safety when working near a gas appliance. Any modifications or repairs involving gas lines should be performed by a qualified and licensed professional. This guide focuses solely on the tile replacement process and assumes the fireplace itself is functioning correctly and safely.
### Planning and PreparationProper planning is essential for a successful tile replacement project. This stage involves assessing the existing tile, selecting new materials, and gathering the necessary tools and safety equipment.
The first step is to carefully examine the existing tile around the fireplace wallset. Assess the extent of the damage or the reason for replacement. Are there loose tiles, cracks, or simply an outdated design? Taking accurate measurements of the area to be tiled is critical for calculating the amount of new tile and adhesive required. It is always wise to purchase slightly more tile than needed to account for cuts and potential breakage.
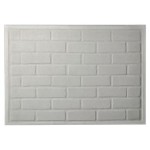
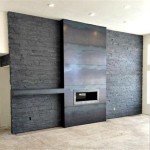
Selecting new tile requires considering factors such as style, material, size, and heat resistance. Common choices for fireplace surrounds include ceramic, porcelain, stone, and glass tiles. Porcelain and stone tiles are particularly durable and heat-resistant, making them suitable options for areas exposed to higher temperatures. Ensure the chosen tile is appropriate for use around a fireplace; consult with a tile supplier for recommendations if unsure.
Gather the necessary tools and materials before starting the project. Essential tools include a tile cutter or wet saw, a grout float, a grout sponge, a notched trowel (size determined by the tile size), a rubber mallet, a chisel and hammer (for removing old tile), a level, a measuring tape, safety glasses, gloves, dust mask, thin-set mortar, grout, and tile spacers. Prepare the work area by covering nearby furniture and flooring with drop cloths to protect them from dust and debris.
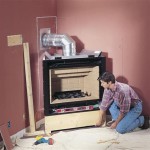
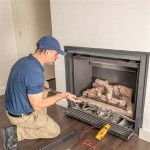
Before commencing any demolition, ensure the gas supply to the fireplace is completely shut off. While this guide focuses on tile replacement, it is paramount to reiterate the importance of a qualified technician for gas line related tasks. Even if the appliance appears to be off, potential residual gas near the pilot light or valves warrants extreme caution.
### Removing Existing TileThe process of removing the old tile requires patience and careful execution to avoid damaging the wall behind it. The goal is to remove the tile without excessively damaging the drywall or cement board substrate that it is adhered to.
Begin by gently scoring the grout lines around the tiles with a utility knife. This will help weaken the grout and make the tile removal process easier. Using a hammer and chisel, carefully tap the chisel at an angle behind each tile. Work slowly and methodically, applying gentle pressure to avoid cracking the tile or damaging the wall. If the tile is particularly stubborn, a heat gun can be used to soften the adhesive, but exercise caution to prevent overheating or fire hazards.
As tiles are removed, collect them in a container to prevent accidents. Once all the tiles are removed, inspect the underlying surface. Scrape away any remaining thin-set mortar or adhesive using a putty knife or scraper. If the wall is damaged, repair it with drywall compound or cement board patch as needed. Allow the repaired areas to dry completely before proceeding.
After removing the old tile and adhesive, thoroughly clean the surface. Vacuum up any loose debris and wipe the area with a damp cloth to remove dust. A clean, dry surface is essential for proper adhesion of the new tile.
### Installing New TileThe installation of new tile requires careful attention to detail to ensure a level, aesthetically pleasing surface. This involves applying thin-set mortar, setting the tiles, and using spacers to maintain consistent grout lines.
Prepare the thin-set mortar according to the manufacturer's instructions. Mix the mortar thoroughly until it reaches a smooth, creamy consistency. Using a notched trowel, apply a thin, even layer of mortar to the wall, working in small sections at a time. The size of the notches on the trowel will depend on the size of the tile being used; consult the thin-set mortar instructions for guidance.
Press each tile firmly into the mortar, using a slight twisting motion to ensure good contact. Place tile spacers between each tile to maintain uniform grout lines. Use a level to check the alignment of the tiles as you go, making sure they are level and plumb. If a tile is not level, gently tap it into place with a rubber mallet.
For tiles that need to be cut to fit around the fireplace wallset or at the edges of the tiled area, use a tile cutter or wet saw. A wet saw provides cleaner, more precise cuts, especially for larger or harder tiles. Always wear safety glasses when cutting tile. After cutting, smooth the edges of the tile with a tile file or sanding block to remove any sharp edges.
Continue laying tiles until the entire area around the fireplace wallset is covered. Allow the thin-set mortar to dry completely according to the manufacturer's instructions, typically 24-48 hours, before proceeding to the grouting stage. Do not disturb the tiles during this drying period.
### Grouting and FinishingGrouting fills the spaces between the tiles, creating a waterproof seal and enhancing the overall aesthetic of the tiled surface. This stage requires careful application and cleaning to achieve a professional finish.
Remove the tile spacers before applying grout. Prepare the grout according to the manufacturer's instructions. Apply the grout to the tile surface using a grout float, pressing it firmly into the grout lines. Work in small sections at a time, using the grout float to remove excess grout from the tile surface.
After applying the grout, wait for the grout to partially dry, typically about 15-30 minutes, depending on the type of grout used. Use a damp grout sponge to wipe away the excess grout from the tile surface. Rinse the sponge frequently in clean water and wring it out thoroughly. Be careful not to remove too much grout from the grout lines.
Allow the grout to cure completely according to the manufacturer's instructions, typically 24-72 hours. During this time, avoid exposing the tiled surface to water or excessive humidity. Once the grout is fully cured, polish the tile surface with a clean, dry cloth to remove any remaining grout haze.
Inspect the grout lines for any cracks or voids. If any imperfections are found, apply additional grout to fill them in. Seal the grout with a grout sealer to protect it from stains and water damage. Apply the sealer according to the manufacturer's instructions.
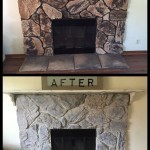
Finally, carefully reattach any trim pieces or decorative elements that were removed during the tile replacement process. Clean the surrounding area and remove any remaining debris. The replaced tile around the gas fireplace wallset should now be complete, enhancing the aesthetic appeal of the space.

7 Ways To Remodel Your Old Fireplace

7 Ways To Remodel Your Old Fireplace

Fireplace Makeover Ideas That Won T Burn Through Your Wallet

Trim Closeup

One Hour Diy S Are My Favorite But I Made An Exception With This Fireplace Makeover That Took About Eight Builder Great Homes Can Often Feel Generic Or Boring Easily Customizable Small

7 Ways To Remodel Your Old Fireplace

Diy Budget Fireplace Makeover 2024 Living Room Part 2

Why You Should Upgrade Your Fireplace Instead Of Replacing It

7 Ways To Update Your Fireplace Mountain Home Stove

Fireplace Makeover Ideas That Won T Burn Through Your Wallet