How To Refinish A Fireplace Insert
A fireplace insert can be a valuable addition to a home, providing supplemental heat and enhancing the aesthetic appeal of a living space. Over time, however, the finish on a fireplace insert can become worn, discolored, or damaged due to heat exposure, soot accumulation, and general wear and tear. Refinishing a fireplace insert is a viable option to restore its original appearance, protect it from further corrosion, and ultimately extend its lifespan. This article provides a comprehensive guide on how to refinish a fireplace insert, outlining the necessary steps, materials, and safety precautions involved.
Before undertaking any refinishing project, it is crucial to understand the type of fireplace insert being worked on. Fireplace inserts are generally constructed from either cast iron or steel, and the type of material will influence the choice of refinishing products and techniques. Cast iron inserts are typically heavier and more durable, while steel inserts may be more prone to rust if the protective coating is compromised. Additionally, consider the existing finish. Some inserts have a painted finish, while others may have a porcelain or enamel coating. Understanding these factors will assist in selecting the appropriate refinishing approach.
Preparation is Key: Cleaning and Disassembly
The first and arguably most important step in refinishing a fireplace insert is thorough preparation. This stage involves cleaning the insert to remove soot, rust, and any existing loose paint or debris, as well as disassembling the insert to allow for easier access to all surfaces.
Begin by ensuring the fireplace is completely cold. Never attempt to clean or refinish a hot fireplace insert. Once cooled, use a high-efficiency particulate air (HEPA) vacuum cleaner to remove loose soot and ash from the insert and the surrounding firebox. This will minimize the spread of dust and potential irritants during the cleaning process. Wear appropriate personal protective equipment (PPE), including a dust mask, gloves, and eye protection, to prevent inhalation of particles and skin contact with cleaning agents.
Next, use a stiff-bristled brush and a specialized fireplace cleaner to scrub the insert thoroughly. These cleaners are formulated to dissolve soot and creosote buildup. Follow the manufacturer’s instructions carefully, and ensure adequate ventilation to prevent the buildup of fumes. For stubborn soot deposits, a solution of trisodium phosphate (TSP) can be used, but exercise caution as TSP is a strong alkaline cleaner and can be corrosive. Rinse the insert thoroughly with clean water after cleaning to remove any residue from the cleaning agents.
After cleaning, carefully inspect the insert for rust. Small areas of surface rust can be removed with a wire brush or steel wool. For more extensive rust, consider using a rust converter product. These products chemically react with the rust, converting it into a stable, paintable surface. Follow the manufacturer’s instructions for application and drying times.
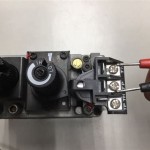
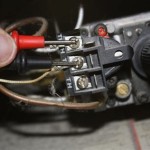
Disassembly of the fireplace insert is often necessary to access all surfaces for cleaning and refinishing. Remove any doors, decorative panels, baffles, or other removable components. These parts can be cleaned and refinished separately. Take photographs of the insert before disassembly to aid in reassembly later. Store the removed parts in a safe place to prevent damage or loss.
If the existing paint is peeling or chipping, it will need to be removed before refinishing. Several methods can be used for paint removal, including sanding, scraping, and chemical stripping. Sanding is effective for removing loose paint and smoothing the surface, but it can create a significant amount of dust. Use a sander with a dust collection system and wear a respirator to minimize dust exposure. Scraping can be used to remove thicker layers of paint, but be careful not to gouge or damage the metal surface. Chemical strippers are effective for removing multiple layers of paint, but they can be corrosive and require careful handling. Always follow the manufacturer’s instructions and wear appropriate PPE when using chemical strippers.
Selecting the Right Refinishing Products
Choosing the correct refinishing products is crucial for achieving a durable and aesthetically pleasing finish on a fireplace insert. The primary product to consider is high-temperature paint, which is specifically formulated to withstand the extreme heat generated by a fireplace. Standard paints are not suitable for this application, as they will blister, peel, and emit harmful fumes when exposed to high temperatures.
High-temperature paints are typically available in aerosol cans or liquid form. Aerosol paints are convenient for applying thin, even coats, while liquid paints can be applied with a brush or sprayer. Choose a paint that is compatible with the type of metal the insert is made from (cast iron or steel) and that meets the desired aesthetic. High-temperature paints are available in a variety of colors and finishes, including matte, satin, and gloss.
Before applying the high-temperature paint, it is often recommended to apply a primer. A high-temperature primer will improve the adhesion of the paint and provide additional protection against rust and corrosion. Choose a primer that is compatible with the high-temperature paint being used.
In addition to paint and primer, other products may be needed, such as masking tape and paper for protecting surrounding surfaces, sandpaper for smoothing the surface, and a tack cloth for removing dust particles before painting.
When selecting refinishing products, prioritize quality and durability. Cheaper paints may not withstand the high temperatures of a fireplace, leading to premature failure. Invest in reputable brands that are known for producing high-quality, high-temperature paints.
Applying the Finish: Painting and Curing
With the fireplace insert cleaned, disassembled, and properly prepared, and the appropriate refinishing products selected, the next step is to apply the finish. This involves applying the primer, followed by the high-temperature paint, and then curing the finish to ensure its durability and longevity.
Begin by masking off any areas that should not be painted, such as glass windows, decorative trim, or hardware. Use high-quality masking tape that is designed for use with high-temperature paints. Cover surrounding surfaces with drop cloths or plastic sheeting to protect them from overspray.
Apply the high-temperature primer in thin, even coats. Follow the manufacturer’s instructions for application and drying times. Allow the primer to dry completely before proceeding to the next step. Lightly sand the primed surface with fine-grit sandpaper to smooth out any imperfections. Remove any dust particles with a tack cloth before applying the paint.
Apply the high-temperature paint in thin, even coats, using either an aerosol can, a brush, or a sprayer. Follow the manufacturer’s instructions for application and drying times. Avoid applying thick coats of paint, as this can lead to runs, drips, and uneven drying. Multiple thin coats are always preferable to one thick coat. Allow each coat to dry completely before applying the next.
After the final coat of paint has been applied, allow the insert to dry completely. Refer to the manufacturer’s instructions for recommended drying times. Once the paint is dry to the touch, it is necessary to cure the finish to ensure its durability and heat resistance. Curing involves gradually heating the insert to a specific temperature and maintaining that temperature for a specific period of time.
The curing process typically involves starting with a low temperature and gradually increasing it over several hours. For example, the manufacturer may recommend starting at 250°F for one hour, then increasing to 400°F for one hour, and finally increasing to 600°F for one hour. This process allows the paint to fully bond to the metal surface and develop its heat-resistant properties.
During the curing process, the paint may emit some fumes. Ensure adequate ventilation by opening windows and doors. Avoid inhaling the fumes, and consider wearing a respirator. After the curing process is complete, allow the insert to cool completely before reassembling it.
Once the insert has cooled, reassemble all of the components that were removed during disassembly. Ensure that all screws and bolts are properly tightened. Inspect the finished product to ensure that the paint is evenly applied and that there are no runs, drips, or imperfections. Touch up any areas that need attention with a small brush or aerosol can.
Finally, clean the surrounding area and remove any masking tape or drop cloths. The refinished fireplace insert is now ready to be used. Following these steps carefully will result in a beautiful and durable finish that will protect the insert and enhance the appearance of the fireplace.

How To Spray Paint A Brass Fireplace Insert Erfly House

How To Spray Paint A Brass Fireplace Insert Erfly House

10 Fireplace Makeover Ideas Before And After Regency

How To Spray Paint A Brass Fireplace Insert Erfly House

How To Spray Paint A Brass Fireplace Insert Erfly House

How To Spray Paint A Brass Fireplace Insert Erfly House

How To Paint Metal Fireplace Surround Four Generations One Roof

How To Update Brass Fireplace Insert With Spray Paint Iekel Road Home

Diy Fireplace Makeover With High Heat Paint Jessica Welling Interiors

Brass Fireplace Update East Coast Creative