How to Replace Tile Around a Gas Fireplace
A gas fireplace can be a beautiful and functional addition to any home, but like any other appliance, it requires maintenance and occasional repairs. One common issue that homeowners may encounter is damaged or outdated tile surrounding the fireplace. Replacing this tile can significantly enhance the aesthetic appeal of the fireplace and give it a fresh, modern look. This article will guide you through the process of replacing tile around a gas fireplace, providing step-by-step instructions and valuable tips for successful completion.
1. Preparation and Planning
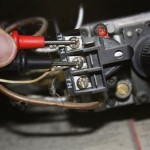
Before starting the tile replacement process, it is crucial to prepare the area and gather the necessary materials. First, ensure that the gas fireplace is turned off and the pilot light is extinguished for safety. This step should always be prioritized before starting any work around a gas appliance. Next, clear the area around the fireplace, removing any furniture or obstructions that could hinder your work. Measure the existing tile to determine the dimensions and quantity of new tile needed. Consider the style and color of the new tile to match or complement the existing décor. It is also advisable to purchase extra tile to account for potential breakage or cutting errors.
In addition to tile, gather the following materials: * Mortar (appropriate for tile) * Grout (matching the tile color) * Tile spacers * Notched trowel * Rubber mallet * Tile cutter or wet saw (depending on tile size and material) * Safety goggles * Gloves * Sponge * Bucket * Cleaning solution (for grout and tile)
2. Removing the Existing Tile
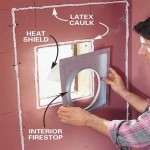
Once you have gathered the necessary materials, it is time to remove the old tile. This can be a delicate process, especially if the tile is adhered to a fragile surface. Begin by carefully removing any loose tiles. If the tiles are firmly attached, use a hammer and chisel to gently tap the edges of the tile to loosen it. Work slowly and carefully to prevent damaging the surrounding area. Be cautious not to damage the fireplace surround or the gas valve components located behind the tile. Always work with caution and wear safety gear when removing existing tile to protect yourself from dust and debris.
Once the old tile is removed, inspect the underlying surface for any damage. If there are cracks or loose areas, repair them before installing the new tile. You may need to apply a layer of patching compound or use a concrete adhesive to secure the surface and create a solid foundation for the new tile. Allow the repair material to dry completely before proceeding to the next step.
3. Installing the New Tile
With the surface prepared, you are ready to install the new tile. Begin by mixing the mortar according to the manufacturer's instructions. Use a notched trowel to spread a thin layer of mortar evenly over the prepared surface. Ensure that the mortar is evenly distributed and free of air pockets. Place the first tile in the desired location, using spacers to maintain consistent spacing between tiles. Gently press the tile into the mortar, ensuring it is firmly attached. Use a rubber mallet to ensure the tile is level and flush with the surrounding surface.
Continue laying tiles in the same manner until all the tiles are installed. It is essential to maintain a consistent grout line between the tiles, using spacers for accurate spacing. Once all the tiles are in place, allow the mortar to cure completely before proceeding to the next step. The curing time will vary depending on the type of mortar used, so check the manufacturer's instructions for specific recommendations.
4. Grouting and Cleaning
After the mortar has dried completely, it's time to grout the tiles. This step will fill the spaces between the tiles and create a smooth, finished look. Apply grout to the tile using a grout float, ensuring it is evenly distributed between the tiles. Wipe away excess grout with a damp sponge, using diagonal movements to prevent streaks or unevenness. Allow the grout to dry completely, then clean the tile using a grout cleaner and a damp sponge. This step will remove any excess or dried grout, leaving your tile sparkling clean and ready to showcase your beautiful fireplace.

How To Prep A Fireplace For New Tile House One

Fireplace Makeover Painting The Tile In My 120 Year Old Home

How To Reface A Fireplace For Gas Insert Major Steps

Diy Fireplace Makeover With Vinyl Tiles Sew Much Ado

How To Tile Over A Brick Fireplace The Handyman S Daughter

How To Tile A Fireplace House One

Er Friendly Fireplace Makeover With L Stick Tiles The Homes I Have Made

How To Tile A Fireplace My Uncommon Slice Of Suburbia

How To Tile Over A Brick Fireplace The Handyman S Daughter

Diy Fireplace Makeover With Vinyl Tiles Sew Much Ado
Related Posts