Also include a disclaimer.
How To Build A Corner Gas Fireplace
A corner gas fireplace can be a significant addition to a living space, offering both aesthetic appeal and functional warmth. Unlike traditional fireplaces that are centered on a wall, a corner fireplace maximizes space utilization and offers a unique focal point for the room. This article provides a guide for constructing a corner gas fireplace, covering essential planning steps, key construction techniques, and necessary safety considerations.
The installation process can be complex, particularly when dealing with gas lines and venting. It is strongly recommended that homeowners consult with and potentially hire qualified professionals for certain aspects of the installation, especially those relating to gas line connections and electrical work. This ensures not only that the fireplace functions correctly but also that it meets all local building codes and safety standards.
Planning and Preparation
Before commencing the physical construction, thorough planning is essential. This involves assessing the suitability of the chosen corner, determining the necessary dimensions, and selecting the appropriate gas fireplace insert.
Corner Assessment: The corner selected for the fireplace must have adequate structural support and clearance from combustible materials. Check local building codes for specific requirements regarding proximity to studs, insulation, and other flammable items. These clearances are critical to prevent fire hazards. The flooring in the chosen corner must also be able to support the weight of the fireplace structure and the insert itself.
Dimensional Planning: Accurate measurements are crucial. Determine the desired height, width, and depth of the fireplace structure. Consider the size of the room and the overall aesthetic you aim to achieve. A fireplace that is too large can overwhelm a small room, while one that is too small might not provide the desired visual impact in a larger space. Sketching a detailed plan, including all dimensions, is highly recommended.
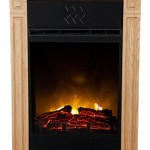
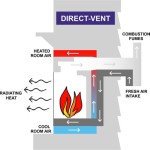
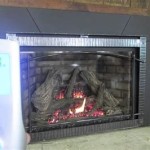
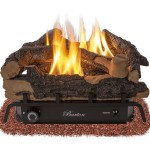
Selecting the Gas Fireplace Insert: Gas fireplace inserts are available in a variety of sizes, BTU outputs, and styles. Choose an insert that is appropriately sized for the room and that meets your heating needs. Consider the venting requirements of the chosen insert; direct vent models are generally easier to install as they can vent directly to the outside through a wall, while other models may require a chimney. Ensure the insert is certified by a recognized testing agency, such as CSA or UL, to guarantee its safety and performance.
Gathering Materials and Tools: Once the planning phase is complete, gather all necessary materials and tools. This will typically include framing lumber (such as 2x4s), drywall, cement board (for areas near the firebox), screws, nails, joint compound, paint, and the chosen facing material (e.g., stone, brick, tile). Essential tools include a measuring tape, level, saw (circular saw or miter saw), drill, screw gun, hammer, drywall knife, and safety glasses.
Framing the Corner Fireplace Structure
The framing process establishes the basic structure of the corner fireplace. Accurate framing is essential for ensuring the stability and safety of the finished product.
Building the Frame: Using the planned dimensions, construct a frame using the lumber. The frame should be sturdy and well-supported. Start by creating a base that is level and square. Then, build the vertical supports, ensuring they are plumb and properly spaced to accommodate the gas fireplace insert. The frame should also incorporate spaces for running gas lines and electrical wiring, if necessary. It is advisable to double-check all measurements as the frame is being assembled to avoid costly errors later in the construction.
Reinforcing the Frame: Reinforce the frame with additional supports as needed, particularly around the area where the gas fireplace insert will be installed. This is especially important if the facing material is heavy, such as natural stone. Consider adding cross bracing to increase the overall rigidity of the frame. Proper reinforcement is key to preventing sagging or shifting over time.
Installing Cement Board: Cement board is a fire-resistant material that should be used to cover the frame in areas near the firebox. Cut the cement board to size and attach it to the frame using cement board screws. Ensure that the seams between the cement boards are properly taped and mudded with cement board joint compound. This provides a fire-resistant barrier and a smooth surface for applying the facing material.
Installing the Gas Fireplace Insert and Facing Material
This stage involves the careful installation of the gas fireplace insert and the application of the chosen facing material, which significantly contributes to the fireplace's aesthetic appeal.
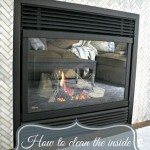
Gas Line Connection and Venting: This step requires strict adherence to safety protocols and local building codes. It is *highly recommended* that a licensed gas professional handle the gas line connection. Before connecting the gas line, ensure the gas supply is turned off. The venting system must be installed according to the manufacturer's instructions to ensure proper exhaust of combustion gases. A poorly installed vent can lead to carbon monoxide poisoning, so accuracy is paramount. Following a successful installation, a gas leak test should also be performed.
Electrical Connections (if applicable): Some gas fireplace inserts require electrical connections for features like blowers or remote controls. These connections should be made by a qualified electrician. Ensure that all wiring is properly grounded and meets local electrical codes.
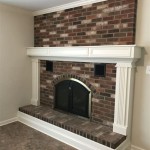
Installing the Facing Material: Once the gas line and electrical connections are complete and inspected, begin installing the facing material. This could be stone, brick, tile, or another material. Apply the facing material using the appropriate adhesive or mortar, following the manufacturer's instructions. Ensure that the facing material is level and properly aligned. Pay close attention to detail, as the facing material is what gives the fireplace its finished look. Allow the adhesive or mortar to dry completely before applying grout (if applicable).
Finishing Touches: After the facing material is installed and the grout has dried, apply any necessary sealants or finishes. Clean the fireplace thoroughly to remove any dust or debris. Inspect the finished fireplace to ensure that all components are properly installed and functioning correctly.
By meticulously following these steps, one can construct a corner gas fireplace that not only enhances the aesthetics of the room but also provides reliable and efficient heating. Remember, safety should always be the top priority, and professional assistance should be sought for any aspects of the installation that are beyond your capabilities.
Disclaimer: This article provides general guidance on how to build a corner gas fireplace. It is not a substitute for professional advice. Building codes and regulations vary by location, and it is the homeowner's responsibility to ensure compliance with all applicable laws. Gas line and electrical connections should be performed by qualified professionals. The author and publisher are not responsible for any damages, injuries, or losses resulting from the use of this information.

Country Fireplace Corner Install Of A Gas Minocqua Wi

How To Frame A Fireplace Corner Gas Makeover

How To Build A Faux Diy Corner Fireplace With German Schmear Brick Treatment This Life

Pin On Mantle Decorating

How To Build A Faux Diy Corner Fireplace With German Schmear Brick Treatment This Life

Corner Fireplace With Tv Above Google Search Remodel Gas

Country Fireplace Corner Install Of A Gas Minocqua Wi

The Corner Gas Fireplace A Great Way To Maximize Your Space

ᑕ❶ᑐ 14 Ways To Maximize Space With A Corner Gas Fireplace

Diy How To Build A Simple Corner Fireplace Gas Electric
Related Posts