How To Build Built-Ins Next to a Fireplace
Built-ins flanking a fireplace can significantly enhance a room's aesthetics and functionality, transforming a simple hearth into a focal point and providing valuable storage. Constructing built-ins yourself allows for customization to match specific needs and design preferences. This article outlines the key steps involved in building built-ins next to a fireplace, emphasizing planning, construction, and finishing.
Planning and Design Considerations
Before embarking on the physical construction, meticulous planning is crucial. This phase involves assessing the available space, determining the desired functionality, and selecting the appropriate materials. Accurate measurements are paramount; consider the dimensions of the fireplace, the height and width of the surrounding walls, and any architectural features that may influence the design. The depth of the built-ins should allow for sufficient storage without encroaching excessively into the room.
Functionality plays a significant role in the design process. Determine the intended purpose of the built-ins: will they primarily serve as bookshelves, entertainment centers, or general storage? This will dictate the number of shelves, drawers, and cabinets required. Consider incorporating features such as adjustable shelves, cable management systems, or specialized compartments for specific items.
Style and aesthetics should complement the existing decor of the room and the fireplace itself. Options range from traditional designs with raised panel doors and decorative moldings to contemporary styles with clean lines and minimalist hardware. The choice of materials, such as solid wood, plywood, or MDF (Medium-Density Fiberboard), will also influence the overall look and durability of the built-ins. MDF is a cost-effective option for painted finishes, while solid wood offers a more premium appearance and longevity. Ensure that the materials are compatible with the fireplace's heat output and meet local building codes.
Creating detailed drawings or using 3D modeling software can help visualize the finished product and identify potential issues before construction begins. This allows for adjustments to the design and ensures that all components fit together seamlessly.
Construction Process: A Step-by-Step Guide
The construction process involves several stages, starting with building the basic framework, installing the shelves and drawers, and attaching the face frames. Safety precautions should be observed throughout the process, including wearing safety glasses, using appropriate power tools, and ensuring adequate ventilation.
The framework is typically constructed from plywood or solid wood. Assemble the base cabinets first, ensuring they are level and square. Attach the base cabinets to the wall using screws and shims to create a stable foundation. Next, build the upper cabinets and attach them to the wall studs, again ensuring they are level and plumb. Use construction adhesive in addition to screws for added strength and stability. Framing should be spaced appropriately to support the weight of the shelves and contents.
Shelves can be made from plywood, solid wood, or even glass, depending on the desired appearance and weight-bearing capacity. Fixed shelves can be attached with screws and wood glue, while adjustable shelves require shelf supports or tracks. Drawers are typically constructed from plywood with solid wood fronts. Assemble the drawer boxes using dovetail joints or pocket screws, and attach the drawer slides to the drawer boxes and the cabinet frames. Ensure the drawers slide smoothly and are properly aligned.
Face frames add a finished look to the built-ins and conceal the edges of the plywood or MDF. They are typically made from solid wood and attached to the cabinet frames using glue and nails or screws. Choose a style that complements the overall design of the built-ins, such as a simple shaker-style frame or a more decorative frame with molding.
Finishing and Installation Considerations
The finishing stage is crucial for achieving a professional-looking result. This involves preparing the surfaces, applying primer and paint or stain, and installing hardware. Thorough surface preparation is essential for a smooth and durable finish. Fill any holes or imperfections with wood filler and sand the surfaces smooth with progressively finer grits of sandpaper.
Primer is applied to seal the wood and provide a uniform surface for the paint or stain. Choose a primer that is compatible with the type of material and the desired finish. Apply the primer evenly and allow it to dry completely before sanding lightly to remove any imperfections.
Paint or stain is applied in multiple coats, allowing each coat to dry thoroughly before applying the next. Use high-quality paint or stain that is specifically designed for wood surfaces. For a painted finish, consider using a spray gun for a smooth and even application. For a stained finish, apply the stain with a brush or rag and wipe off the excess to achieve the desired color and depth.
Hardware, such as knobs, pulls, and hinges, is installed after the finish has dried. Choose hardware that complements the style of the built-ins and provides a functional and aesthetically pleasing touch. Ensure the hardware is properly aligned and securely attached.
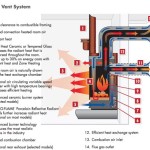
When installing built-ins near a fireplace, consider heat resistance. Maintain a safe distance between the built-ins and the fireplace to prevent heat damage. Fire-resistant materials can be utilized for the portions closest to the fireplace for additional safety. Always consult local building codes for specific requirements regarding fireplace clearances and material usage.
Proper ventilation is another crucial factor. Avoid completely sealing off the space behind the built-ins, as this can trap heat and moisture. Consider incorporating ventilation holes or leaving a small gap between the built-ins and the wall to allow for airflow. This will help prevent warping, mold growth, and other issues related to temperature and humidity fluctuations.

Diy Fireplace Surround And Built Ins Our Blessed Life

Diy Fireplace Built Ins Billy Bookcase Come Stay Awhile By Amanda Vernaci Modern Farmhouse Home Renovation

How To Build Easy Custom Built In Shelving Basic

Diy Built In Cabinets Around The Fireplace Part 2 Honeybear Lane

Fireplace Builtins Design And Build

How To Make Custom Diy Built In Shelves Lucy Jo Home

Diy Built In Cabinets Around The Fireplace Part 2 Honeybear Lane

Hammers And High Heels Feature Project Holly Brian S Fireplace Built Ins

Diy Fireplace Surround And Built Ins Our Blessed Life

My Big Finish Diy Fireplace Built Ins
Related Posts