How To Put Bricks On Fireplace: A Comprehensive Guide
Adding brick to a fireplace can dramatically enhance its aesthetic appeal, lending a rustic, traditional, or modern touch to a living space. This guide provides a detailed overview of the process, from preparation to installation, ensuring a successful brick application on a fireplace.
Before commencing the project, it is crucial to understand the various factors involved. These include the type of brick to be used, the condition of the existing fireplace surface, the necessary tools and materials, and adherence to building codes and safety precautions. Careful planning and meticulous execution are essential for achieving a professional and durable result.
This process requires a blend of masonry skills, attention to detail, and a commitment to accurate measurements. By following these guidelines, individuals can transform a standard fireplace into a visually striking focal point of their home.
Key Point 1: Preparation and Assessment
The initial stage involves a thorough assessment of the existing fireplace structure. This assessment determines the type of preparation required and helps identify any potential challenges that may arise during the installation process.
First, the existing fireplace surround, including any mantels, trim, or decorative elements, must be carefully removed. This step ensures a clean and unobstructed surface for the brick application. It is important to handle these elements with care, as they may be reinstalled later. Proper storage of the removed elements is also necessary to prevent damage.
Next, the surface of the fireplace needs to be thoroughly cleaned. This involves removing any dust, dirt, soot, grease, or loose paint. A wire brush, scraper, and appropriate cleaning solutions may be required. The goal is to provide a clean and porous surface for the mortar to adhere to. In some cases, a pressure washer may be used with caution, ensuring that the existing structure is not damaged.
Once the surface is clean, it should be inspected for any cracks, holes, or structural weaknesses. If any such issues are identified, they must be addressed before proceeding. Minor cracks can be filled with patching compound, while more significant structural problems may require the expertise of a professional mason or contractor.
Determining the type of material the existing fireplace is made of is critical. If the existing fireplace is made of combustible materials such as wood, it needs to be adequately insulated and separated from the brickwork according to local building codes and manufacturer specifications. This separation is commonly achieved using non-combustible materials like cement board or a fire-rated backer board. The manufacturer's documentation for the chosen brick and mortar will specify the required clearances and installation methods.
The selection of the brick type is another important consideration. Bricks are available in a wide variety of colors, textures, and sizes. The choice should be based on the desired aesthetic, the architectural style of the home, and the functional requirements of the fireplace. Thin brick veneers are often a popular choice for fireplace applications due to their lighter weight and ease of installation. However, traditional full-size bricks can also be used, provided the existing structure can support the added weight.
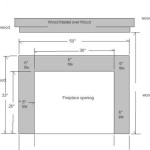
Finally, accurate measurements of the fireplace surface are essential for calculating the amount of brick and mortar required. These measurements should include the height, width, and depth of the area to be covered. It is always advisable to purchase slightly more materials than needed to account for cuts, waste, and potential errors.
Key Point 2: Material and Tool Selection
Selecting the appropriate materials and tools is crucial for ensuring a successful brick installation. Using high-quality materials and having the right tools at hand will not only make the job easier but also contribute to the longevity and aesthetic appeal of the finished product.
Brick: As mentioned previously, the choice of brick should be based on aesthetic preference, the architectural style of the home, and structural considerations. Thin brick veneers are generally easier to work with and require less structural support than full-size bricks. Ensure the bricks are rated for fireplace use, especially if they will be directly exposed to heat.
Mortar: The type of mortar used is critical for the durability of the brickwork. Type N mortar is generally recommended for exterior, above-grade applications like fireplaces. It is a versatile mortar that provides a good balance of strength and flexibility. Pre-mixed mortar is convenient, but mixing your own mortar allows for better control over the consistency and workability. Regardless of the choice, always follow the manufacturer's instructions for mixing and application.
Adhesive (for thin brick veneer): If using thin brick veneer, a high-quality polymer-modified thin-set mortar is essential for bonding the brick to the substrate. This type of mortar provides excellent adhesion and flexibility, which is important for preventing cracks and failures. Again, follow the manufacturer's instructions for mixing and application.
Sealer: Applying a brick sealer after the installation is complete can help protect the brickwork from stains, moisture, and other environmental factors. Choose a sealer that is specifically designed for use on brick and masonry. Check compatibility of the sealer with the chosen brick and mortar beforehand.
Tools: A range of tools are necessary for a successful brick installation. These include:
- Trowel: A brick trowel is used to apply and spread mortar.
- Margin Trowel: A margin trowel is used for scooping and mixing mortar.
- Brick Hammer: A brick hammer is used for cutting and shaping bricks.
- Chisel: A chisel is used for making precise cuts in bricks.
- Level: A level is essential for ensuring that the bricks are installed straight and plumb.
- Spacer: Spacers ensure consistent joint widths between bricks.
- Mortar Mixer (optional): A mortar mixer can be used to mix large batches of mortar efficiently.
- Grouting Sponge: A grouting sponge is used for cleaning excess mortar from the surface of the bricks.
- Bucket: A bucket is needed for mixing mortar and cleaning tools.
- Safety Glasses: Safety glasses are essential for protecting the eyes from debris.
- Gloves: Gloves are necessary for protecting the hands from mortar and other materials.
- Dust Mask: A dust mask is necessary for protecting the lungs from dust and debris.
Key Point 3: Installation Process
The installation process requires careful attention to detail and precise execution. Following these steps will help ensure a professional and durable finished product.
Dry Lay: Before applying any mortar, it is advisable to dry lay the bricks to ensure a proper fit and appearance. This involves arranging the bricks on the fireplace surface without any mortar to visualize the final layout. Adjustments can be made to the brick placement and spacing as needed. This step also helps identify any bricks that may need to be cut or shaped.
Mortar Application: Once the dry lay is complete, begin applying the mortar to the back of each brick. Use a trowel to create a uniform layer of mortar, ensuring that the entire surface is covered. The thickness of the mortar bed should be consistent to maintain a level surface. For thin brick veneer, apply thin-set mortar to both the back of the brick and the substrate.
Brick Placement: Carefully place each brick onto the fireplace surface, pressing it firmly into the mortar. Use a level to ensure that the brick is straight and plumb. Spacers can be used to maintain consistent joint widths between bricks. Excess mortar that squeezes out from the joints should be removed immediately with a trowel or a damp sponge. Start from the bottom and work your way up, ensuring each course is level before proceeding.
Cutting Bricks: In many cases, it will be necessary to cut bricks to fit around corners, edges, or other architectural features. A brick hammer and chisel can be used for making precise cuts. Score the brick along the desired cut line with the chisel, then tap the chisel firmly with the brick hammer to break the brick along the score line. For more complex cuts, a wet saw with a diamond blade may be used.
Jointing: Once the mortar has partially dried (typically after a few hours), the joints should be tooled to create a professional finish. This involves using a jointing tool to compress the mortar and create a smooth, concave, or V-shaped profile. The choice of joint profile is a matter of personal preference. Excess mortar should be removed from the surface of the bricks with a clean, damp sponge. Ensure the joint finish is consistent throughout the project.
Curing: After the installation is complete, the mortar must be allowed to cure properly. This typically takes several days, depending on the temperature and humidity. During this time, the brickwork should be protected from rain, direct sunlight, and extreme temperatures. Mist the brickwork with water periodically to keep the mortar moist, which promotes proper curing and prevents cracking. Follow the mortar manufacturer's instructions for specific curing recommendations.
Sealing (Optional): After the mortar has fully cured, a brick sealer can be applied to protect the brickwork from stains, moisture, and other environmental factors. Follow the manufacturer's instructions for application.
Final Inspection: Once everything is complete, conduct a final inspection to ensure everything is aesthetically pleasing and structurally sound. Address any imperfections by repairing or replacing the necessary elements.

Diy Fireplace Makeover How To Add Brick A

Diy Fireplace Makeover How To Add Brick A

How To Install Thin Brick Veneers On Your Fireplace

How To Install A Mantel On Brick Fireplace 1905 Farmhouse

How To Install A Mantel On Brick Fireplace 1905 Farmhouse

Mortar Wash Brick Fireplace Makeover Dimples And Tangles

How To Plaster A Brick Fireplace So Much Better With Age

Diy Fireplace Makeover How To Add Brick A

How To Install A Floating Mantle The Easy Way In Just One Afternoon

How To Plaster A Brick Fireplace So Much Better With Age
Related Posts