How to Lay a Brick Fireplace Hearth
A brick fireplace hearth serves as a functional and aesthetic focal point within a room. It provides a fire-resistant surface in front of the fireplace opening, protecting the surrounding flooring from embers and heat. Laying a brick hearth requires careful planning, proper preparation, and precise execution. This article provides a comprehensive guide to the process, ensuring a durable and visually appealing outcome.
Planning and Preparation
Before commencing any physical work, a detailed plan should be established. This includes determining the hearth's dimensions, selecting suitable brick, and acquiring the necessary tools and materials. Accurate measurements are crucial for a professional-looking finish.
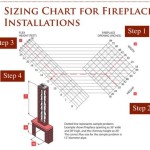
The dimensions of the hearth should be dictated by the fireplace opening and the surrounding room layout. Local building codes often specify minimum hearth dimensions extending beyond the fireplace opening. These regulations prioritize safety and should be adhered to strictly. A typical hearth might extend 16-20 inches beyond the fireplace opening and 8-12 inches on either side. Consult with local building codes to confirm the required projection and width.
Brick selection is another critical aspect of the planning process. Firebricks are specifically designed for high-temperature environments and are the optimal choice for direct contact with flames within the fireplace itself. However, for the hearth extension, standard clay bricks or pavers can be used, provided they are aesthetically pleasing and durable. Consider the color, texture, and size of the bricks to ensure they complement the fireplace and the overall room design. Ensure the chosen bricks are rated for exterior use if the fireplace is situated on an exterior wall or in an unheated space.
Gathering the required tools and materials will streamline the installation process. Essential tools include a brick hammer, a brick chisel, a level, a rubber mallet, a trowel, a margin trowel, a mixing tub, mortar, sand, a wheelbarrow (optional), a tape measure, a pencil, safety glasses, work gloves, and a wet saw (if cutting bricks is necessary). Materials include the chosen bricks, mortar mix, sand (for the mortar mix if not pre-mixed), a vapor barrier (optional but recommended), and potentially backer board if the subfloor requires reinforcement. Determine the quantity of bricks and mortar required based on the hearth's dimensions, adding a surplus of about 10% to account for cuts and breakage.
The subfloor beneath the hearth needs adequate preparation. First, assess the existing subfloor for structural integrity. If the subfloor is weak or uneven, it may require reinforcement with backer board or even a new subfloor layer. Clean the subfloor thoroughly, removing any debris, dust, or existing flooring materials. A clean and level surface is essential for a stable and even hearth. Consider applying a vapor barrier to prevent moisture migration from the subfloor into the brick and mortar, particularly in damp environments.
Mortar Mixing and Brick Laying
Proper mortar mixing is critical for achieving a strong and durable bond between the bricks. Premixed mortar is often the easiest option, requiring only the addition of water. However, mixing mortar from scratch allows for customization of the mixture's consistency and strength. Follow the manufacturer's instructions for the correct water-to-mortar ratio. Typically, mortar should have a thick, pasty consistency similar to peanut butter. Avoid adding too much water, as this will weaken the mortar and compromise its bonding capabilities. Use a mixing tub and a hoe or a mortar mixer for thorough blending. Allow the mortar to slake (rest) for a few minutes after mixing to improve its workability.
Before laying the bricks, dry-lay a test pattern. This involves arranging the bricks in the desired pattern without mortar to visualize the final layout and identify any necessary cuts. Ensure the pattern fits within the planned dimensions and that the bricks are evenly spaced. Consider using shims or spacers to maintain consistent joint widths during the dry-lay process. Mark any bricks that need to be cut using a pencil and a brick chisel. A wet saw is recommended for making precise and clean cuts, but a brick hammer and chisel can also be used, albeit with less precision. Remember to wear safety glasses when cutting bricks.
Begin laying the bricks by applying a bed of mortar to the prepared subfloor. The mortar bed should be approximately 1 inch thick and slightly wider than the first row of bricks. Use a trowel to spread the mortar evenly and create furrows to improve adhesion. Place the first brick firmly into the mortar bed, ensuring it is level and aligned with the planned layout. Apply mortar to the end of the adjacent brick and position it against the first brick, maintaining the desired joint width. The standard joint width is typically 3/8 inch, but this can be adjusted to suit the aesthetic preference. Use shims or spacers to maintain consistent joint widths throughout the installation.
Continue laying the bricks row by row, ensuring that each brick is level and properly aligned. Use a level frequently to check both the horizontal and vertical alignment of the bricks. Tap the bricks gently with a rubber mallet to ensure they are fully seated in the mortar. Remove any excess mortar that squeezes out from between the joints using a trowel. Use a margin trowel for precise mortar application in tight spaces. Maintain a consistent mortar joint thickness throughout the hearth for a uniform and professional appearance.
When laying the final row of bricks, it may be necessary to cut some bricks to fit the remaining space. Measure the required dimensions carefully and cut the bricks accordingly. Ensure that the cut edges are clean and straight. Apply mortar to the cut bricks and position them against the previously laid row, maintaining the desired joint width. Once all the bricks have been laid, allow the mortar to cure for at least 24 hours before walking on the hearth.
Finishing and Curing
After the mortar has sufficiently cured, the joints should be finished. This process, known as "pointing," involves filling the joints with fresh mortar and shaping them for a clean and professional look. Rake out any loose or uneven mortar from the joints using a pointing tool or a small trowel. Dampen the joints slightly with a sponge to improve mortar adhesion. Apply fresh mortar to the joints using a pointing tool, ensuring that the joints are completely filled. Smooth the mortar joints with a pointing tool, creating a concave or flush finish, depending on the desired aesthetic.
Avoid overworking the mortar, as this can weaken it and cause it to crumble. Remove any excess mortar from the surface of the bricks using a damp sponge. Rinse the sponge frequently to prevent smearing. For a more rustic look, leave the mortar joints slightly recessed. For a more modern look, create a flush or slightly protruding mortar joint.
The curing process is critical for the strength and durability of the mortar. Keep the hearth damp for several days after laying the bricks to prevent the mortar from drying out too quickly. This can be achieved by covering the hearth with plastic sheeting or by misting it with water periodically. Avoid subjecting the hearth to heavy loads or extreme temperatures during the curing process. The mortar should be fully cured after approximately 28 days, at which point the hearth is ready for normal use.
Once the mortar is fully cured, clean the surface of the bricks to remove any remaining mortar residue or stains. Use a mild detergent and water to scrub the bricks gently. Avoid using harsh chemicals or abrasive cleaners, as these can damage the brick surface. Rinse the bricks thoroughly with clean water and allow them to dry completely. Apply a brick sealant to protect the hearth from moisture and stains. This will help to prolong the life of the hearth and maintain its aesthetic appeal.

How To Build A Brick Hearth Ehow

How To Install A Floating Mantle The Easy Way In Just One Afternoon

Easy Fireplace Mantel Diy
.png?strip=all)
Blog Contact Cherokee Brick

Easy Fireplace Mantel Diy

How To Diy A Fireplace Surround Using Thin Bricks The Sommer Home

How To Build A Brick Hearth For Wood Stove If Only April

How To Build A Diy Built In Fireplace With An Electric Insert The Creative Mom

How To Install A Mantel On Brick Fireplace 1905 Farmhouse

How To Build A Brick Hearth Doityourself Com
Related Posts


