How to Lay a Brick Fireplace: A Comprehensive Guide
Constructing a brick fireplace is a significant undertaking that can add warmth, ambiance, and value to a home. It requires careful planning, meticulous execution, and a thorough understanding of building codes and safety regulations. This article provides a step-by-step guide to the process, focusing on the key elements involved in laying a brick fireplace.
Planning and Preparation
Before commencing any physical work, meticulous planning is paramount. This stage involves several critical aspects that will influence the success and integrity of the fireplace. Firstly, a thorough examination of local building codes and permit requirements is necessary. Fireplaces are subject to strict regulations to ensure safety and prevent fire hazards. Compliance with these codes is non-negotiable.
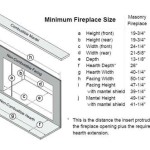
Secondly, the design of the fireplace must be finalized. This includes determining the dimensions, style (e.g., traditional, modern, rustic), and aesthetic features such as the hearth, firebox opening, and chimney design. Consider the overall architectural style of the house and how the fireplace will integrate seamlessly. Scaled drawings or blueprints are essential for accurate construction and material estimation.
Thirdly, material selection is crucial. High-quality firebricks are specifically designed to withstand extreme temperatures and are essential for lining the firebox. Common bricks can be used for the outer structure. Mortar mix formulated for high-temperature applications is also necessary, ensuring the bond between the bricks remains strong under intense heat. The quantity of bricks and mortar needs to be carefully calculated based on the fireplace design and dimensions, accounting for potential waste.
Finally, gather the necessary tools and equipment. Essential tools include a brick trowel, brick hammer, level, measuring tape, mortar mixing tub, wheelbarrow (for transporting materials), safety glasses, work gloves, and a brick saw or angle grinder with a masonry blade for cutting bricks. Ensure all tools are in good working condition before starting the project.
Laying the Foundation and Hearth
The foundation is the crucial base upon which the entire fireplace rests. It must be strong, level, and capable of supporting the considerable weight of the brick structure. Typically, a concrete slab serves as the foundation. If an existing concrete slab is used, ensure it is properly reinforced and of sufficient thickness to handle the load. Reinforcing steel (rebar) within the concrete adds significant structural integrity.
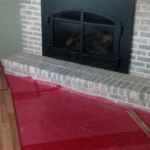
The hearth, the area extending outward from the firebox opening, requires a solid and fire-resistant base. The hearth should be constructed of concrete and faced with brick, stone, or other non-combustible materials. The size of the hearth is dictated by building codes and depends on the size of the firebox opening. It is designed to protect the floor from sparks and embers.
Start by pouring a concrete footing that extends beyond the desired dimensions of the hearth. Allow the concrete to cure completely according to the manufacturer's instructions. Once cured, begin laying the first course of bricks for the hearth, ensuring they are level and plumb. Use a mortar bed approximately 1/2 inch thick, and carefully align each brick. Check the level both horizontally and vertically to avoid any unevenness. This first course is critical for establishing a solid and level base for the subsequent layers.
Continue laying subsequent courses of brick, using a bricklaying pattern (e.g., running bond, stack bond, herringbone) that complements the fireplace design. Maintain consistent mortar joint thickness and ensure the bricks are properly bonded. Remove excess mortar as you go, using a trowel or pointing tool to create a neat and professional finish. The hearth should be slightly raised above the surrounding floor level.
Constructing the Firebox and Smoke Chamber
The firebox is the heart of the fireplace, where the fire is contained. It must be constructed of firebricks, which are specifically designed to withstand the extreme temperatures generated by burning wood. Firebricks are typically thicker and denser than common bricks and are made from a refractory material that resists cracking and spalling.
Begin by laying the firebricks for the firebox floor, using a high-temperature mortar mix. Ensure the floor is level and slightly sloped towards the back to facilitate ash removal. Then, start laying the walls of the firebox, carefully aligning each firebrick and maintaining consistent mortar joints. Stagger the joints for added strength and stability. Use a brick hammer to carefully shape and trim the firebricks as needed.
Above the firebox is the smoke chamber, a critical component that directs smoke and gases upward into the chimney. The smoke chamber should have smooth, angled walls to facilitate efficient airflow. This is typically achieved by using a corbelling technique, where each course of bricks is slightly offset from the one below, creating a gradual narrowing towards the flue.
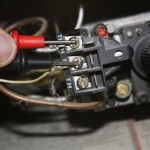
The damper is a crucial component located at the top of the firebox, between the firebox and the smoke chamber. It is a metal plate that can be opened or closed to regulate airflow and prevent drafts when the fireplace is not in use. Install the damper according to the manufacturer's instructions, ensuring it is properly seated and functions smoothly. The damper frame is typically mortared into place.
The firebox and smoke chamber must be perfectly aligned both vertically and horizontally to ensure the efficient and safe venting of smoke and gases. Misalignment can lead to poor draft and potential smoke spillage into the room.
Building the Chimney
The chimney is the vertical structure that carries smoke and gases away from the fireplace and out of the house. It is an essential safety feature that prevents the accumulation of dangerous carbon monoxide and other combustion byproducts.
The chimney typically begins above the smoke chamber and extends upwards, passing through the roof and terminating at a prescribed height above the roofline. The height of the chimney is dictated by building codes and is designed to ensure adequate draft and prevent downdrafts caused by wind.
The chimney is constructed of bricks or other masonry materials, and it must be lined with a flue liner. The flue liner is a clay or metal pipe that provides a smooth, airtight passage for the smoke and gases. The flue liner protects the chimney structure from the corrosive effects of combustion byproducts and prevents creosote buildup, which is a fire hazard.
Start by laying the first course of bricks for the chimney above the smoke chamber. Ensure the bricks are level and plumb, and that the flue liner is properly centered within the chimney shaft. As you build upwards, continue to lay the bricks in a consistent pattern, maintaining consistent mortar joints. Use mortar that is appropriate for chimney construction, typically a Type S mortar, which is designed to withstand the stresses of freeze-thaw cycles.
As the chimney passes through the roof, it is important to properly flash the area to prevent water leaks. Flashing is a metal material that is installed around the chimney to create a watertight seal. The flashing should be integrated with the roofing materials to ensure a durable and effective seal.
The top of the chimney should be capped with a chimney cap or spark arrestor. This prevents rainwater, snow, and debris from entering the chimney and also prevents sparks from escaping, reducing the risk of wildfires.
Mortar Techniques and Bricklaying Patterns
Proper mortar techniques are essential for achieving a strong, durable, and aesthetically pleasing brick fireplace. The mortar mix should be prepared according to the manufacturer's instructions, ensuring the correct proportions of cement, lime, and sand. The mortar should be of a workable consistency, not too wet and not too dry.
When applying the mortar, use a brick trowel to create a bed of mortar approximately 1/2 inch thick on the surface where the brick will be placed. Then, butter the end of the brick with mortar before placing it in position. Press the brick firmly into the mortar bed, ensuring it is properly aligned and level. Excess mortar should be removed immediately using the trowel.
Several bricklaying patterns can be used for a brick fireplace, each with its own unique aesthetic appeal. The running bond pattern, where each brick is offset by half a brick from the one below, is the most common and strongest pattern. The stack bond pattern, where the bricks are aligned directly on top of each other, is a more contemporary look but is less structurally sound and may require reinforcement. Other patterns, such as the herringbone pattern and the English bond pattern, can also be used to create a distinctive look.
Consistently maintain the mortar joints. Consistent mortar joint thickness is crucial for both structural integrity and visual consistency. Typically, mortar joints are approximately 3/8 inch thick. Use a gauge or spacer to ensure consistent joint thickness. Once the mortar has partially set, use a pointing tool to create a neat and professional finish. There are various pointing styles, such as concave, V-shaped, and flush, each providing a different look.

How To Build An Indoor Fireplace The Constructor

Build A Fireplace Brick By Fine Homebuilding

How To Build A Brick Hearth Ehow

Build A Fireplace Brick By Fine Homebuilding

Our Diy Brick Hearth With German Schmear Everyday Laura

How To Build An Indoor Fireplace The Constructor

Diy Fireplace Makeover How To Add Brick A

How To Install Brick On A Fireplace Our Family Maison

Diy Brick Fireplace

How To Build A Brick Fireplace Diy Part 1 Of 5
Related Posts