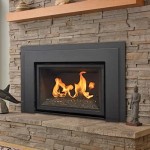
How To Put Stone Tile Over a Brick Fireplace
Updating a brick fireplace with stone tile is a popular home renovation project that can dramatically improve the aesthetic appeal of a living space. The process, while straightforward, requires careful planning, preparation, and execution to ensure a professional and lasting result. This article outlines the steps involved in installing stone tile over an existing brick fireplace, providing a comprehensive guide for achieving a beautiful and durable finish.
Key Point 1: Assessing the Brick Surface and Preparing for Tile
Before commencing the tiling process, a thorough assessment of the existing brick fireplace is crucial. This involves inspecting the brick for any signs of damage, such as cracks, loose bricks, or crumbling mortar. Any structural issues must be addressed before proceeding, as these can compromise the integrity of the tile installation.
Cleaning the brick surface is an essential step in ensuring proper adhesion of the tile. Use a wire brush to remove any loose debris, dirt, soot, or efflorescence (salt deposits) that may be present. Heavy-duty cleaners designed for masonry can be used to remove stubborn stains. Ensure the cleaning solution is thoroughly rinsed off and the brick surface is completely dry before moving on to the next stage.
Once the brick is clean and dry, it is necessary to create a suitable surface for tile adhesion. Applying a bonding agent, also known as a primer, is highly recommended. This liquid substance is brushed or rolled onto the brick and creates a tacky surface that promotes a strong bond between the brick and the mortar. Choose a bonding agent specifically designed for masonry surfaces and follow the manufacturer’s instructions for application and drying time.
In some cases, particularly if the brick surface is uneven or has deep mortar joints, a scratch coat may be necessary. A scratch coat is a thin layer of mortar applied to level the surface and provide a uniform base for the tile. Apply the scratch coat with a trowel, ensuring it fills in any low spots and covers the entire brick surface. Use a notched trowel to create grooves in the scratch coat, which will further aid in tile adhesion. Allow the scratch coat to cure completely before proceeding.
Carefully measure the fireplace and determine the layout of the tiles. Consider the desired aesthetic and any design elements you want to incorporate. Determine the number of tiles needed, including any cuts that will be required. It's generally advisable to purchase slightly more tiles than calculated to account for breakage or errors during the installation process. A dry layout of the tiles on the floor before applying mortar can assist in visualizing the final product and identifying any potential issues.
Key Point 2: Installing the Stone Tile
With the brick surface prepared, the next step is to apply the mortar and install the stone tile. Selecting the appropriate type of mortar is crucial for a successful and lasting installation. Thin-set mortar is generally recommended for installing stone tile over brick. Choose a thin-set mortar specifically formulated for use with natural stone, as these mortars are designed to prevent staining and discoloration. Follow the manufacturer's instructions for mixing the mortar to achieve the correct consistency.
Using a notched trowel, apply a generous layer of mortar to the back of each tile. The size of the notch on the trowel will depend on the size and type of tile being used; consult the mortar manufacturer’s recommendations. Ensure the entire back of the tile is covered with mortar, and create even ridges to maximize adhesion. Press the tile firmly into place on the prepared brick surface, using a slight twisting motion to ensure good contact with the mortar. Use tile spacers to maintain consistent grout lines between the tiles. This not only creates a clean and uniform appearance but also allows for expansion and contraction of the tiles, preventing cracking.
Start at the bottom of the fireplace and work your way up, one row at a time. Use a level to ensure each tile is properly aligned and that the entire surface remains plumb. Periodically check the flatness of the tile surface with a straight edge to identify and correct any unevenness. Remove any excess mortar that squeezes out between the tiles with a damp sponge. Avoid letting the mortar dry on the tile surface, as it can be difficult to remove later.
Cutting stone tiles to fit around the fireplace surround or other architectural features may be necessary. Use a wet saw specifically designed for cutting tile. This type of saw uses a diamond blade and a stream of water to provide clean and accurate cuts. Always wear safety glasses and hearing protection when using a wet saw. When cutting tiles, make sure to measure accurately and cut slightly larger than needed. You can then use a tile nipper to fine-tune the fit.
For tiles located at the top of the fireplace, it may be necessary to use temporary supports to hold them in place until the mortar sets. These supports can be made from wood or plastic and should be removed once the mortar has cured sufficiently. Allow the mortar to cure completely for the recommended time, as specified by the manufacturer. This is critical for ensuring the tiles are securely bonded to the brick surface.
Key Point 3: Grouting, Sealing, and Final Touches
Once the mortar has fully cured, the next step is to apply grout to the spaces between the tiles. Grout fills the gaps, providing a water-resistant seal and enhancing the overall appearance of the installation. Choose a grout color that complements the stone tile and the surrounding décor. Consider using a sanded grout for wider grout lines, as it is less prone to cracking.
Mix the grout according to the manufacturer’s instructions, ensuring it is smooth and consistent. Apply the grout to the tile surface using a grout float, pressing it firmly into the grout lines. Work in small sections, and use the float to remove excess grout from the tile surface. Hold the float at a 45-degree angle and scrape diagonally across the tiles to avoid pulling grout out of the joints.
After applying the grout, wait a short period for it to set slightly, then use a damp sponge to clean the tile surface. Rinse the sponge frequently in clean water to remove grout residue. Be careful not to remove too much grout from the joints. Once the grout has hardened, use a clean, dry cloth to buff the tile surface and remove any remaining grout haze. This may require several passes to achieve a completely clean finish.
Allow the grout to cure completely for the recommended time, typically 24 to 72 hours. Once the grout is cured, consider applying a grout sealer to protect it from stains and moisture penetration. Apply the sealer according to the manufacturer’s instructions. This will prolong the life of the grout and make it easier to clean.
Finally, inspect the completed installation for any imperfections or areas that need touch-ups. Fill any small cracks or gaps with matching grout or caulk. Clean the tile surface one last time to remove any lingering dust or debris. Apply a stone sealer to the tile surface to protect it from stains and water damage. This is especially important for porous stone tiles. The frequency of resealing will depend on the type of stone and the amount of use the fireplace receives. Follow the sealer manufacturer’s recommendations. With careful planning and execution, this process can transform an old brick fireplace into a stunning focal point of any room.

How To Tile A Fireplace Even If It S Brick The Handyman Daughter

How To Tile A Fireplace Even If It S Brick The Handyman Daughter

How To Tile A Brick Fireplace Jenna Kate At Home

How To Tile A Fireplace Even If It S Brick The Handyman Daughter

How To Cover A Brick Fireplace With Stone

Read This Before Your Stone Fireplace Makeover Understanding Undertones

How To Tile A Fireplace Even If It S Brick The Handyman Daughter

Thin Stone Veneers Make A Fireplace Update Easy Swenson Granite 100 Natural Stones

How To Cover A Brick Fireplace With Wood Stone Nina Hendrick Home

Fireplace Facelift Using Natural Stone Veneer
Related Posts

