How to Build a Bookcase Next to a Fireplace: A Comprehensive Guide
Integrating a bookcase next to a fireplace can significantly enhance the aesthetic appeal and functionality of a living space. This project, while requiring careful planning and execution, can transform an ordinary room into a cozy and inviting haven. This article provides a comprehensive guide on how to build a bookcase next to a fireplace, outlining the necessary steps from initial planning to final installation.
The success of this project hinges on precise measurements, careful material selection, and a thorough understanding of basic carpentry techniques. Before commencing, it is crucial to assess the available space, considering both the fireplace's dimensions and the room's overall layout. The design should complement the existing architectural style and not impede the fireplace's safe operation. Ventilation and clearance requirements, according to local building codes, must be strictly adhered to.
Key Considerations Before Starting
Before embarking on the construction process, several crucial factors need careful evaluation. These pre-construction considerations will dictate the overall design, material selection, and ultimately, the success of the bookcase integration.
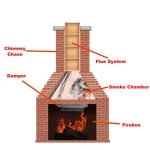
Clearance and Safety: The primary concern is maintaining adequate clearance around the fireplace. Consult local building codes and the fireplace manufacturer's specifications to determine the minimum safe distances required between combustible materials and the firebox. This clearance applies not only to the sides but also to the top and back of the bookcase. Insufficient clearance can lead to a fire hazard. The design of the bookcase must accommodate this clearance without appearing disjointed or aesthetically unappealing. Consider incorporating heat shields or non-combustible materials like cement board or metal flashing behind the bookcase if the clearance is minimal.
Design and Style: The bookcase should complement the fireplace’s design and the overall aesthetic of the room. Consider whether the fireplace is traditional, modern, or rustic. The bookcase's style, material, and finish should harmonize with these elements. For example, a traditional fireplace might pair well with a bookcase featuring raised panel doors, crown molding, and a stained wood finish. A modern fireplace might be better suited for a minimalist bookcase with clean lines, a flat-panel design, and a painted surface. Consider the color palette of the room and select materials and finishes that blend seamlessly with the existing decor. Sketching out different design options and using visual aids like mood boards can help refine the design concept.
Space Planning and Measurements: Accurate measurements are critical for a successful bookcase installation. Measure the height, width, and depth of the available space next to the fireplace, taking into account any architectural features like baseboards, crown molding, or electrical outlets. Create a detailed drawing or digital model of the bookcase, specifying the dimensions of each component, including shelves, side panels, and back panels. Ensure that the dimensions are accurate to within 1/8 inch to avoid fitment issues during installation. Consider the depth of the shelves based on the size of the books or other items that will be stored in the bookcase. A deeper shelf can accommodate larger books and decorative items, while a shallower shelf can create a more streamlined look.
Materials and Tools Required
Selecting the appropriate materials and gathering the necessary tools is essential for a smooth and efficient construction process. The choice of materials should be based on the desired aesthetic, budget, and structural requirements.
Wood Selection: Common choices for bookcase construction include plywood, MDF (Medium-Density Fiberboard), and solid wood. Plywood is a cost-effective and durable option, especially for the carcass of the bookcase. MDF is a smooth and stable material that is ideal for painted surfaces. Solid wood offers a premium look and feel but is generally more expensive and requires more careful handling. Consider the grain pattern and color of the wood when making your selection. If using plywood, choose a hardwood veneer for a more attractive appearance. If using solid wood, select a species that complements the existing decor, such as oak, maple, or cherry.
Hardware and Fasteners: Select high-quality hardware, including screws, nails, shelf supports, and hinges. Use screws that are long enough to provide adequate holding power but not so long that they protrude through the material. Choose shelf supports that are appropriate for the weight of the items that will be stored on the shelves. Consider using adjustable shelf supports to allow for flexibility in shelf placement. For cabinets or doors, select hinges that are durable and easy to adjust. Ensure all fasteners are compatible with the chosen wood to prevent corrosion or discoloration.
Tools: A well-equipped workshop will significantly simplify the construction process. Essential tools include a table saw, circular saw, miter saw, drill, screwdriver, measuring tape, level, square, sander, and clamps. A table saw is indispensable for accurately cutting large panels of plywood or MDF. A circular saw is useful for making quick cuts on site. A miter saw is ideal for cutting precise angles for trim and molding. A drill is needed for drilling pilot holes and installing screws. A sander is essential for smoothing rough edges and preparing surfaces for finishing. Clamps are necessary for holding pieces together while the glue dries. Other useful tools include a router for creating decorative edges, a pocket hole jig for creating strong and concealed joints, and a stud finder for locating wall studs for secure mounting.
Construction Steps
The construction process involves several key steps, each requiring precision and attention to detail. Following these steps carefully will ensure a structurally sound and aesthetically pleasing bookcase.
Cutting the Components: Using the detailed drawings and measurements, cut all the necessary components for the bookcase, including the side panels, shelves, top, bottom, and back panel. Use a table saw or circular saw to cut the large panels to size, ensuring that the cuts are straight and accurate. Use a miter saw to cut the trim and molding to the desired angles. Label each component clearly to avoid confusion during assembly. Double-check the measurements before making any cuts to minimize errors and waste. Pay particular attention to the dimensions of the side panels and shelves, as these components will determine the overall size and shape of the bookcase.
Assembling the Carcass: Assemble the carcass of the bookcase using wood glue and screws or nails. Start by attaching the side panels to the bottom panel, ensuring that the corners are square. Use clamps to hold the pieces together while the glue dries. Then, attach the top panel to the side panels, again ensuring that the corners are square. Install the shelves, using shelf supports or pocket hole screws to secure them to the side panels. For adjustable shelves, drill holes for shelf supports at regular intervals along the side panels. Ensure shelves being mounted with screws are level before the screws are fully tightened. The back panel provides structural support and helps to keep the bookcase square. Attach the back panel using nails or screws, ensuring that it is flush with the edges of the carcass. Consider using a solid wood back panel for added stability or a plywood back panel for a lightweight option.
Finishing and Installation: Once the carcass is assembled, it is time to finish the bookcase. Sand all surfaces smooth, paying particular attention to the edges and corners. Apply a primer to seal the wood and provide a smooth base for the finish coat. Choose a finish that complements the fireplace and the overall aesthetic of the room. Options include paint, stain, and varnish. Apply the finish coat in thin, even layers, allowing each layer to dry completely before applying the next. Once the finish is dry, install the bookcase next to the fireplace. Locate the wall studs using a stud finder and attach the bookcase to the studs using screws. Ensure that the bookcase is level and plumb before tightening the screws. Add any trim or molding to conceal the seams and create a finished look. Finally, install the shelves and any doors or drawers. Inspect the bookcase for any imperfections and make any necessary adjustments. Ensure proper ventilation around the fireplace and that no part of the new bookcase violates local fire safety codes.

White Built In Bookshelves Around The Fireplace Green With Decor

White Built In Bookshelves Around The Fireplace Green With Decor

Diy Built In Cabinets Around The Fireplace Part 2 Honeybear Lane

Fireplace Mantel Surround Pt 2 Bookcase

Diy Built In Bookshelves From Billy Bookcases With Fireplace Thrifty And Chic

Reader Question How Can I Build Symmetrical Bookcases Around This Fireplace Addicted 2 Decorating

Best Built In Bookshelves Around A Fireplace Design Ideas

How To Build Bookshelves Around A Fireplace
:max_bytes(150000):strip_icc()/freeandunfettered-24c0b3d4e3a5492fbf4cb5325c0de5ac.jpg?strip=all "How To Make Diy Built In Bookshelves 20 Ideas Tutorials")
How To Make Diy Built In Bookshelves 20 Ideas Tutorials

What Type Of Bookshelves Beside Fireplace
Related Posts